
Overview
This section provides an overview of the following topics related to the Benefit Options page of the Annual Plan Application Submission process:
- Introduction to Benefit Options
- The Unique Benefit Option Identifier (UBOI)
- Retiree Submission Methods
- User Roles
- Timing & Dependencies
- Modifying Benefit Options
Introduction to Benefit Options
A Benefit Option is a prescription drug plan offered by a Plan Sponsor to retirees. It is a particular benefit design, category of benefits, or cost-sharing arrangement offered within a group health plan.
A qualifying Benefit Option is one for which the actuarial value of the retiree prescription drug coverage under the plan is at least equal to the actuarial value of the defined standard prescription drug coverage under Medicare Part D.
A Plan Sponsor must determine how many Benefit Options should be established in the RDS Secure Website. It can set up Benefit Options in many ways. An application may have a single Benefit Option or multiple Benefit Options; however, if a group health plan has only one Benefit Option, the application must not include more than one Benefit Option.
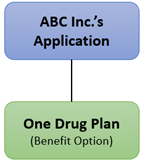
Example: One Application With One Benefit Option
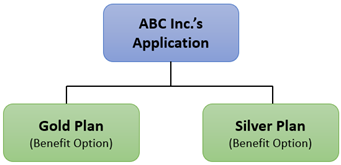
Example: One Application With Multiple Benefit Options
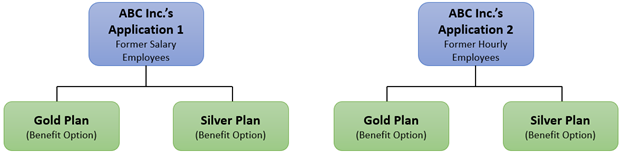
Example: Multiple Applications With Multiple Benefit Options
The Unique Benefit Option Identifier (UBOI)
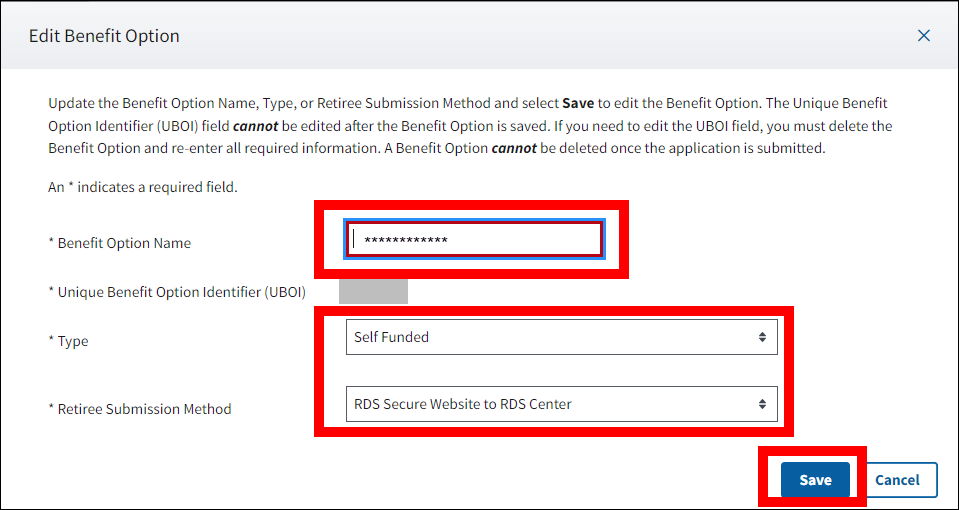
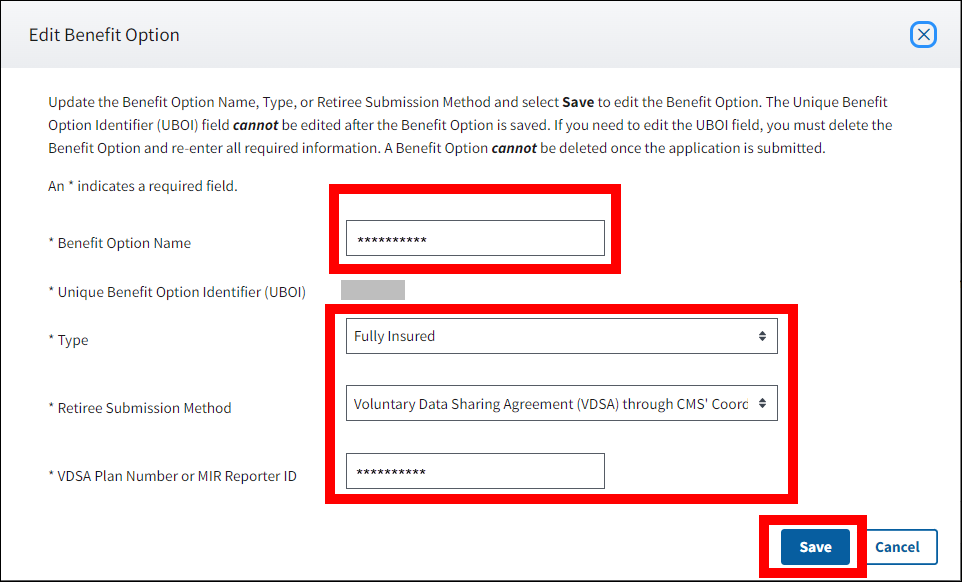
The Unique Benefit Option Identifier (UBOI) is a user-defined value used to communicate information about each Benefit Option in an application during electronic data exchanges. For example, this could be an Rx Group Number. The UBOI cannot be changed once it is saved, except by deleting the Benefit Option and re-entering it before submitting the application.
When exchanging data with the RDS Center, the UBOI must be entered exactly as it was saved on the RDS application, including any leading or trailing zeroes, spaces, punctuation, etc. Reference the Benefit Options page in the RDS Secure Website if you are unsure what should be entered for the UBOI during data exchange.
If none of the UBOIs included on the Retiree List or Cost Report match the UBOIs on the application, CMS' RDS Center will reject the entire file. Refer to Troubleshooting Exchanging Retiree Information With CMS' RDS Center and Manage Final Costs for additional information.
Retiree Submission Methods
The Retiree Submission Method is the way the Plan Sponsor chooses to send and receive retiree enrollment data for each Benefit Option on an application. The selected method will also be used automatically for the Retiree Response Files and the Weekly Notification Files. The RDS Secure Website will always receive copies of retiree files for all Retiree Submission Method options as a default.
The Retiree Submission Method is established at the Benefit Option level; if an application includes more than one Benefit Option, each Benefit Option may be assigned its own submission method. The submission method selections may be changed at any time throughout the plan year.
Information is exchanged using a Comma Separated Value (CSV) file for Secure Website uploads, or a Connect:Direct file for the other submission options, where each line represents one combination of beneficiary, Benefit Option, and Subsidy Period. Refer to Overview of Electronic Data Interchange (EDI) and Retiree Processing for additional information.
User Roles
The Account Manager, Authorized Representative, and Designee(s) with the Define Benefit Options privilege are permitted to create, manage, and remove Benefit Options.
Timing & Dependencies
Benefit Options can be started after the Create Application page has been completed and an Application ID has been assigned.
Benefit Options must be marked with a green checkmark in the Application section of the left navigation menu to complete the Application Submission Process.
Once Benefit Options has been completed, the Valid Initial Retiree List can be submitted. If the Retiree Submission Method is set to the RDS Secure Website, users will select the Manage Retirees section of the left navigation menu to upload the file into the Retiree and Response Files tab.
*Please note: The file will not be processed until all steps of the Application Submission Process are completed, and the application has been submitted to CMS’ RDS Center. The Application, including the Valid Initial Retiree List, must be received by CMS’ RDS Center before the Application Deadline has passed.
Modifying Benefit Options
Benefit Options may be revisited at any point in the Application Submission Process and throughout the application lifecycle, however certain limitations exist for modification of Benefit Option information.
Benefit Options
It is not possible to add or delete Benefit Options once the application has been submitted to CMS' RDS Center. For more information, refer to Make Changes to an Application After Submission.
Benefit Option Name
Benefit Option Name can be changed at any point in the application lifecycle.
Unique Benefit Option Identifier (UBOI) value
After the Benefit Option is saved, the Unique Benefit Option Identifier (UBOI) cannot be changed. If the application has not yet been submitted and the Plan Sponsor would like to modify the UBOI, it must delete the entire Benefit Option and begin again. After the application has been submitted, the UBOI cannot be changed.
Benefit Option Type value
After the Benefit Option Type is defined, it may be changed up until costs are reported for that Benefit Option. If the Benefit Option Type change involves any change to benefits, cost-sharing, or retiree premium contributions, the Actuary must re-evaluate whether the Benefit Option and plan satisfy the Actuarial Equivalence Tests for the applicable 12-month annualized period, taking into account any such changes.
If a Plan Sponsor deems it necessary to remove a Benefit Option from an application after it has been submitted, it is necessary to remove the retirees from that Benefit Option; the Benefit Option itself will remain on the application with a retiree count of zero. To remove the retirees associated with the Benefit Option, the Plan Sponsor sends a Monthly Retiree List with delete transactions for only those associated retirees. If necessary, the Plan Sponsor should assign those retirees to other UBOIs as applicable. For more information on removing retirees, refer to Submit a Valid Initial Retiree List and Monthly Retiree List.
After the Attestation is complete, but before the application is submitted, a Benefit Option can be deleted. However, the Actuary section of the application will become incomplete and the Actuary must re-attest the application after the Benefit Options are finalized again.
Retiree Submission Method
The Retiree Submission Method may be changed at any point in the Application Submission Process and throughout the application lifecycle up until the Covered Retirees section of Reconciliation is complete, or the Reconciliation Deadline has passed.
The Plan Sponsor can return to Benefit Options and update or change the Retiree Submission Method. However, if the Plan Sponsor is changing the Retiree Submission Method to Connect:Direct, VDSA (Voluntary Data Sharing Agreement), or Mandatory Insurer Reporting (MIR), it is IMPERATIVE that the Plan Sponsor does not change the Retiree List Submission Method until the appropriate connections to CMS' RDS Center are established and tested. Step-by-step instructions for each Retiree Submission Method are provided on this page.
Changing the Retiree List Submission Method before the new connection is established jeopardizes the Weekly Notification File process. If the Plan Sponsor selects Connect:Direct, VDSA, or MIR as the Retiree Submission Method before the connection is successfully established, CMS' RDS Center will be unable to send the Weekly Notification File until the connectivity is established.
The Plan Sponsor should consider the retirees that were submitted prior to the EDI Method or Source change, and ensure that the Qualifying Covered Retirees' (QCRs') information matches the method or Plan Sponsor partner that is now assigned responsibility. The Plan Sponsor should then download the Covered Retiree List (CRL) for verification. Retirees that were submitted from a source that is no longer current should be removed using a Delete transaction, and added using the new Retiree List Submission Method, or modified using an Update/Add transaction using the new Retiree List Submission Method in order for the Plan Sponsor or Vendor to properly receive Notification Files. For information about downloading the CRL, refer to Covered Retiree List.
Step-by-Step Instructions
This section provides step-by-step instructions to complete the Benefit Options section.
Select the appropriate Retiree Submission Method option to view the steps associated with the chosen method.
To access the RDS Secure Website and navigate to the Dashboard, review instructions to access the RDS Secure Website.
RDS Secure Website to RDS Center
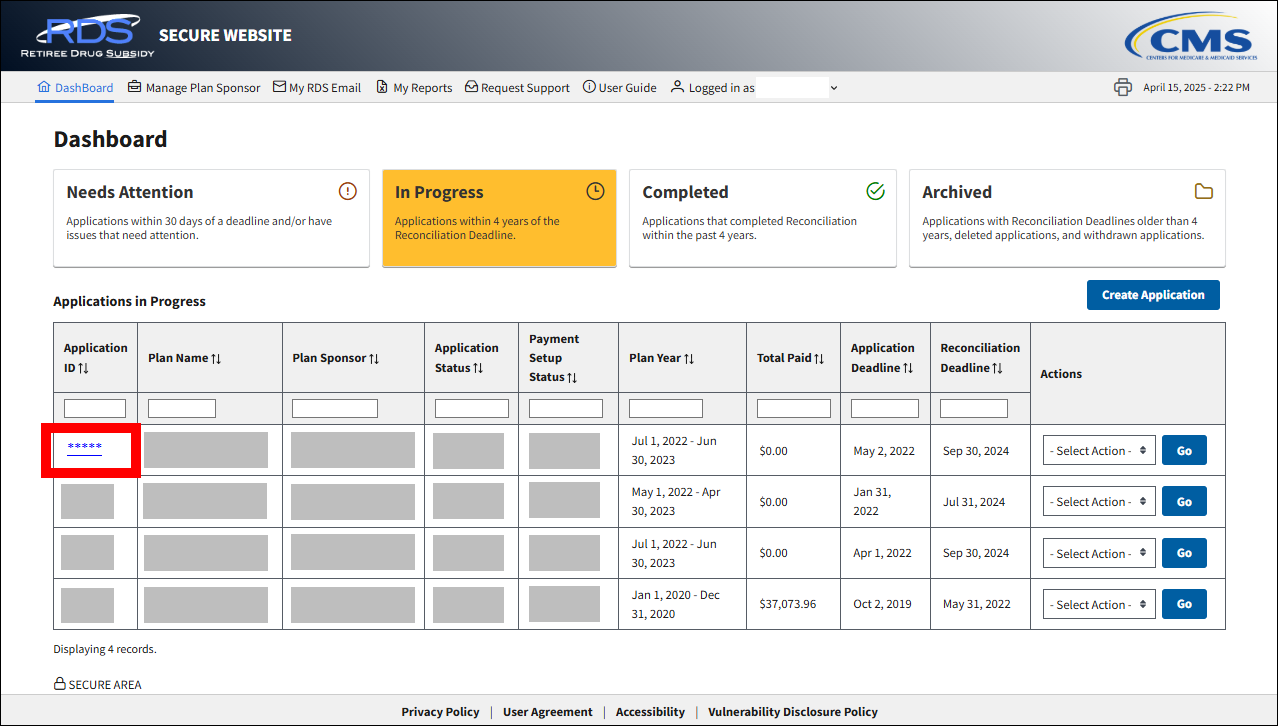
On the Dashboard page:
- Select In Progress to view a list of all Applications in progress.
-
Select the Application ID for which you want to assign Benefit Options.
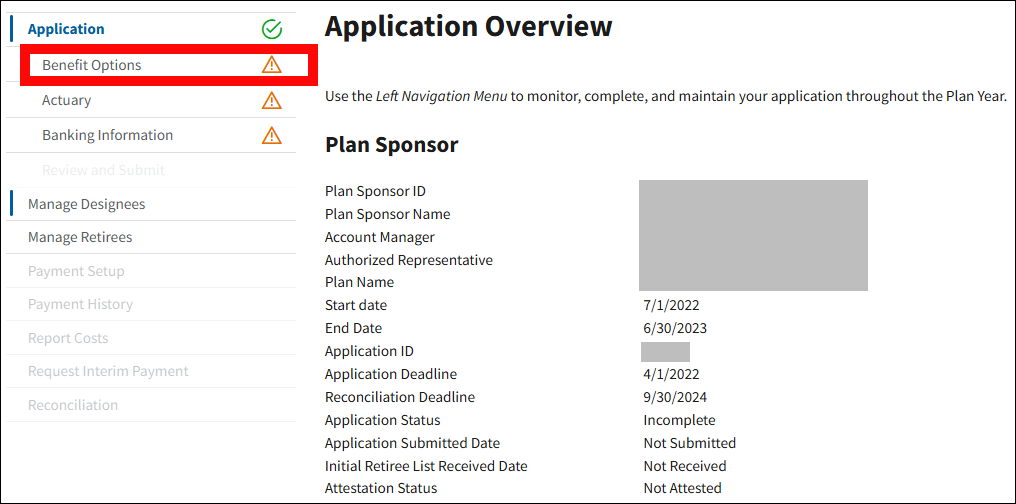
On the Application Overview page:
-
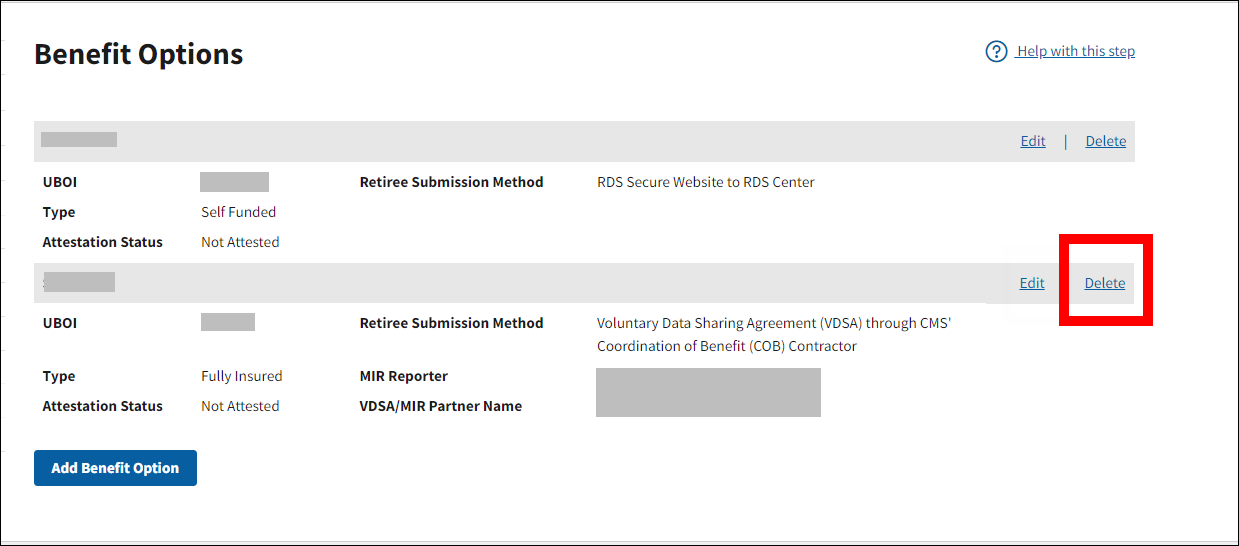
Select Benefit Options from the left navigation menu.
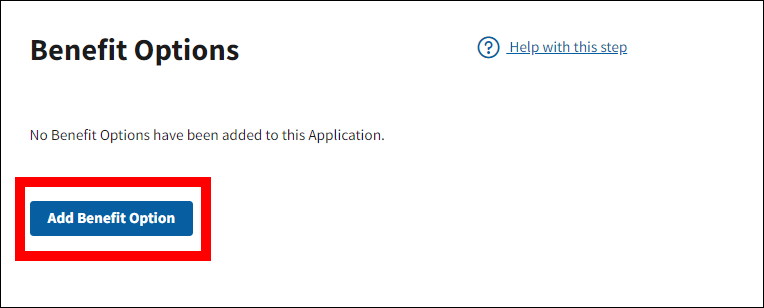
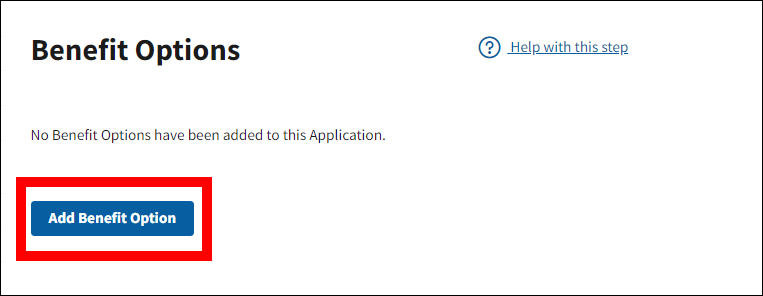
On the Benefit Options page:
-
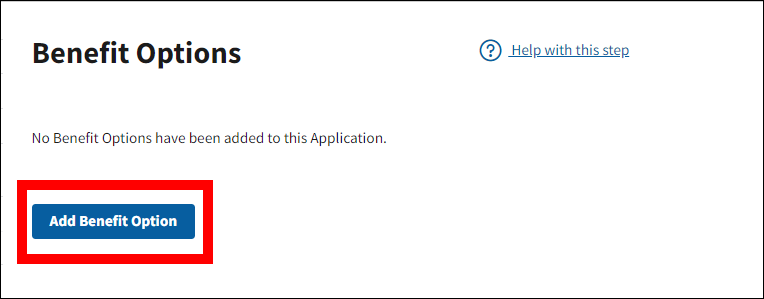
Select Add Benefit Option.
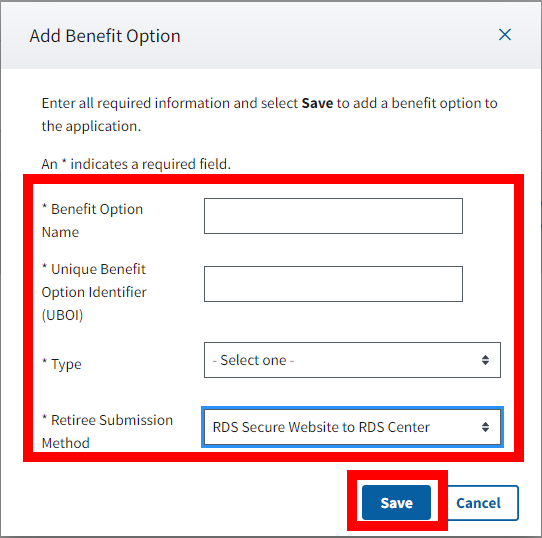
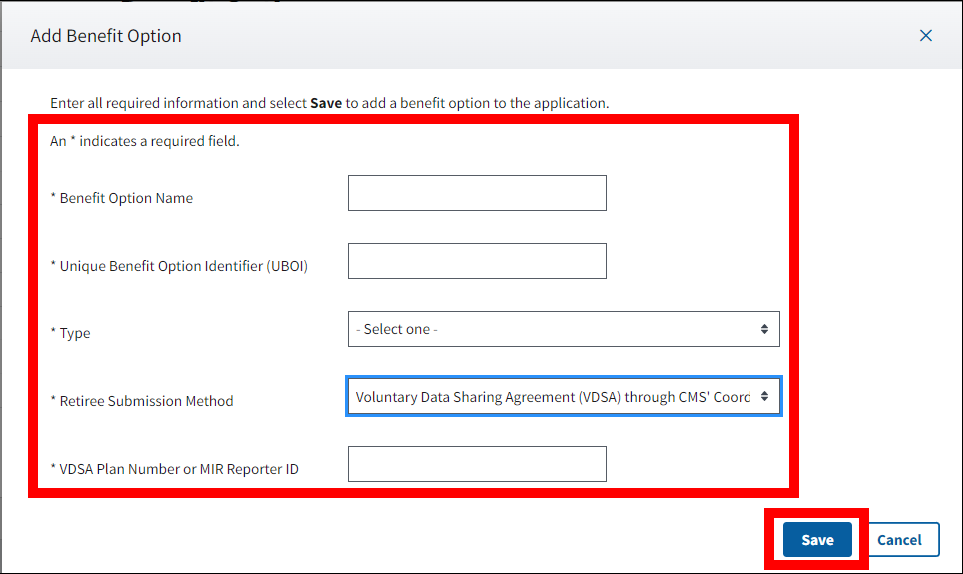
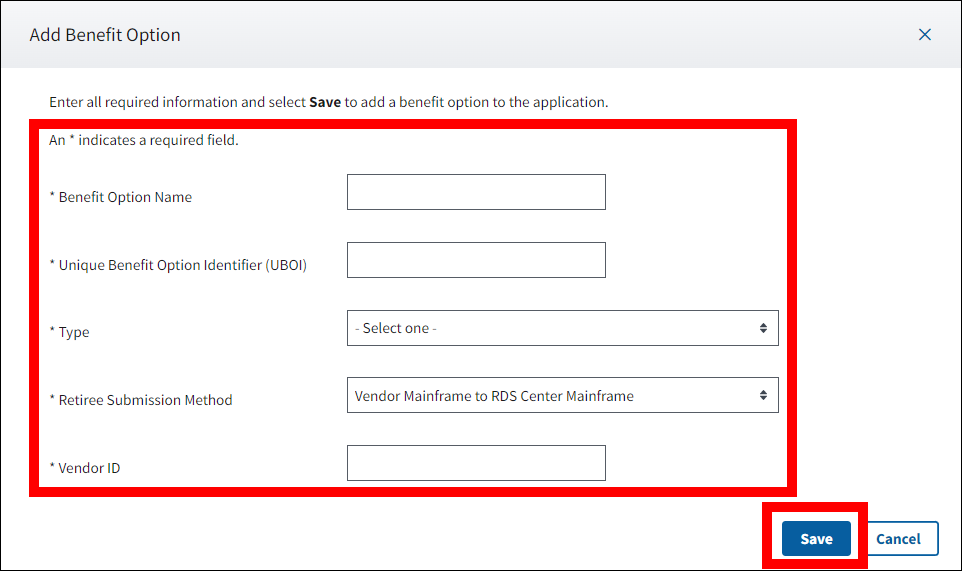
In the Add Benefit Option pop-up window:
An asterisk (*) indicates a required field.
- *Enter the Benefit Option Name.
-
*Enter the Unique Benefit Option Identifier.
- The Unique Benefit Option Identifier field cannot contain the following characters:
- Tilde ~
- Pipe |
- Backslash \
- Comma ,
- Semicolon ;
- Quotation mark ?
- The Unique Benefit Option Identifier field cannot contain the following characters:
-
*Select the Type.
- Dropdown menu options include:
- Self Funded
- Fully Insured
- Dropdown menu options include:
-
*Select RDS Secure Website to RDS Center from the Retiree Submission Method dropdown menu.
- The Retiree Submission Method may be changed at any point in the Application Submission Process and throughout the application lifecycle, up until the Covered Retirees section of Reconciliation is complete, or the Reconciliation Deadline has passed.
-
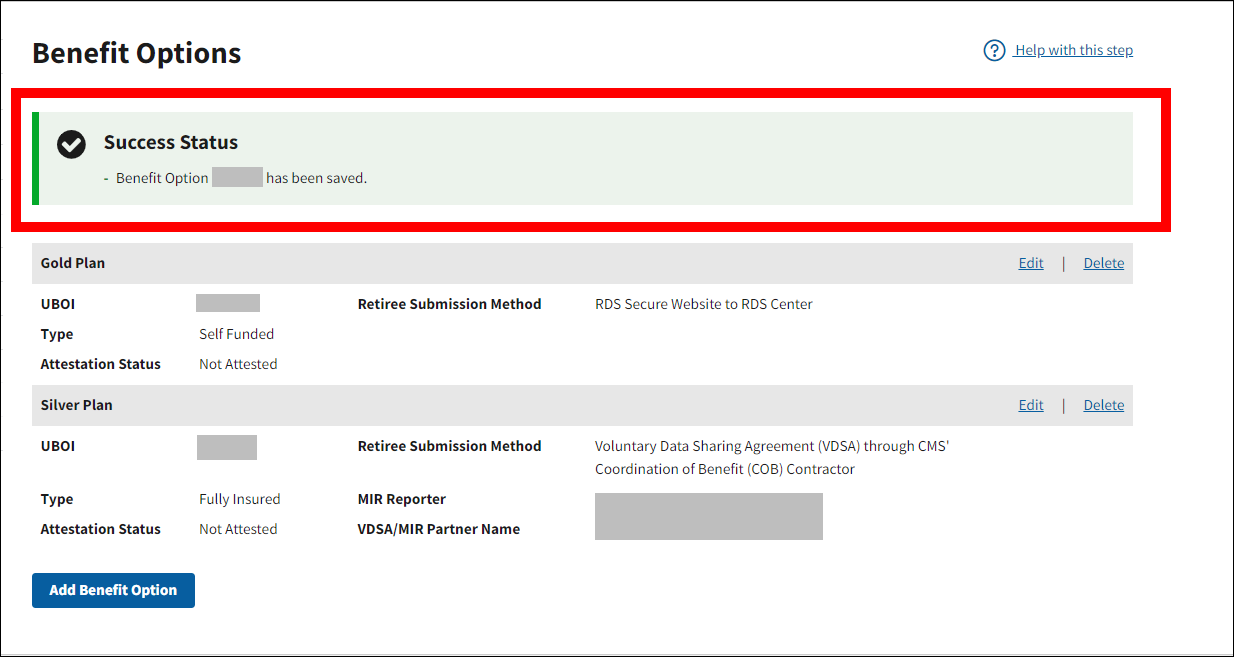
Select Save to add the Benefit Option to the application, or select Cancel to return to the Benefit Options page.
-
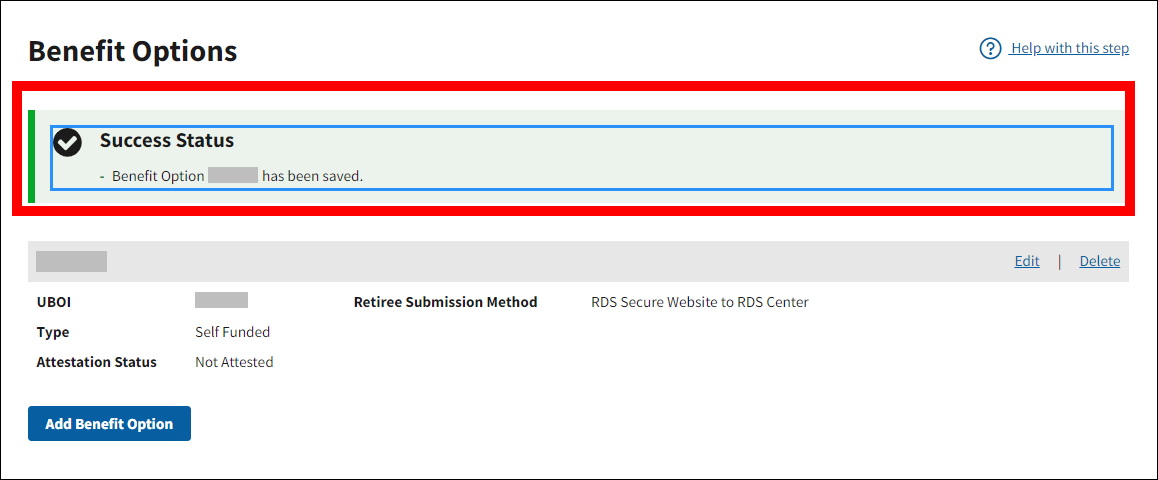
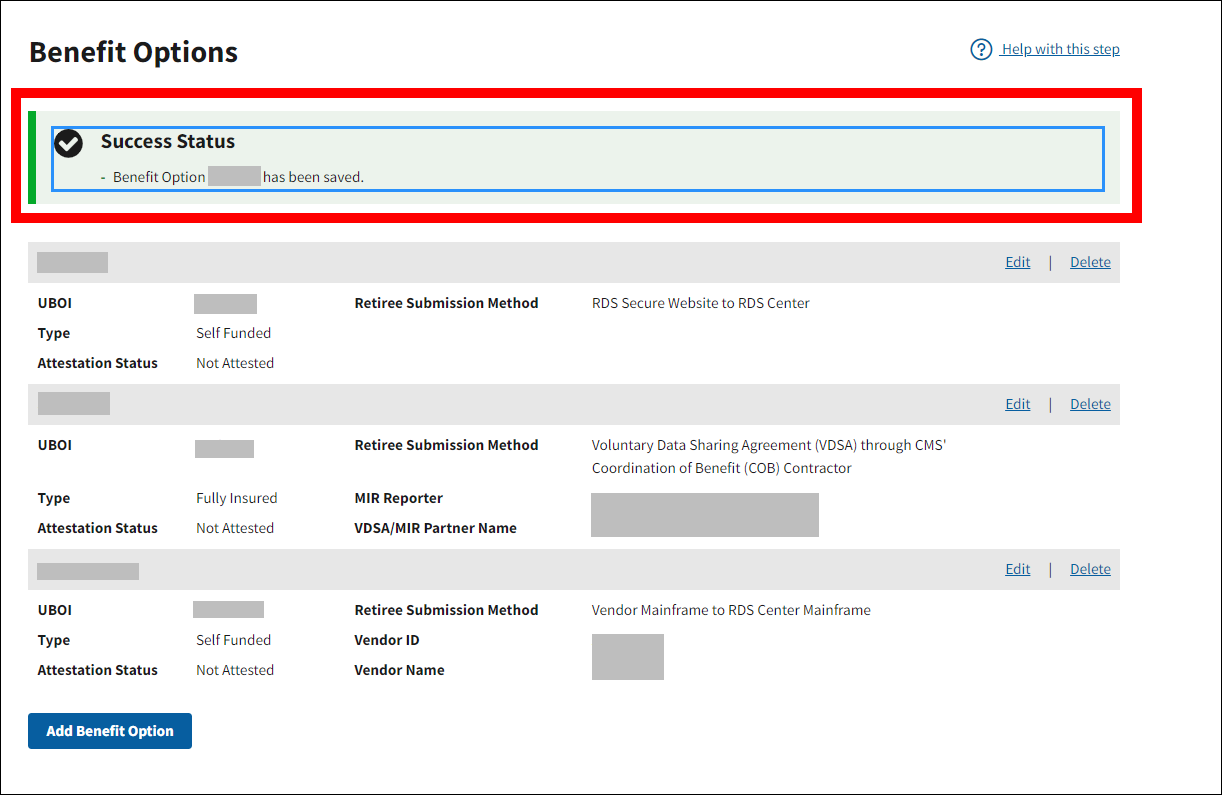
Once the Benefit Option is successfully created, a Success message will display at the top of the page and a green check mark will appear next to the Benefit Options section in the left navigation menu.
-
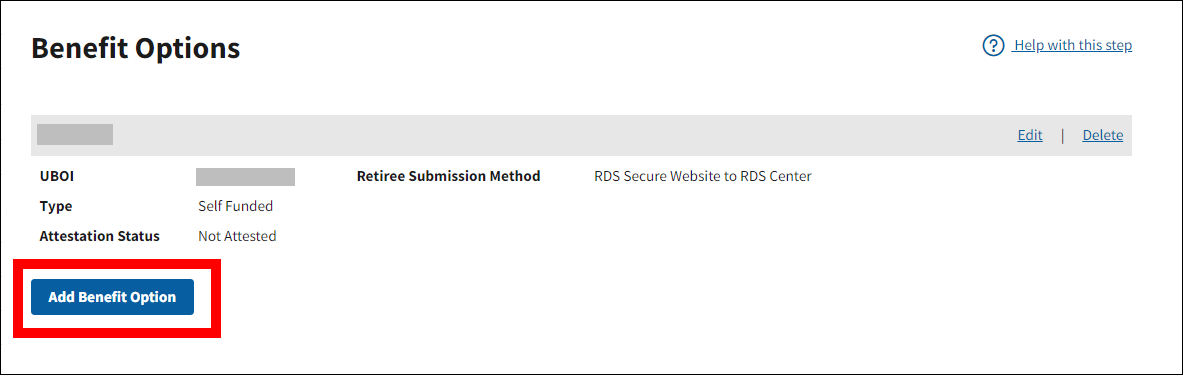
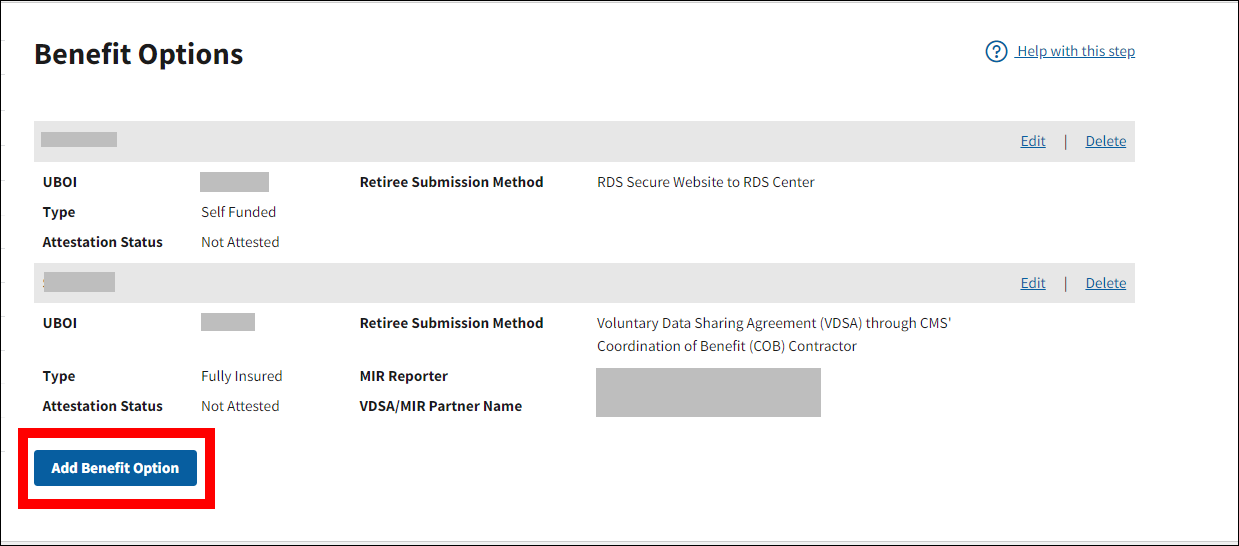
To add another Benefit Option to the application, select Add Benefit Option from the Benefit Options page and repeat Steps 5 – 10 as many times as needed. Navigate to the appropriate Retiree Submission Method section if additional Benefit Options will use a different Retiree Submission Method.
-
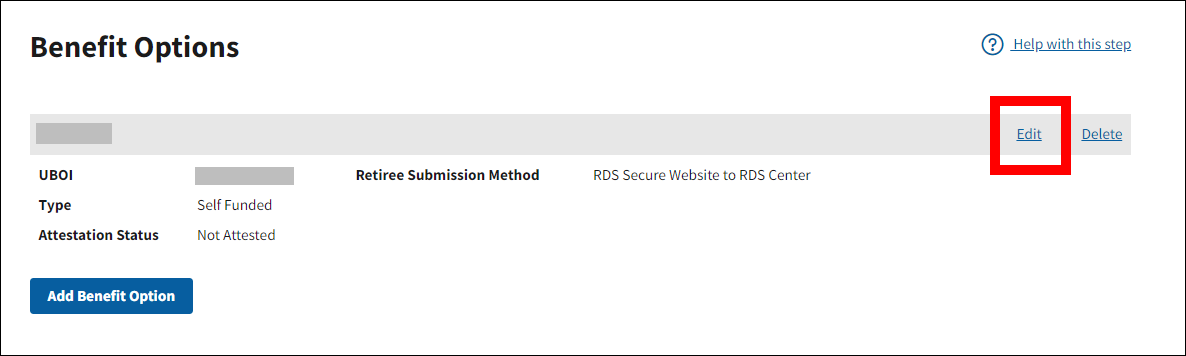
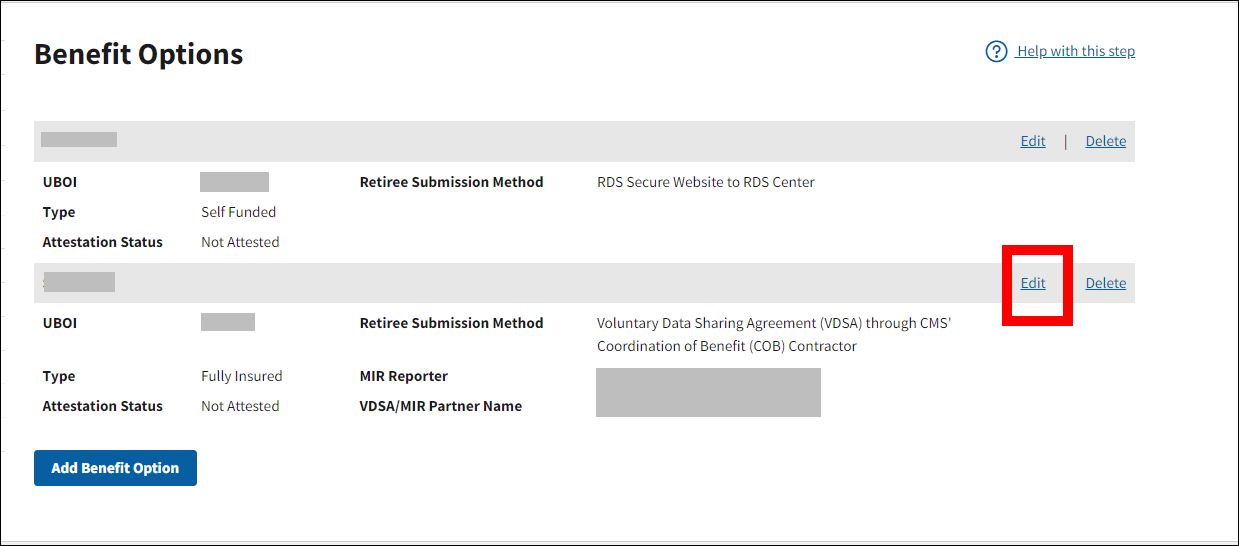
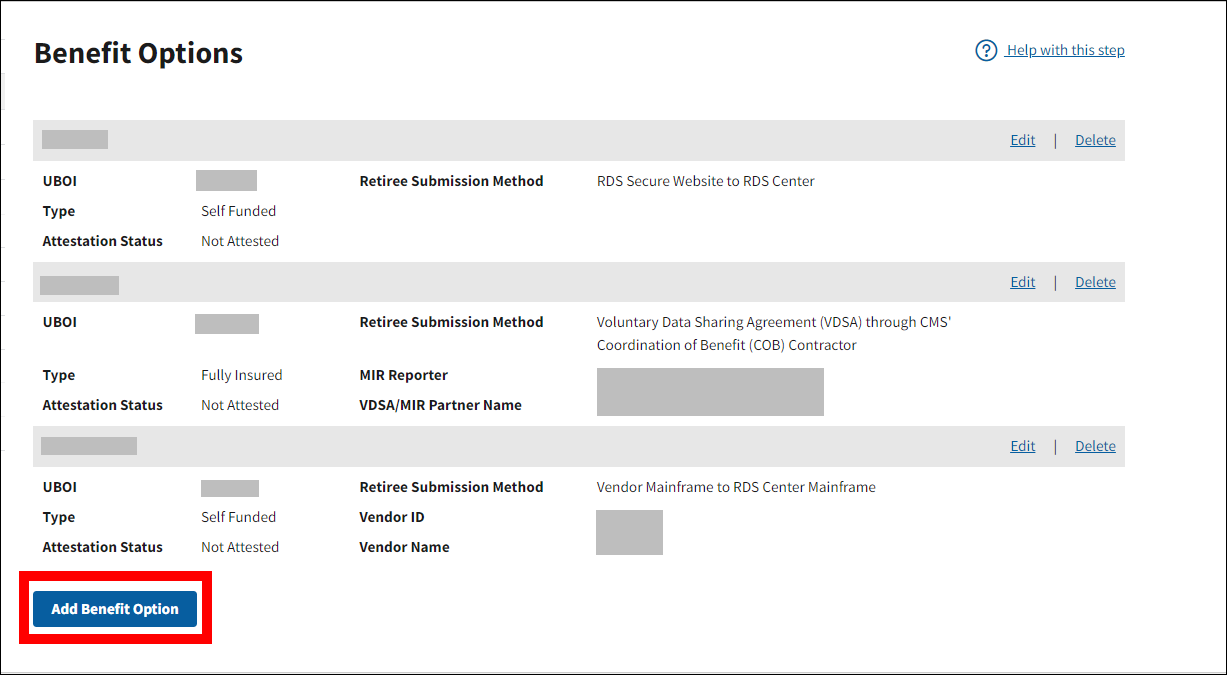
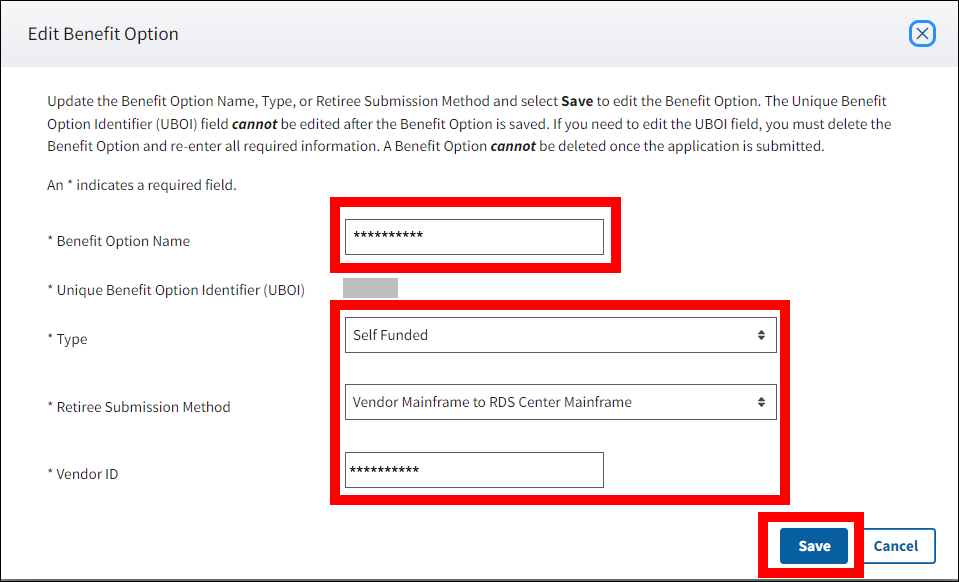
To edit the Benefit Option Name, Type, or Retiree Submission Method, select Edit on the Benefit Options page. Make the necessary updates and select Save to keep the changes, or select Cancel to discard the changes and return to the Benefit Options page.
-
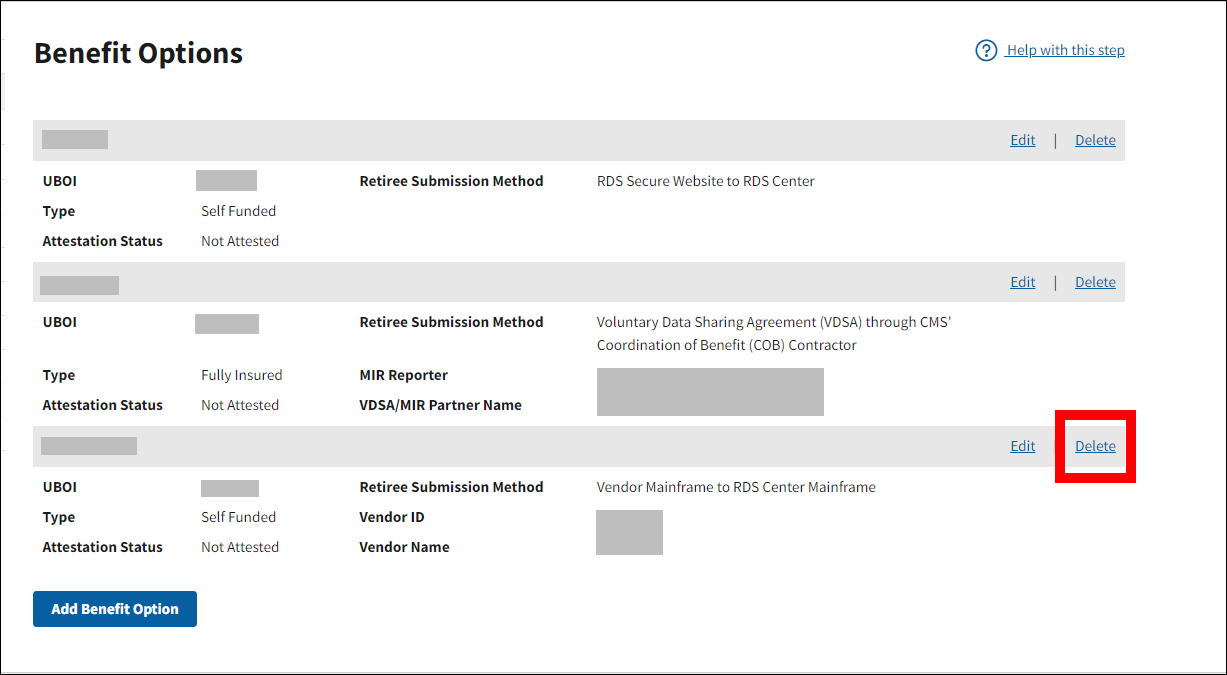
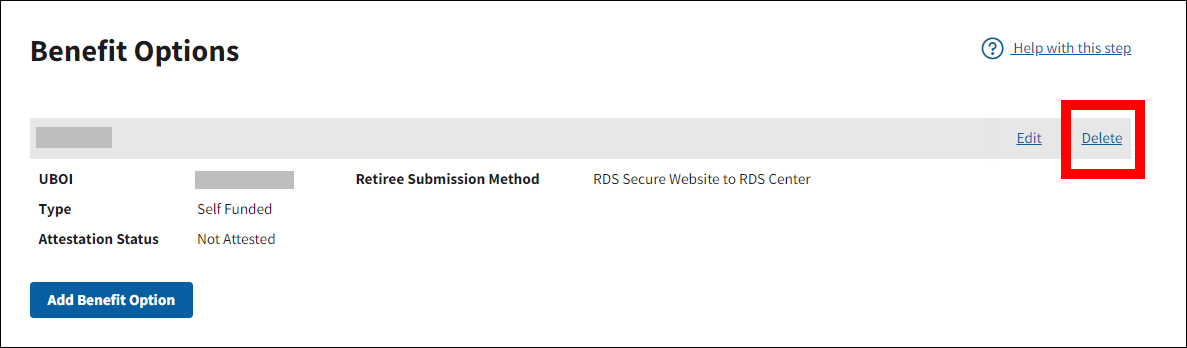
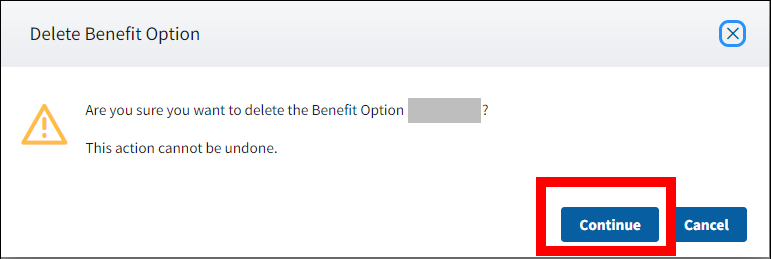
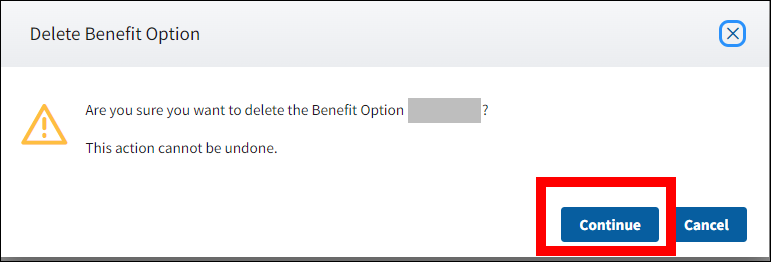
To delete the Benefit Option from the application, select Delete on the Benefit Options page. Read the warning message and select Continue to remove the Benefit Option, or select Cancel to disregard the change and keep the Benefit Option on the application.
Note: If the Unique Benefit Option Identifier (UBOI) needs to be changed after it is saved, the only option is to delete the Benefit Option and re-enter. A Benefit Option may not be deleted once the application is submitted.
Voluntary Data Sharing Agreement (VDSA) through CMS’ Coordination of Benefits (COB) Contractor
On the Dashboard page:
- Select In Progress to view a list of all Applications in progress.
-
Select the Application ID for which you want to assign Benefit Options.
On the Application Overview page:
-
Select Benefit Options from the left navigation menu.

On the Benefit Options page:
-
Select Add Benefit Option.
In the Add Benefit Option pop-up window:
An asterisk (*) indicates a required field.
- *Enter the Benefit Option Name.
-
*Enter the Unique Benefit Option Identifier.
- The Unique Benefit Option Identifier field cannot contain the following characters:
- Tilde ~
- Pipe |
- Backslash \
- Comma ,
- Semicolon ;
- Quotation mark "
- The Unique Benefit Option Identifier field cannot contain the following characters:
-
*Select the Type.
- Dropdown menu options include:
- Self Funded
- Fully Insured
- Dropdown menu options include:
-
*Select Voluntary Data Sharing Agreement (VDSA) through CMS’ Coordination of Benefits (COB) Contractor from the Retiree Submission Method dropdown menu.
- The Retiree Submission Method may be changed at any point in the Application Submission Process and throughout the application lifecycle, up until the Covered Retirees section of Reconciliation is complete, or the Reconciliation Deadline has passed.
- *Enter the VDSA Plan Number or MIR Reporter ID.
-
Select Save to add the Benefit Option to the application, or select Cancel to return to the Benefit Options page.
-
Once the Benefit Option is successfully created, a Success message will display at the top of the page and a green check mark will appear next to the Benefit Options section in the left navigation menu.
-
To add another Benefit Option to the application, select Add Benefit Option from the Benefit Options page and repeat Steps 5 – 10 as many times as needed. Navigate to the appropriate Retiree Submission Method section if additional Benefit Options will use a different Retiree Submission Method.
-
To edit the Benefit Option Name, Type, or Retiree Submission Method, select Edit from the Benefit Options page. Make the necessary updates and select Save to keep the changes, or select Cancel to discard the changes and return to the Benefit Options page.
-
To delete the Benefit Option from the application, select Delete from the Benefit Options page. Read the warning message and select Continue to remove the Benefit Option, or select Cancel to disregard the change and keep the Benefit Option on the application.
Note: If the Unique Benefit Option Identifier needs to be changed after it is saved, the only option is to delete the Benefit Option and re-enter. A Benefit Option may not be deleted once the application is submitted.
Vendor Connect:Direct to RDS Center Connect:Direct OR Plan Sponsor Connect:Direct to RDS Center Connect:Direct
On the Dashboard page:
- Select In Progress to view a list of all Applications in progress.
-
Select the Application ID for which you want to assign Benefit Options.

On the Application Overview page:
-
Select Benefit Options from the left navigation menu.
On the Benefit Options page:
-
Select Add Benefit Option.
In the Add Benefit Option pop-up window:
An asterisk (*) indicates a required field.
- *Enter the Benefit Option Name.
-
*Enter the Unique Benefit Option Identifier.
- The Unique Benefit Option Identifier field cannot contain the following characters:
- Tilde ~
- Pipe |
- Backslash \
- Comma ,
- Semicolon ;
- Quotation mark "
- The Unique Benefit Option Identifier field cannot contain the following characters:
-
*Select the Type.
- Dropdown menu options include:
- Self Funded
- Fully Insured
- Dropdown menu options include:
-
*Select Vendor Mainframe to RDS Center Mainframe (i.e., Connect:Direct) or Plan Sponsor Mainframe to RDS Mainframe (i.e., Connect:Direct) from the Retiree Submission Method dropdown menu.
- The Retiree Submission Method may be changed at any point in the Application Submission Process and throughout the application lifecycle, up until the Covered Retirees section of Reconciliation is complete, or the Reconciliation Deadline has passed.
- *Enter the Vendor ID.
-
Select Save to add the Benefit Option to the application, or select Cancel to return to the Benefit Options page.
-
Once the Benefit Option is successfully created, a Success message will display at the top of the page and a green check mark will appear next to the Benefit Options section in the left navigation menu.
-
To add another Benefit Option to the application, select Add Benefit Option from the Benefit Options page and repeat Steps 5 – 10 as many times as needed. Navigate to the appropriate Retiree Submission Method section if additional Benefit Options will use a different Retiree Submission Method.
-
To edit the Benefit Option Name, Type, or Retiree Submission Method, select Edit from the Benefit Options page. Make the necessary updates and select Save to keep the changes, or select Cancel to discard the changes and return to the Benefit Options page.

-
To delete the Benefit Option from the application, select Delete from the Benefit Options page. Read the warning message and select Continue to remove the Benefit Option, or select Cancel to disregard the change and keep the Benefit Option on the application.
Note: If the Unique Benefit Option Identifier needs to be changed after it is saved, the only option is to delete the Benefit Option and re-enter. A Benefit Option may not be deleted once the application is submitted.