
Overview
Payment Setup is critical to the payment process, as it affects the "who" and "how" of reporting costs and requesting payments. Payment Setup becomes available after an application is approved and is not a required step in the Annual Plan Application submission process.
Payment Setup is the process where the Plan Sponsor determines who reports cost data for each Benefit Option on the application, how the information is communicated to CMS' RDS Center, and who requests interim payments, if the Plan Sponsor chooses to request interim payments. During the Payment Setup process, the Plan Sponsor identifies individuals and/or Vendors responsible for reporting costs associated with each Benefit Option and requesting payments for an approved application.
This section provides an overview of the following topics related to completing Payment Setup:
- Payment Setup Process
- Timing & Dependencies
- Cost Report Submission Methods
- User Roles
- Common Mistakes to Avoid in Payment Setup
- Changing Payment Setup
Payment Setup Process
The Payment Setup Process consists of the following steps:
- Access the Payment Setup Menu
- Assign Payment/Cost Privilege to Account Manager
- Identify Payment Requesters
- Identify Cost Reporters
- Assign Cost Reporters to Benefit Options
Timing & Dependencies
Payment Setup is available in the left Navigation Menu after the application has been submitted and approved. Plan Sponsors do not have to complete Payment Setup as part of the Application Submission Process. The status of Payment Setup will be listed as ‘N/A’ on the Dashboard prior to application approval, indicating that it is not available until that time.
Plan Sponsors should understand the following guidelines before initiating Payment Setup:
- Plan Sponsors cannot submit cost reports or payment requests until Payment Setup is complete.
- Plan Sponsors can complete Payment Setup when an application is in any of the following statuses:
- Approved
- Reconciliation Initiated
- Reconciliation Cost Reporting Opened
- Reconciliation Cost Reporting Closed
- Reconciliation Request Completed
- At least one Cost Reporter must be assigned to each Benefit Option to complete Payment Setup.
- The same person cannot be both a Payment Requester and a Cost Reporter on a given application. A Cost Reporter cannot request payments, and a Payment Requester cannot report costs. This separation of duties guards the RDS Program against fraud and protects taxpayer dollars. The RDS Secure Website enforces this separation of duties requirement during the Payment Setup process by requiring assignment of either the Report Costs privilege or the Request Payment privilege, but not both.
- Cost Reporter Designees assigned to Vendors are considered Vendor Designees.
- Cost Reporter Designees not assigned to Vendors are considered Plan Sponsor Designees.
- There are two reporting methods for submitting costs: Manual Data Entry via the RDS Secure Website, and Connect:Direct.
- Plan Sponsor Cost Reporters are automatically assigned the Manual Data Entry method.
- Vendors are pre-assigned a reporting method based on their Vendor ID and onboarding information.
- If a Vendor is assigned the Manual Data Entry Method, a Vendor Designee is required.
- If a Vendor is assigned the Connect:Direct Method, a Vendor Designee is optional but highly recommended.
- Plan Sponsor and Vendor Cost Reporters are separate sources. The source becomes particularly important if multiple Cost Reporters report on the same Benefit Option for the same plan month. Cost data reported by the same source overwrites (replaces previously submitted data), while cost data reported by different sources are combined and added together.
Cost Report Submission Methods
There are two methods to submit cost reports to CMS' RDS Center: (1) Manual Data Entry using the RDS Secure Website and (2) Connect:Direct. All steps of Payment Setup must be complete to submit cost reports. If Payment Setup is not complete, Data Entry Cost Reporters cannot enter costs, and Connect:Direct cost reports will be rejected by CMS' RDS Center.
Manual Data Entry Using the RDS Secure Website
The Manual Data Entry process requires a user to access the RDS Secure Website and manually enter aggregated retiree cost data by Benefit Option and plan month.
For more information about reporting costs using the Data Entry method, refer to Submit Interim Costs.
RDS Center Connect:Direct Submission
The Connect:Direct process requires a Vendor or a Plan Sponsor to submit aggregated retiree cost data by Benefit Option and plan month using a Connect:Direct connection. Cost data sent using a Connect:Direct connection is viewable in the RDS Secure Website if basic format edits are passed; however, cost data reported using a Connect:Direct connection cannot be changed using the RDS Secure Website. To revise cost data submitted using Connect:Direct, revised cost data files must be submitted using a Connect:Direct connection, and then the new data displays on the RDS Secure Website.
If a Vendor reports costs using Connect:Direct, the Plan Sponsor may assign one of the Vendor's employees as a Designee with the Report Costs privilege (i.e. an RDS Secure Website user), so that they may view the cost report data submitted by the Vendor on the RDS Secure Website. The Designee must establish an RDS Secure Website user account by completing Registration to view the cost data submitted by the Vendor. CMS’ RDS Center strongly recommends assigning Vendor Designees for this purpose.
User Roles
RDS User Roles and Responsibilities
The Authorized Representative and the Account Manager are the only RDS Secure Website user roles with authority to access and complete Payment Setup.
Authorized Representative
The Authorized Representative always has the Request Payment privilege for all of the applications to which they are assigned.
To protect the RDS Program against fraud and protect taxpayer dollars, the RDS Secure Website enforces a separation of duties requirement during the Payment Setup process. As a result, the Authorized Representative is always a Payment Requester on an application and can never report costs. However, the Authorized Representative has the ability to view all interim and final cost reports for all Benefit Options.
The Authorized Representative is the only individual who may submit the annual Payment Request or Reconciliation Payment Request; they will automatically be assigned the Request Payment privilege. The Authorized Representative is not required to request interim payments but is obligated to request the final Reconciliation payment. As a result, the Authorized Representative cannot be a Cost Reporter.
Although assignment of the Request Payment privilege to the Authorized Representative is automatic, the Plan Sponsor can confirm the assignment during Payment Setup by reviewing the Payment Requesters page.
Account Manager
The Account Manager must decide if they want to report costs or request interim payments, but they cannot perform both payment-related privileges on the same application. The separation of duties requirement is at the application level, so it is possible for an Account Manager to report costs on one application and request interim payments on another, if necessary.
Since the same individual cannot report costs and request payment on the same application, the Plan Sponsor must identify the payment-related privilege for the Account Manager during the Payment Setup process. The Account Manager can select either:
- Request interim payment and, consequently, only view cost data;
- Report costs and, consequently, only view payment data; or
- Only view both cost and payment data.
Designees
The Plan Sponsor is not required to assign Designees as Cost Reporters or Payment Requesters — this is only necessary if someone other than the Authorized Representative and the Account Manager is handling either one of these payment privileges.
A Designee can be assigned either the Report Costs privilege or the Request Payment privilege, but not both on the same application. The Plan Sponsor must decide to assign Report Costs privileges or Request Payment privileges to existing Designees already assigned to the application, or to assign new Designees during the Payment Setup process.
Designees assigned the Report Costs privilege have the ability to view cost data for their assigned Benefit Options.
Designees may enter costs in the Secure Website for their associated Benefit Option(s) under two conditions:
- If they are Plan Sponsor Designee Cost Reporters, thereby using the Manual Data Entry reporting method as a default; or
- If they are assigned to a Vendor whose Vendor ID is assigned the Manual Data Entry reporting method.
Plan Sponsors that want Vendors to report cost data using the Data Entry reporting method are required to assign an employee of the Vendor as a Designee. Plan Sponsors that want Vendors to report cost data using the Connect:Direct method are not required to assign a Vendor Designee, though CMS’ RDS Center strongly recommends that one be assigned.
A Plan Sponsor must have at least one Cost Reporter assigned to each Benefit Option. If the Account Manager is not reporting costs, then a Designee and/or Vendor must be assigned as a Cost Reporter, since the Authorized Representative is always assigned the Request Payment privilege.
For interim payments, Designees assigned the Request Payment privilege are permitted to submit interim payment requests, review interim costs when preparing the payment request, and view all cost reports for that application. At Reconciliation, Designees assigned the Request Payment privilege may serve as a payment verifier by reviewing final costs and viewing final cost reports. For more information on which Reconciliation steps Designees may access, refer to User Roles and Responsibilities in the Reconciliation Steps.
System-Specific Roles and Responsibilities
- Cost Reporter
- Payment Requester
- Vendors
- Plan Sponsor Designee Cost Reporter/Vendor Designee Cost Reporter Differences
Cost Reporter
A Cost Reporter is an individual or a Vendor that is responsible for submitting drug cost data to CMS' RDS Center. During the Payment Setup process, Plan Sponsors identify Cost Reporters for each Benefit Option defined within an application.
The Report Costs privilege is assigned at the application level.
Plan Sponsors may choose to assign any of the following as Cost Reporters: the Account Manager, any existing Designee already assigned to the application, any new Designee added to the application, or a Vendor.
Cost Reporters are assigned to an application, and Benefit Options are then assigned to Cost Reporters. At least one Cost Reporter must be assigned to each Benefit Option to complete Payment Setup. However, a single Benefit Option may have more than one Cost Reporter. The Cost Reporters can be multiple Vendors, multiple Plan Sponsor Cost Reporters, or a combination of the two.
There are two source types that can submit cost data: Plan Sponsors and Vendors. A Plan Sponsor is considered a single source regardless of the number of individual Cost Reporters assigned to the Plan Sponsor's application. Each Vendor is considered a single source regardless of the number of individual Cost Reporters assigned to the Vendor. There may be multiple Vendors assigned as Cost Reporters; each Vendor is considered a separate source from other Vendors and from the Plan Sponsor.
Note: Plan Sponsor Cost Reporters and Vendor Cost Reporters are separate sources. Source becomes particularly important if multiple Cost Reporters report costs on the same Benefit Option for the same plan month. Cost data reported by the same source replaces previously submitted data, while cost data reported by different sources are combined and added together.
Payment Requester
A Payment Requester is an individual granted permission to create and submit interim payment requests and prepare the final Reconciliation payment request using the RDS Secure Website.
The Request Payment privilege is assigned at the application level.
Plan Sponsors may choose to assign any of the following as Payment Requesters: Authorized Representatives (who are automatically assigned this privilege by the system); Account Managers manually assigned the Request Payment privilege; and Designees manually assigned the Request Payment privilege.
Only the Authorized Representative can submit the final Reconciliation payment request. The Authorized Representative always has the Request Payment privilege for all of the applications to which they are assigned. The Account Manager and Designees may also be assigned the Request Payment privilege for submitting interim payment requests and for helping to prepare the Reconciliation payment request.
For more information on which Reconciliation steps are accessible for users assigned the Request Payment privilege, refer to User Roles and Responsibilities in the Reconciliation Steps.
Vendors
A Vendor is a Pharmacy Benefit Manager (PBM), Health Plan, or other third-party company that has been contracted by a Plan Sponsor to report costs. During the Payment Setup process, a Plan Sponsor specifies if any Vendors are reporting costs for the application based on the Vendor ID. Using a Vendor to report cost data is optional.
A Vendor may report costs using the Manual Data Entry Method by entering costs directly into the RDS Secure Website, or a Connect:Direct connection.
A Vendor ID is required when assigning a Vendor to an application during Payment Setup. Each Vendor ID has a specific cost report submission method—Data Entry or Connect:Direct—that is assigned to the Vendor by CMS’ RDS Center during the vendor onboarding process. A Vendor that uses the Data Entry and Connect:Direct cost report submission method will have a unique Vendor ID for each method. If the Vendor does not yet have a Vendor ID, they must request a Vendor ID from CMS' RDS Center. After the Vendor receives the Vendor ID, they must communicate that Vendor ID to the appropriate Plan Sponsors so it can be entered during Payment Setup. Vendors should contact CMS’ RDS Center directly for additional information about obtaining a Vendor ID and the vendor onboarding process.
Vendor Cost Reporters
A Vendor Cost Reporter is an organization that manages cost data on behalf of the Plan Sponsor. The source of the cost data is the Vendor.
Vendor Designees
A Vendor Designee is an individual that is assigned to a specific Vendor. By assigning a Designee to a Vendor, that individual is given permission to view or report cost data for the Vendor. Vendors reporting via the Manual Data Entry using the RDS Secure Website are required to have a Vendor Designee assigned by the Plan Sponsor. Vendors reporting via the Connect:Direct method are not required to have a Vendor Designee assigned by the Plan Sponsor, though CMS’ RDS Center strongly recommends that one be assigned.
Plan Sponsor Designee Cost Reporter/Vendor Designee Cost Reporter Differences
A Plan Sponsor Designee Cost Reporter is a Designee with the Report Costs privilege, who is not assigned to a Vendor. A Vendor Designee Cost Reporter is a Designee with the Report Costs privilege who is assigned to a specific Vendor.
By associating a Designee with a Vendor, the Designee is given permission to view or report cost data on behalf of the Vendor. A Plan Sponsor Designee does not have access to any Vendor cost reports. And, a Vendor Designee does not have access to any cost reported by the Account Manager, Plan Sponsor Designee, or another Vendor.
Plan Sponsor Cost Reporters are assigned the Data Entry reporting method by default. Vendor Designees inherit the reporting method from their vendor organization.
Common Mistakes to Avoid in Payment Setup
Common mistakes to avoid in Payment Setup include:
- Not assigning a Benefit Option to a Vendor when the Vendor is a Cost Reporter. When a Benefit Option is not assigned to a Vendor, the costs submitted by the Vendor are rejected, and the Designee for the Vendor is prohibited from entering cost data for the Benefit Option.
- Not attaching a Designee to a Vendor. When a Designee is not attached to a Vendor, the Designee is considered a Plan Sponsor Designee. Plan Sponsor Designees do not have access to Vendor cost reports. If a Vendor is submitting cost reports through Data Entry, Payment Setup cannot be completed until a Cost Reporter Designee is assigned to a Vendor.
- Setting up both the Plan Sponsor and Vendor to report cost data on the same Benefit Option. When both the Plan Sponsor and Vendor report cost data on the same Benefit Option for the same plan month, the cost data figures are combined and added together and can result in a potential duplication.
- Not completing Payment Setup. When Payment Setup is "Incomplete," cost data cannot be reported, Vendor files are rejected, and Data Entry is prohibited on the RDS Secure Website.
- Not setting up a Vendor for Data Entry. If the Designee reports costs without being attached to the Vendor, the cost report activity will not be included in the Vendor's Quick Access Reports (QAR).
Changing Payment Setup
Note: Payment Setup is available in the Left Navigation menu on all pages within an application. Refer to Timing & Dependencies for additional information.
CMS' RDS Center does not limit the number of times changes can be made to Payment Setup. However, Payment Setup must be completed before a cost report is submitted or a Payment Request is made.
Before cost data is reported, anything can be changed in Payment Setup. It is not until after cost data has been reported that there are rules on what can be changed in Payment Setup.
To protect the RDS Program against fraud and protect taxpayer dollars, after a Cost Reporter has reported costs, the following Payment Setup actions are disabled:
- If the Account Manager reported costs, the Account Manager privilege cannot be changed from Report Costs to View Only or Request Payment;
- If a Plan Sponsor Designee reported costs, the Plan Sponsor Designee privilege cannot be changed from Report Costs to Request Payment;
- If a Vendor has reported costs, that Vendor cannot be removed; and
- If any cost reporter type reports costs, Benefit Options assigned cannot be removed.
Step-by-Step Instructions
This section contains step-by-step instructions to complete the Payment Setup process:
- Access the Payment Setup Menu
- Complete Payment Setup: Assign Payment/Cost Privilege to Account Manager
- Complete Payment Setup: Identify Payment Requesters
- Complete Payment Setup: Identify Cost Reporters
- Complete Payment Setup: Assign Cost Reporters to Benefit Options
- Manage Designees: Change Payment/Cost Privilege
- Manage Designees: Delete a Designee
Access the Payment Setup Menu
To access the RDS Secure Website and navigate to the Dashboard page, review instructions to access the RDS Secure Website.
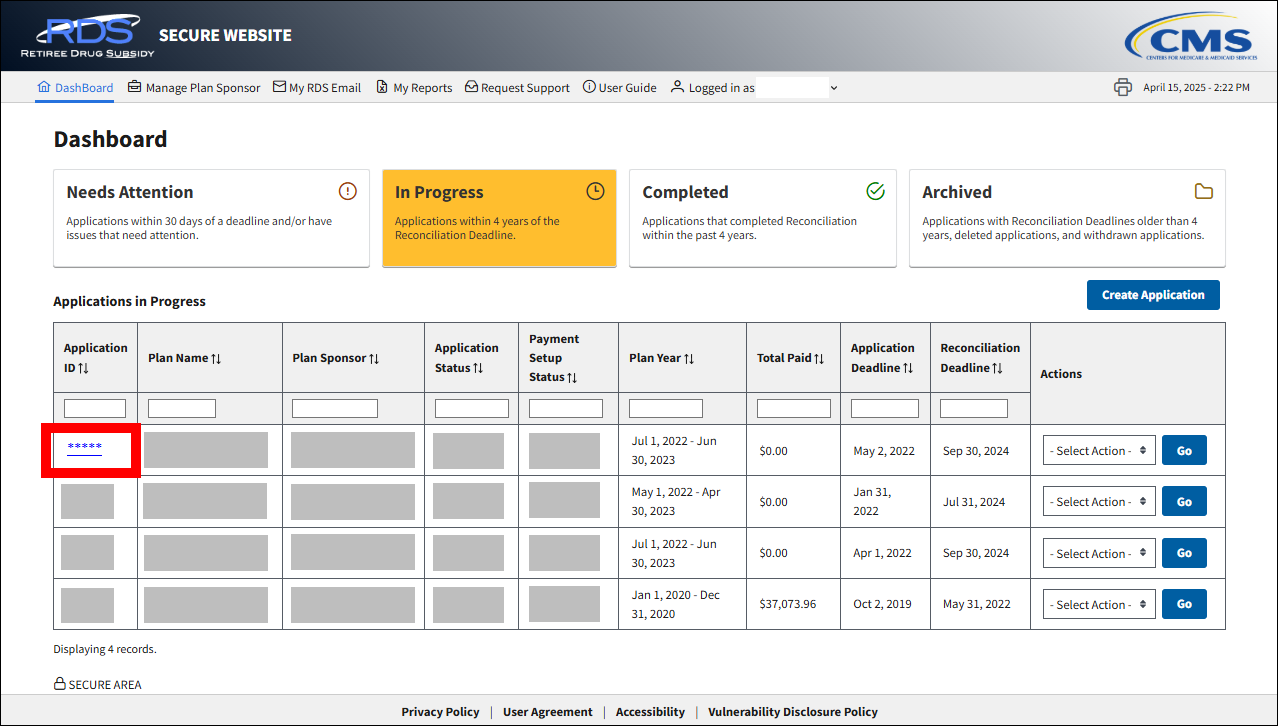
On the Dashboard page:
- Select In Progress to view a list of all Applications in progress.
-
Select the Application ID for which you want to complete Payment Setup.
On the Application Overview page:
-
Select Payment Setup.

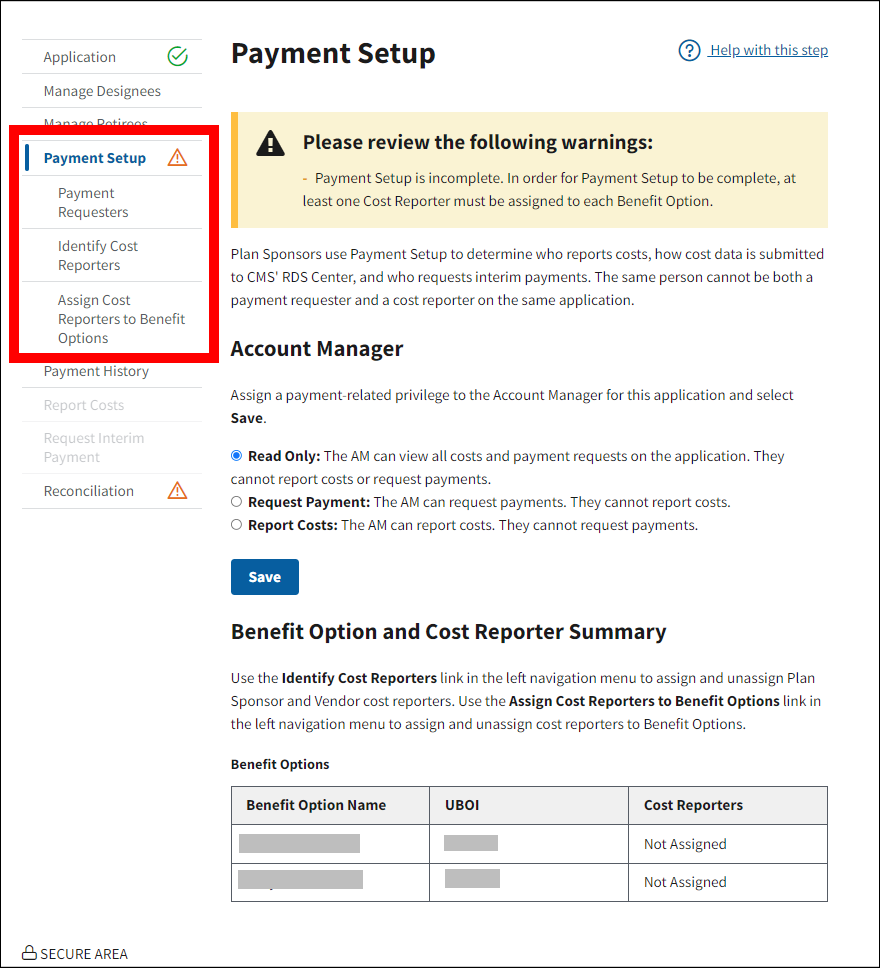
On the Payment Setup page:
- Payment Setup steps are displayed in the left navigation menu:
- Payment Setup
- Payment Requesters
- Identify Cost Reporters
- Assign Cost Reporters to Benefit Options
- Payment Setup
-
To complete Payment Setup, select each Payment Setup step in the left navigation menu.
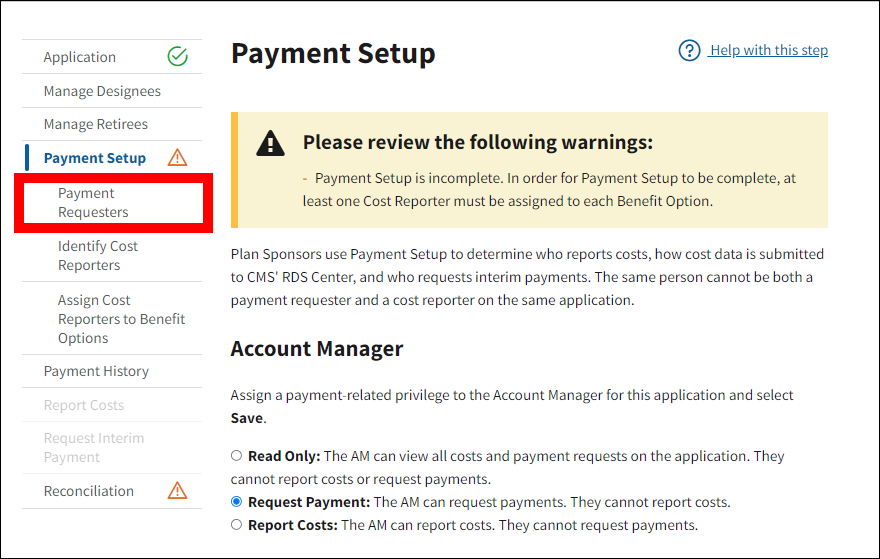
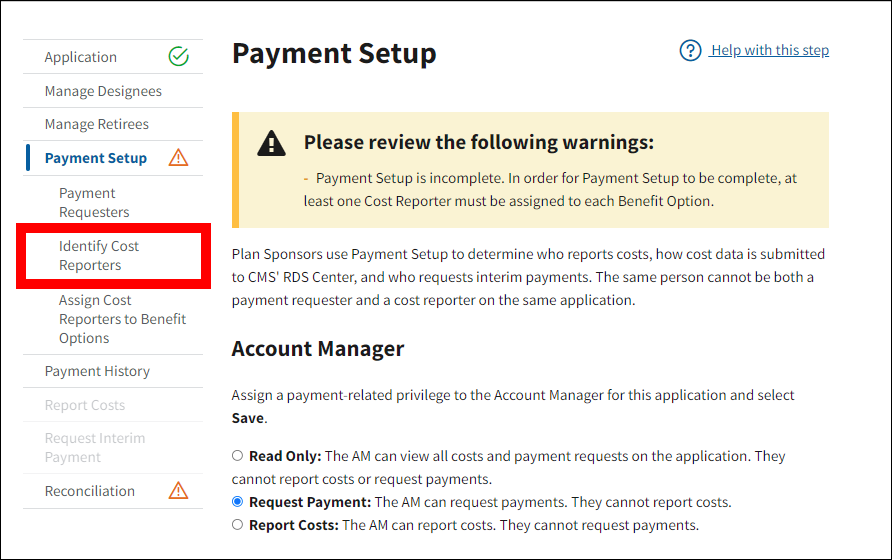
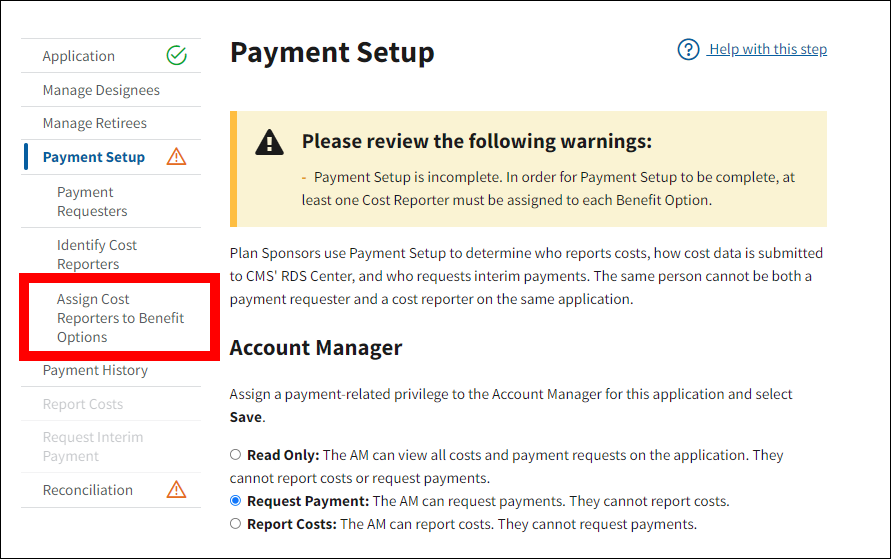
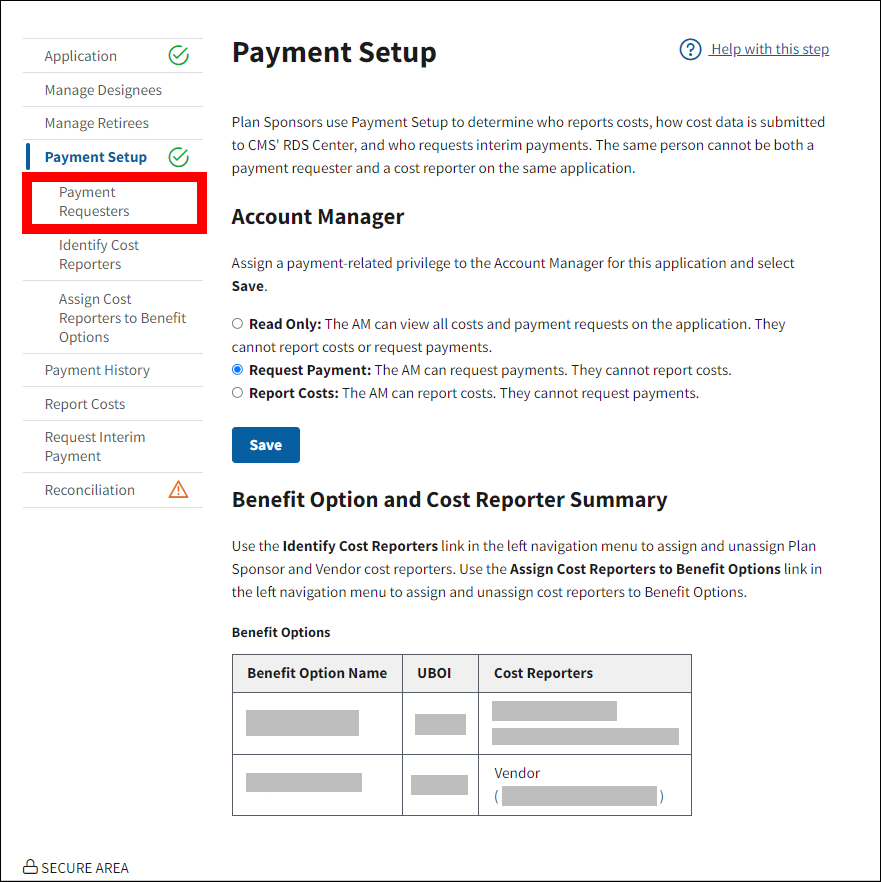
Complete Payment Setup: Assign Payment/Cost Privilege to the Account Manager
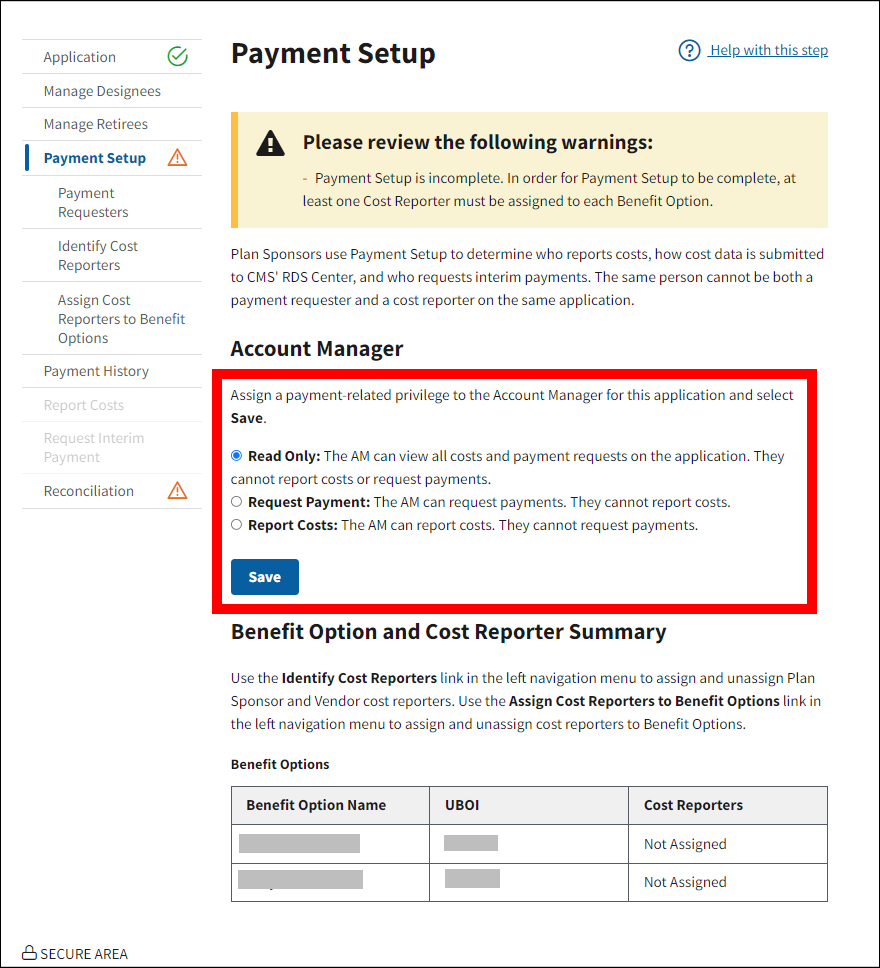
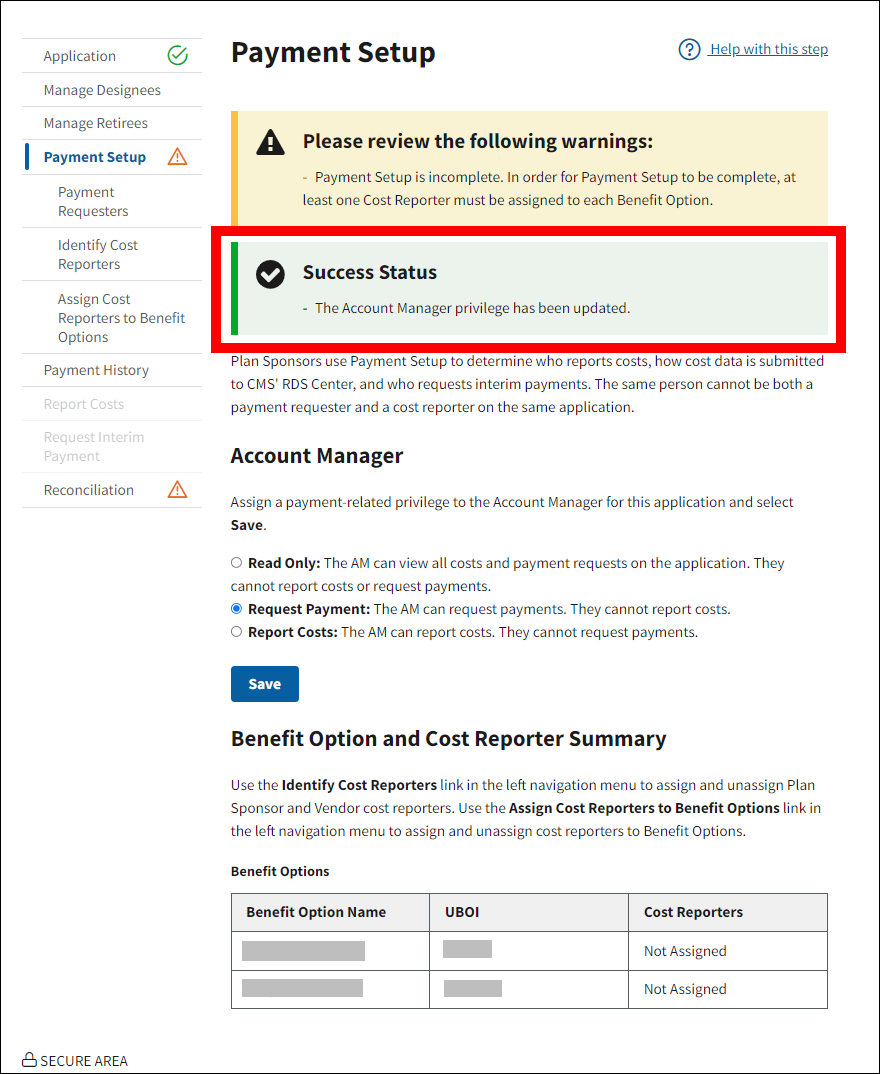
In this step, the Plan Sponsor is required to assign the Account Manager one of the following privileges for the application:
- Read Only: The Read-only privilege allows the Account Manager to view costs and payment requests. Consequently, the Account Manager with this privilege cannot request interim payments nor report costs for the given application. If no action is taken, the Account Manager will be assigned the Read Only option as a default.
- Request Payment: The Request Payment privilege allows the Account Manager to request interim payments for the given application. Consequently, the Account Manager with this privilege can only view cost data for the given application.
- Report Costs: The Report Costs privilege allows the Account Manager to report costs for the given application. Consequently, the Account Manager with this privilege can only view payment data for the given application.
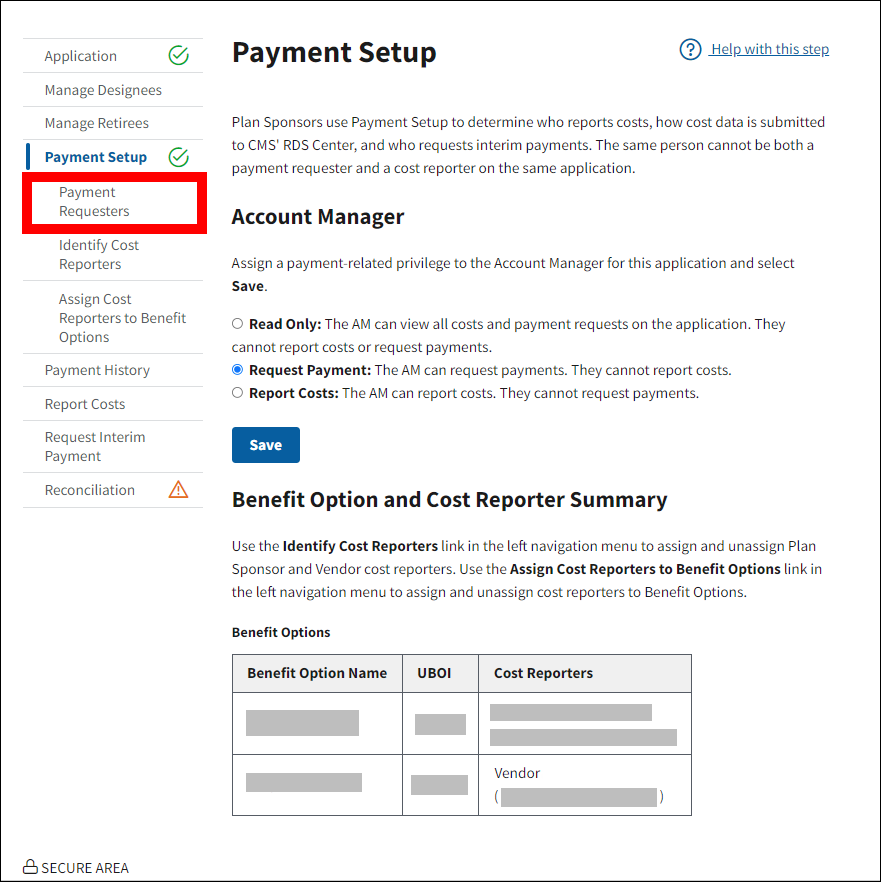
Tools to assign these privileges are available on the Payment Setup page.
On the Payment Setup page:
An asterisk (*) indicates a required field.
- *Select the appropriate radio button: Read Only, Request Payment, or Report Costs.
-
Select Save.
-
A Success message will display on the Payment Setup page stating that the Account Manager privilege has been updated. Payment-related privileges assigned to the Account Manager can also be confirmed on the Payment Requesters page or the Identify Cost Reports page, depending on the privilege.
Complete Payment Setup: Identify Payment Requesters
In this step, the Plan Sponsor can view the individuals who have been granted the Request Payment privilege and choose to assign Plan Sponsor Designees the Request Payment privilege. A Designee can be assigned either the Report Costs or the Request Payment privilege, but not both privileges on the same application. If the Plan Sponsor intends to use Designee(s) to request interim payment for an application, each Designee must be assigned the Request Payment privilege for the application in this step. The Plan Sponsor may invite new Designees to the application or select from a list of active Designees who are assigned to the Plan Sponsor’s other applications.
Add New Plan Sponsor Designee(s) and Assign Request Payment Privilege
On the Payment Setup page:
-
Select Payment Requesters.

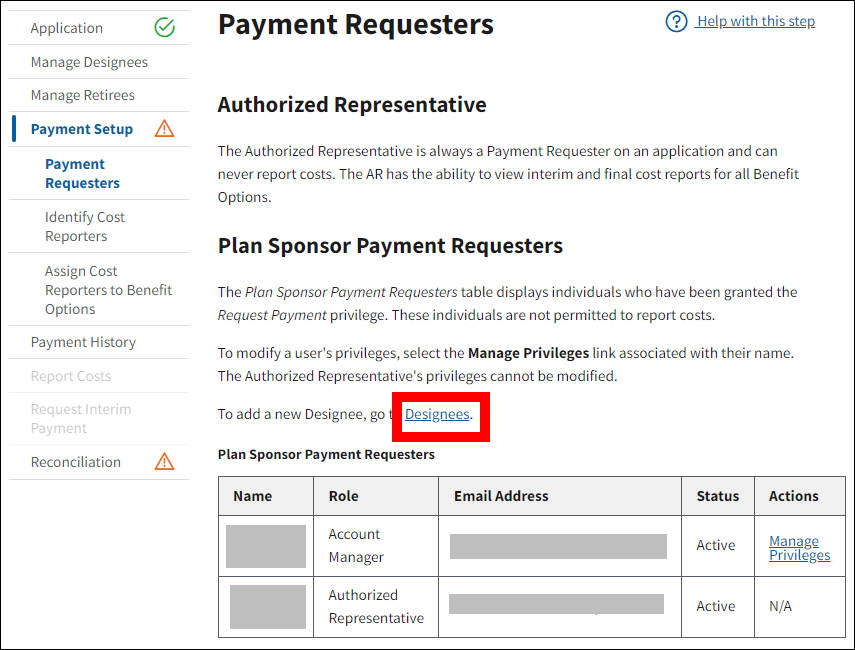
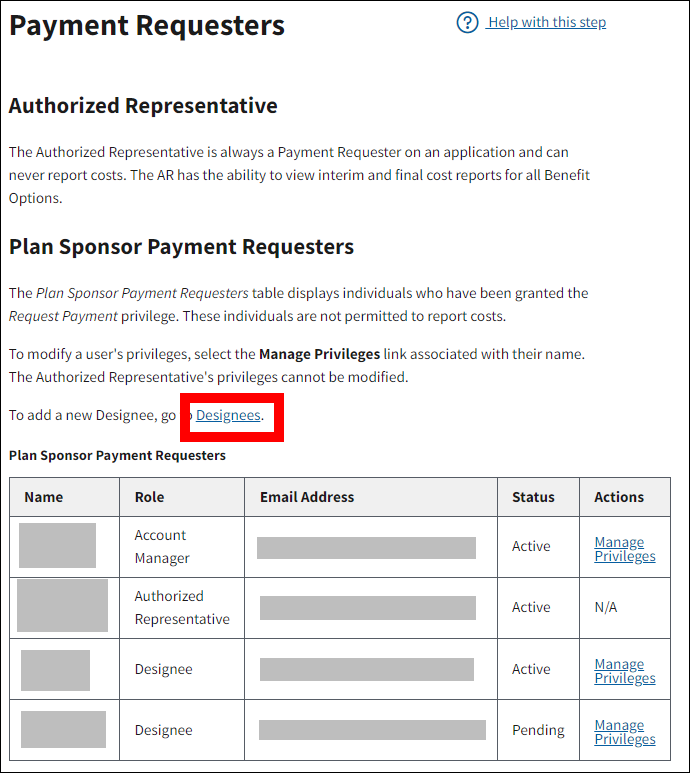
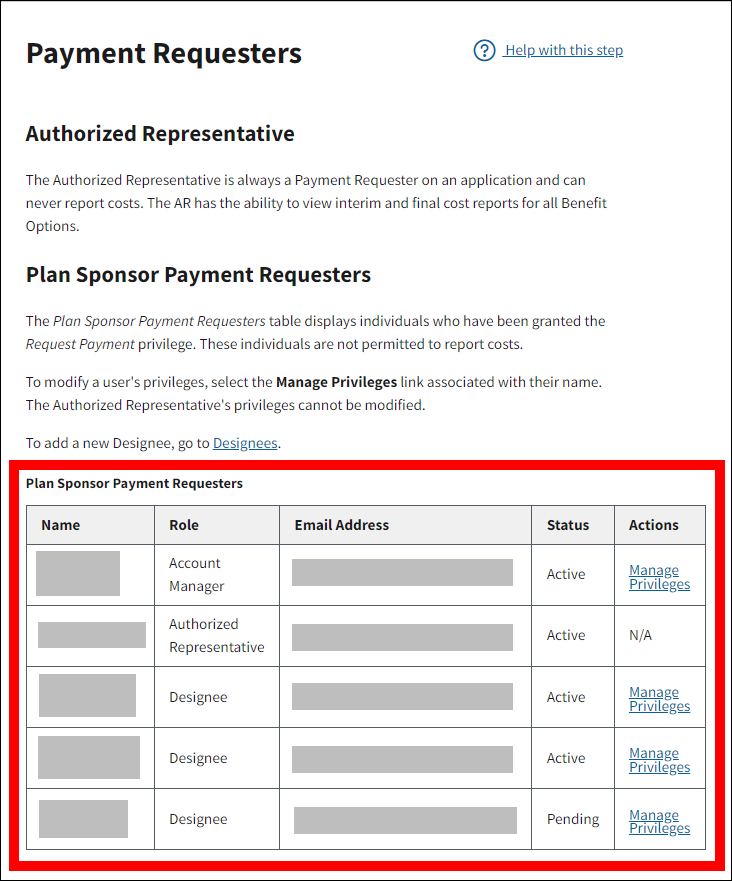
On the Payment Requesters page:
-
Select Designees.
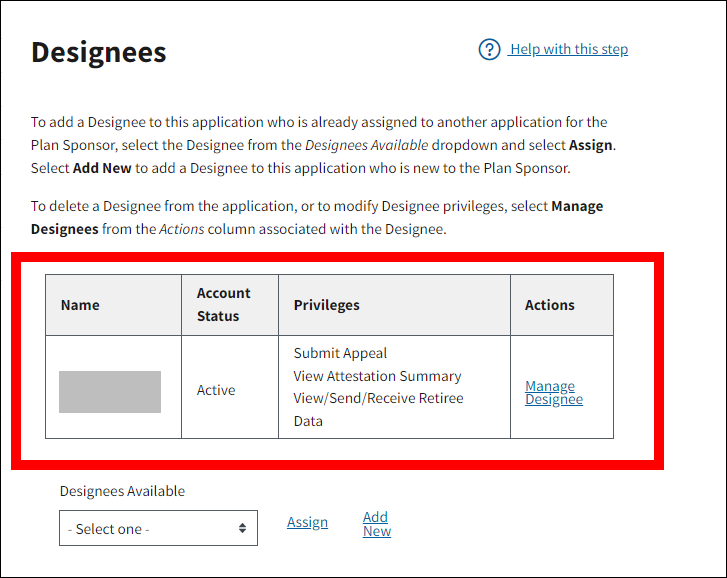
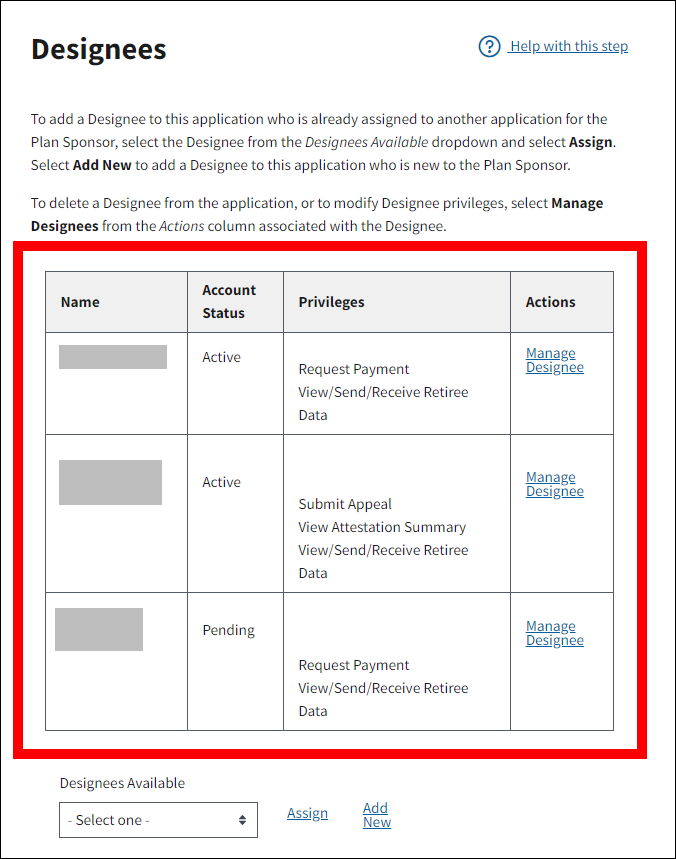
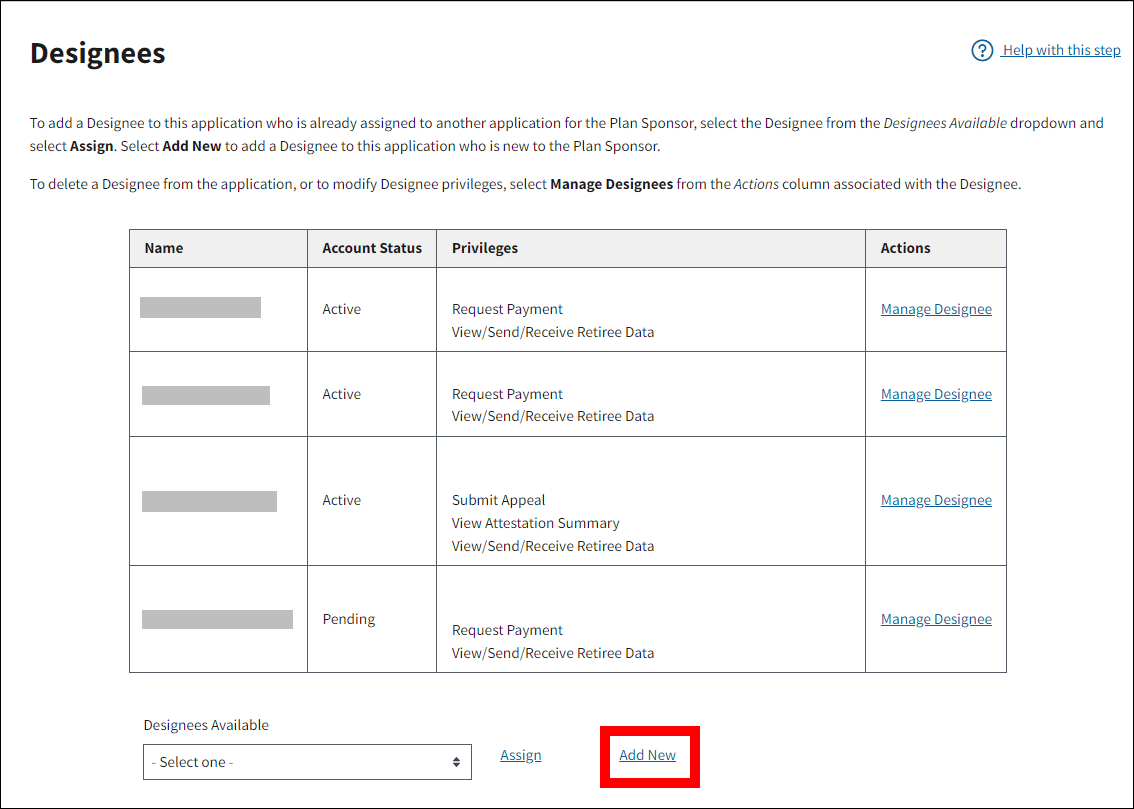
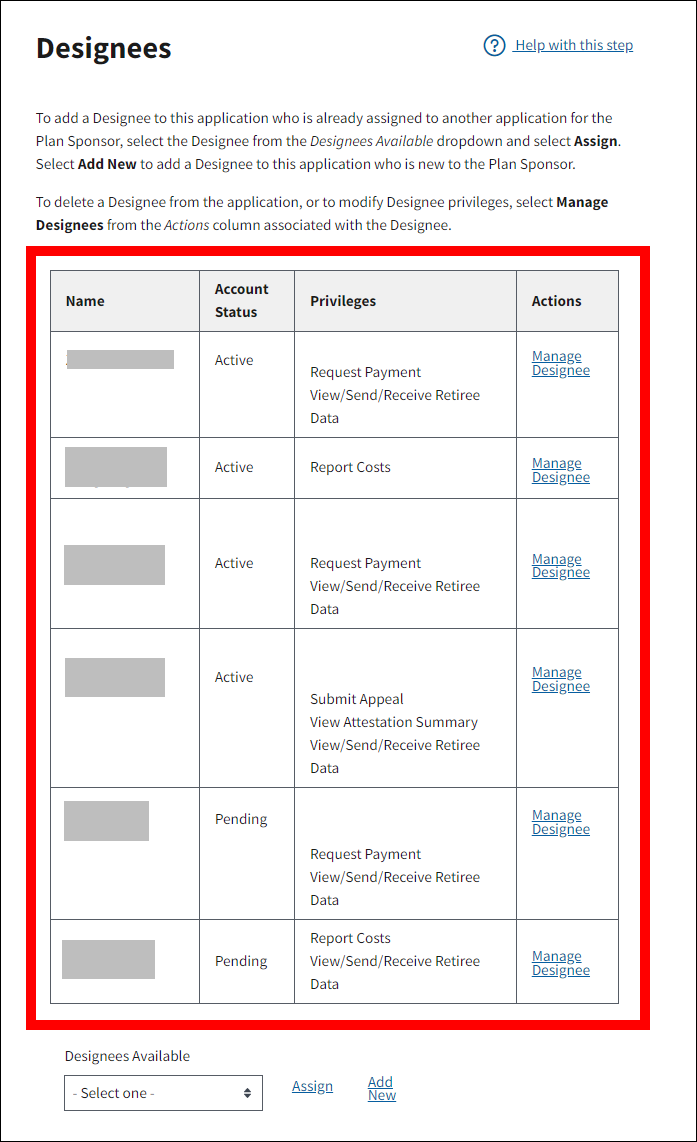
On the Designees page:
-
Review the Designees table. This table displays all Designees currently assigned to the application.
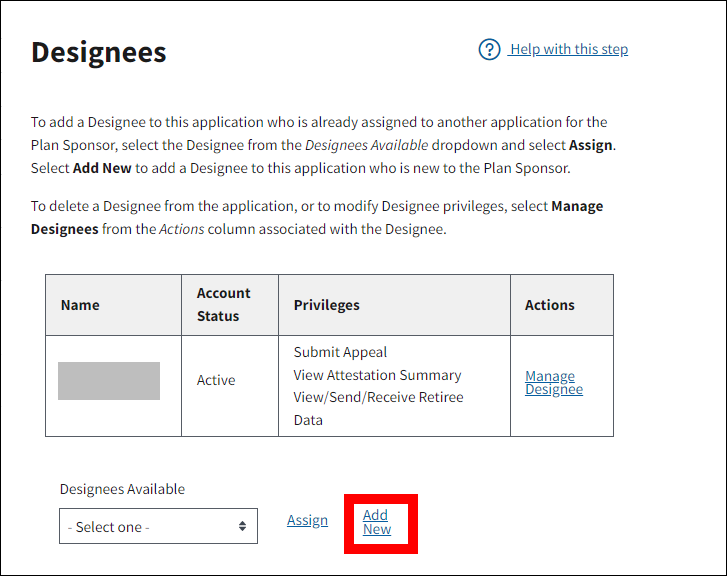
On the Designees page:
-
Select Add New.
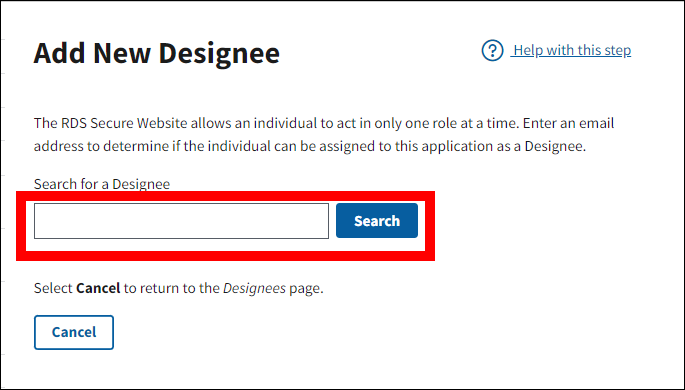
On the Add New Designee page:
-
Enter an Email Address and select Search to determine if this individual is an established RDS Secure Website user, or select Cancel to return to the Designees page.

One of the following scenarios will occur:
- Designee Cannot Be Used: Please correct the following errors: The email addressed entered was found in the RDS SWS associated with an active user holding a different RDS Secure Website user role. This user cannot be assigned as a Designee.
- Designee Not Found: The Email address you entered may be used. Enter the required information to assign a new Designee.
- Designee Found page: The Email address you entered may be used. Enter the required information to assign a new Designee.
If Designee Cannot Be Used, on the Add New Designee page:
- An error message will display stating that the Email Address entered was found in the RDS Secure Website associated with an active user holding a different RDS Secure Website user role. This user cannot be assigned as a Designee.
-
Enter a different Email Address and select Search, or select Cancel to return to the Designees page.

Or
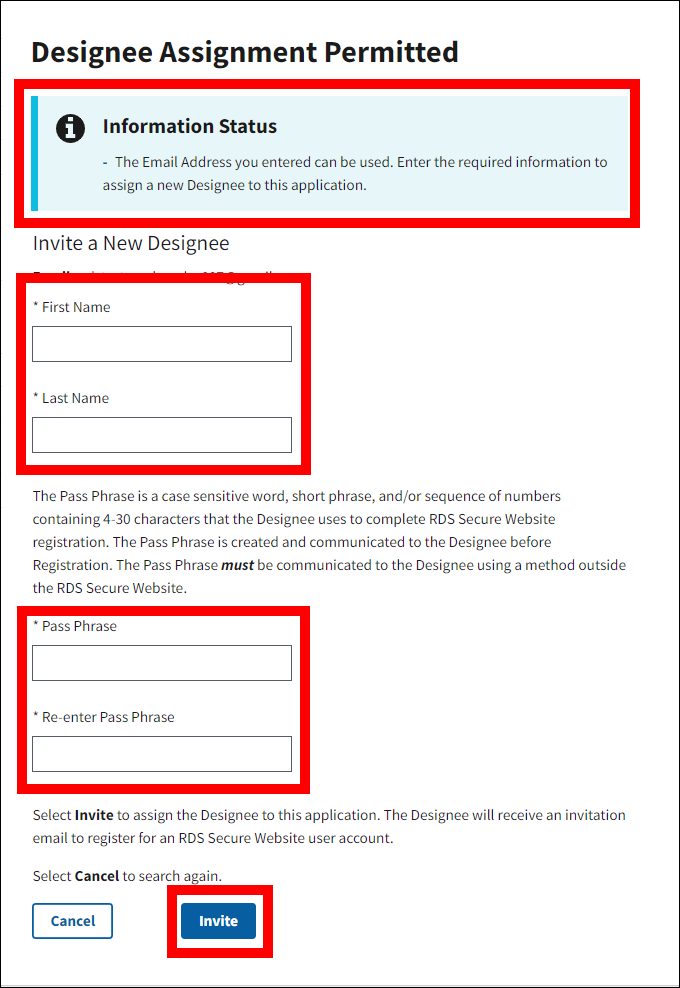
If Designee Not Found, on the Designee Assignment Permitted page:
An asterisk (*) indicates a required field.
- *Enter the First Name.
- *Enter the Last Name.
- *Enter the Pass Phrase.
- *Re-enter Pass Phrase.
-
Select Invite, or select Cancel to return to the Add New Designee page.
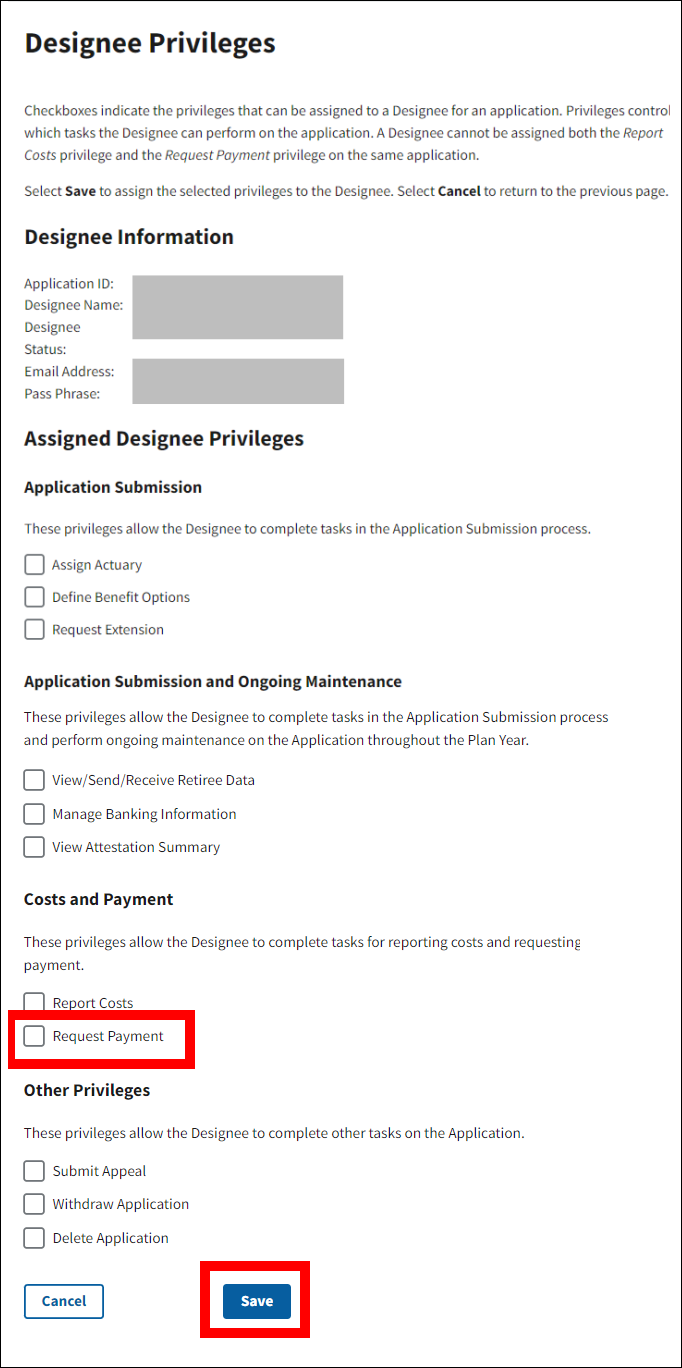
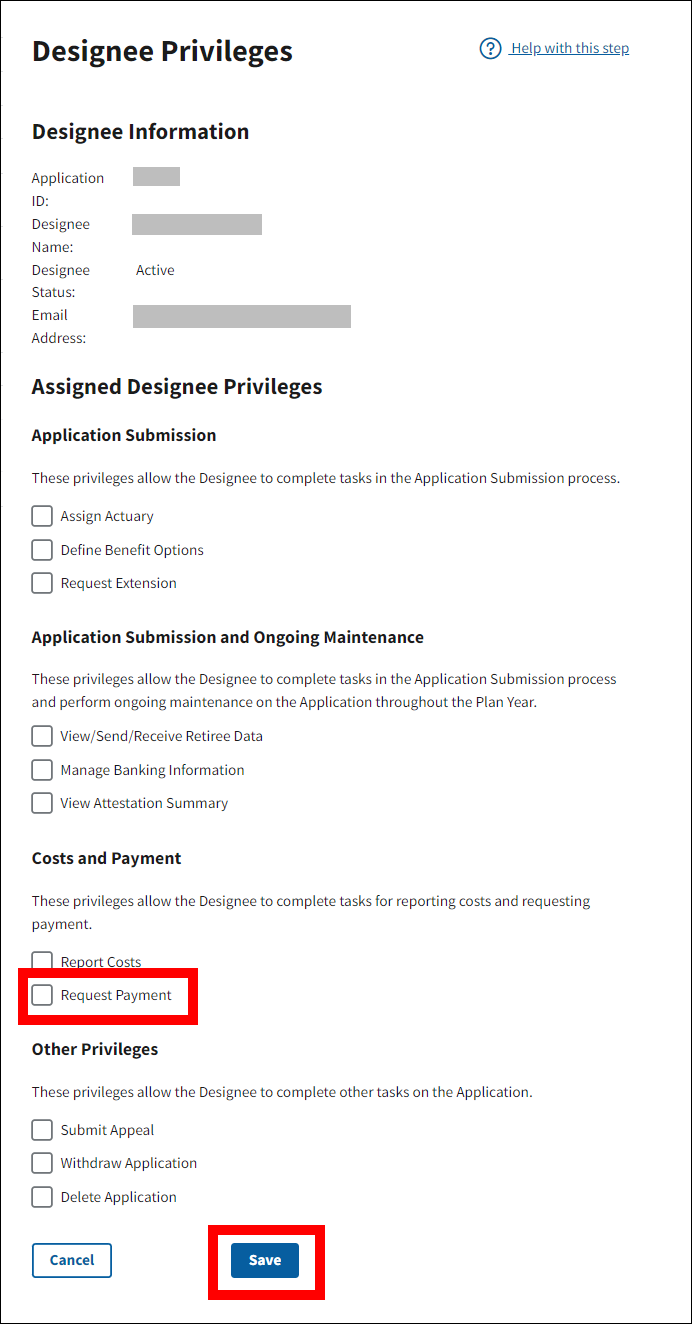
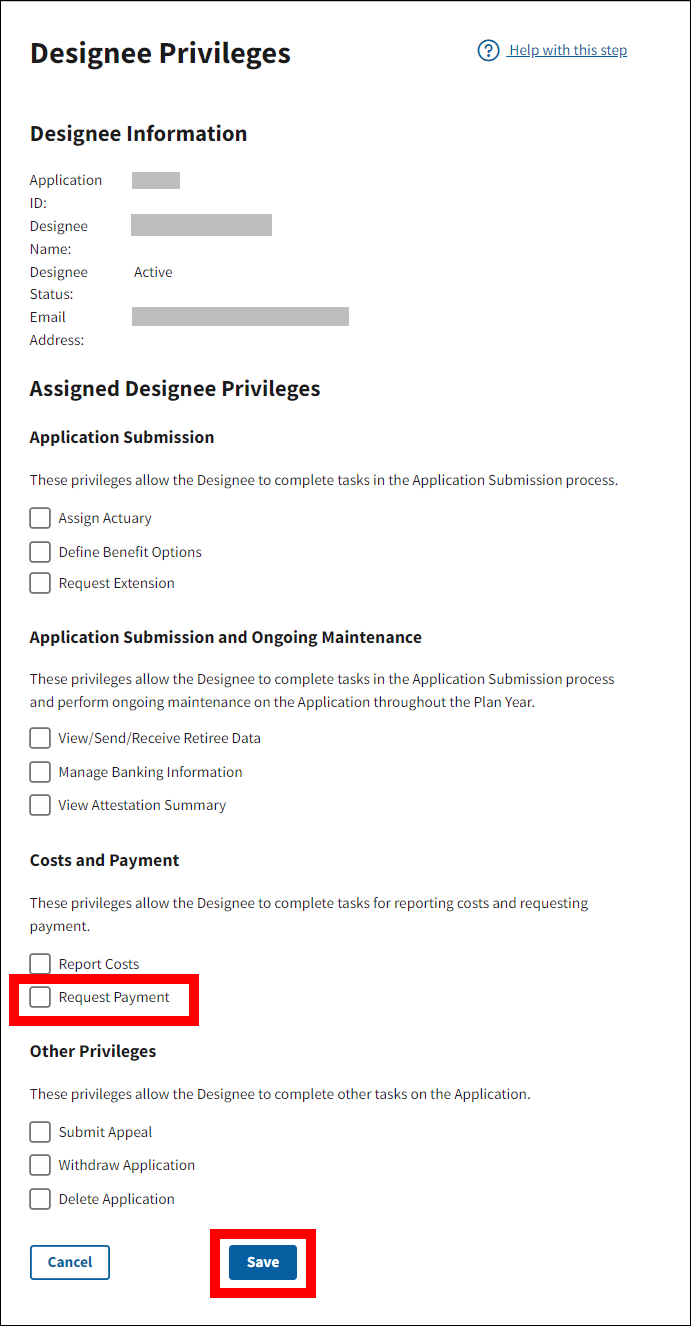
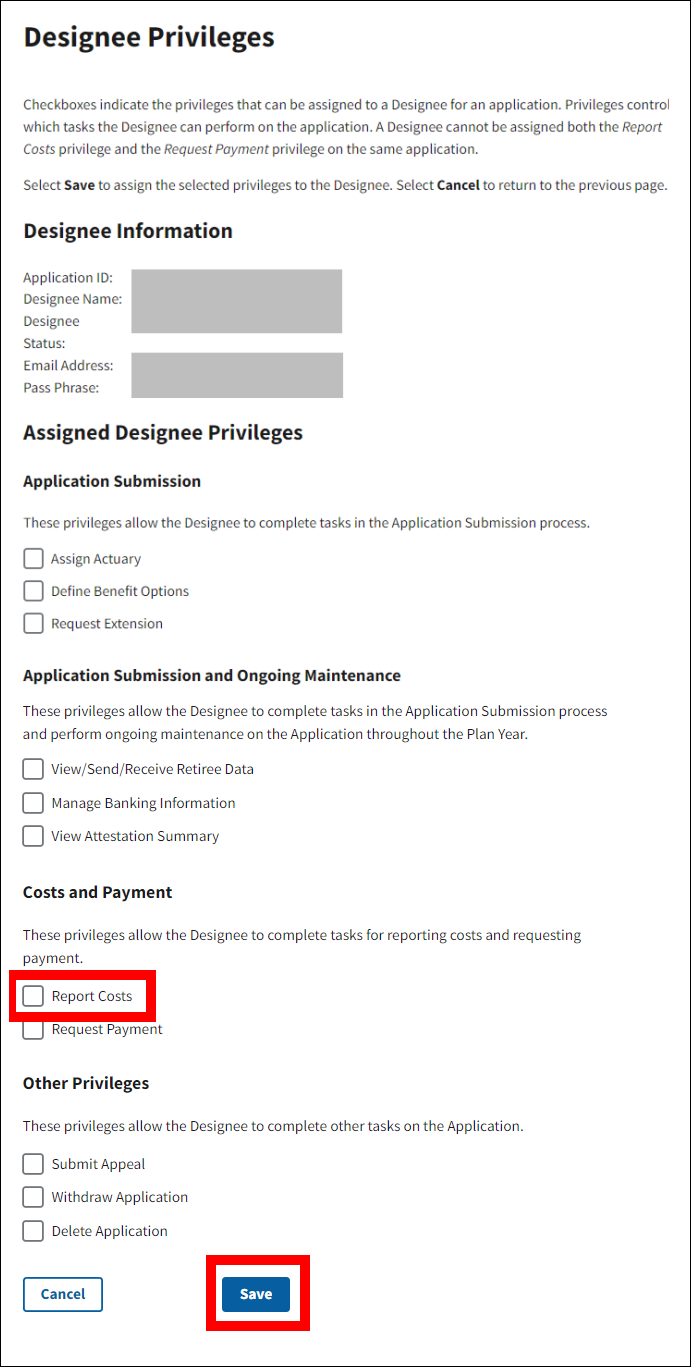
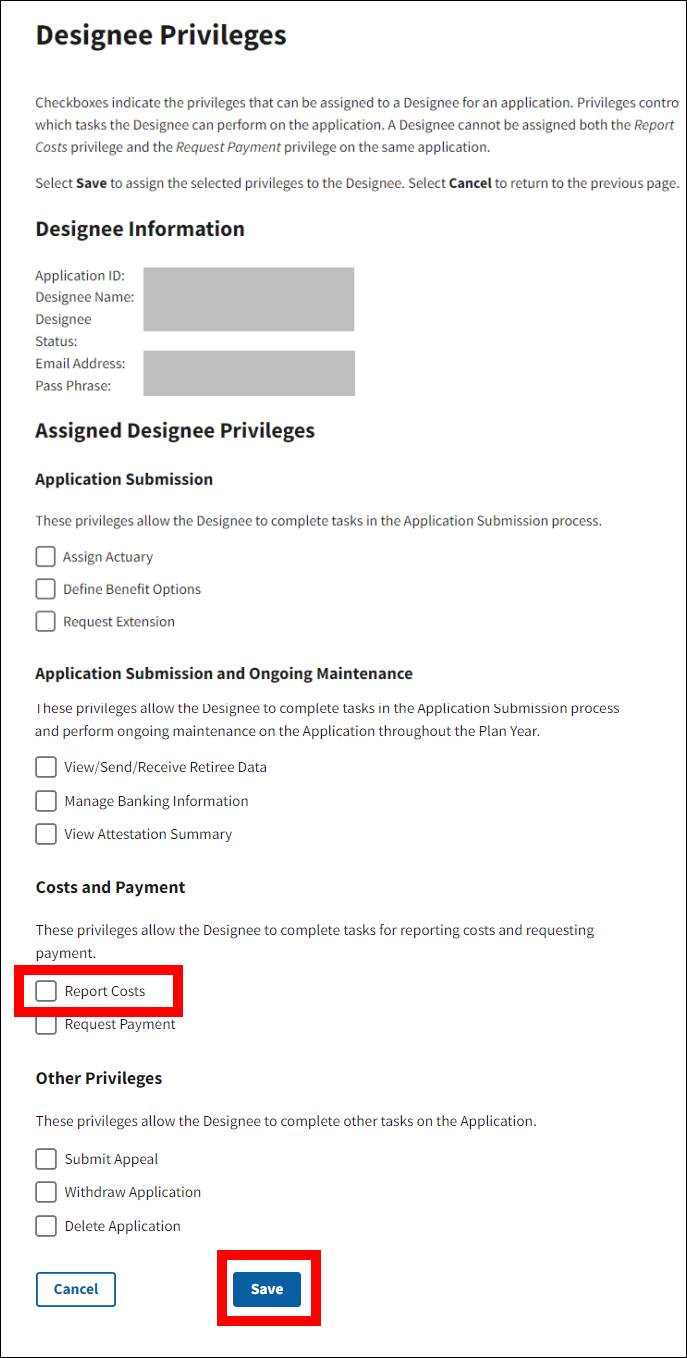
On the Designee Privileges page:
-
In the Costs and Payment section:
- Select the Request Payment checkbox to assign the Designee as a Payment Requester for the application.
- Ensure the Report Costs checkbox is deselected.
Note: Only one Costs and Payment checkbox can be selected for the Designee.
-
Select Save.
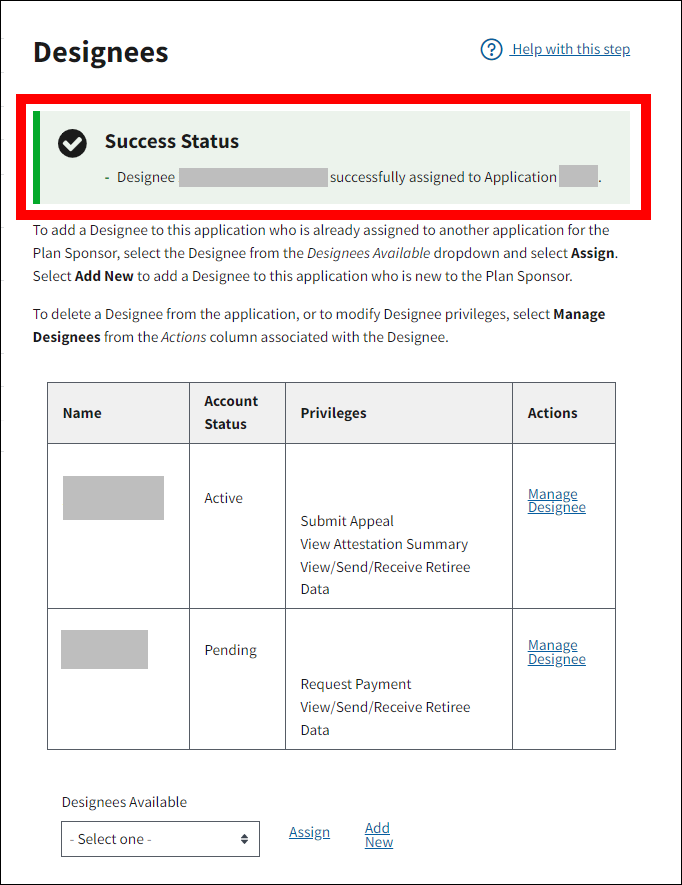
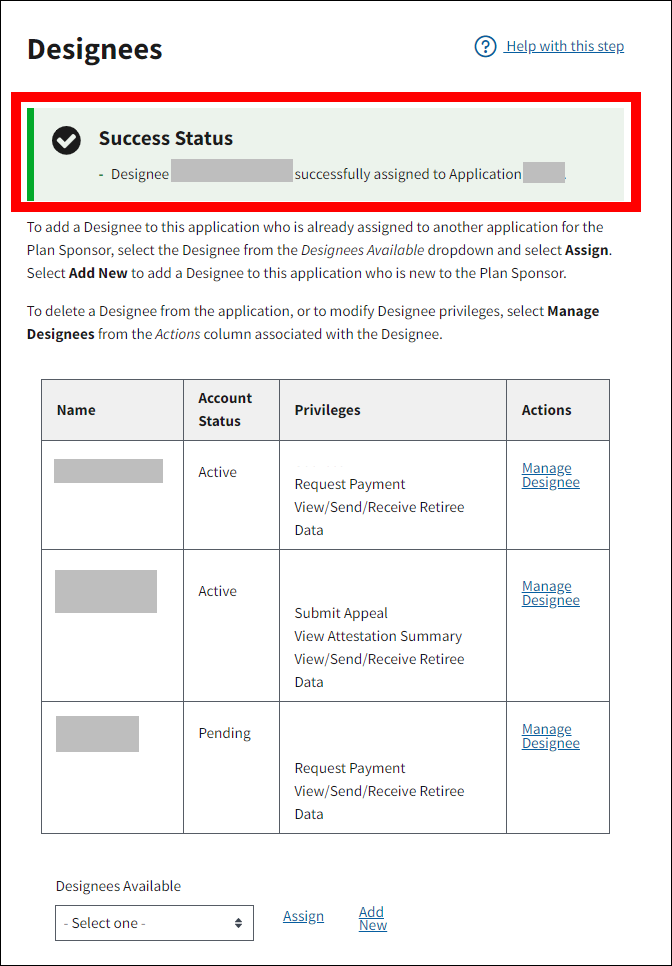
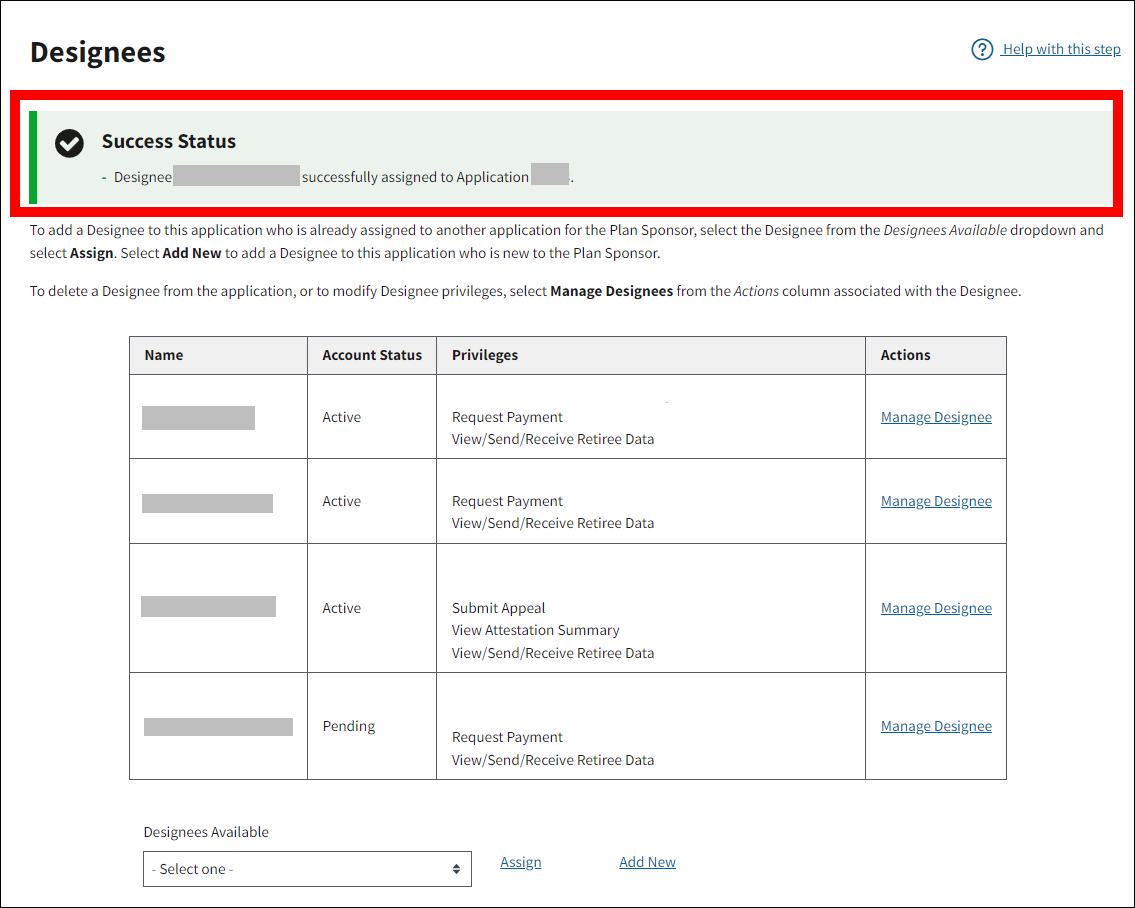
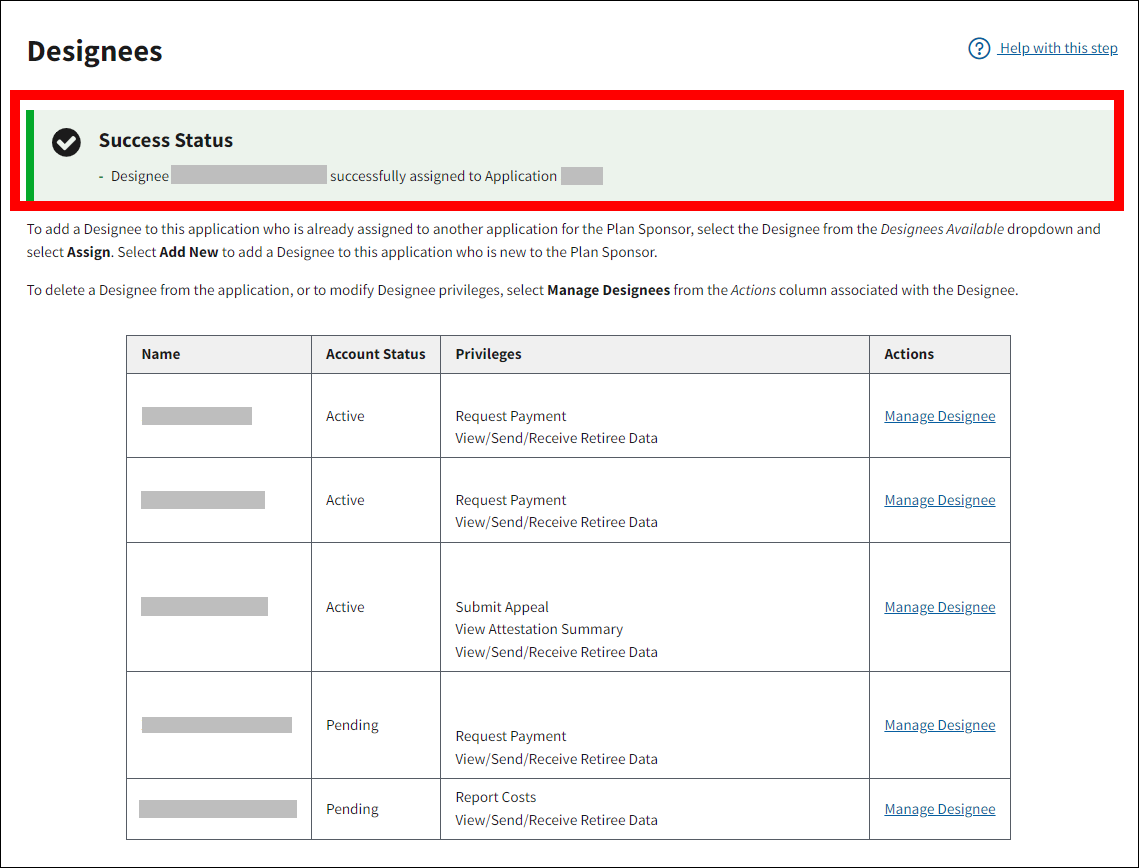
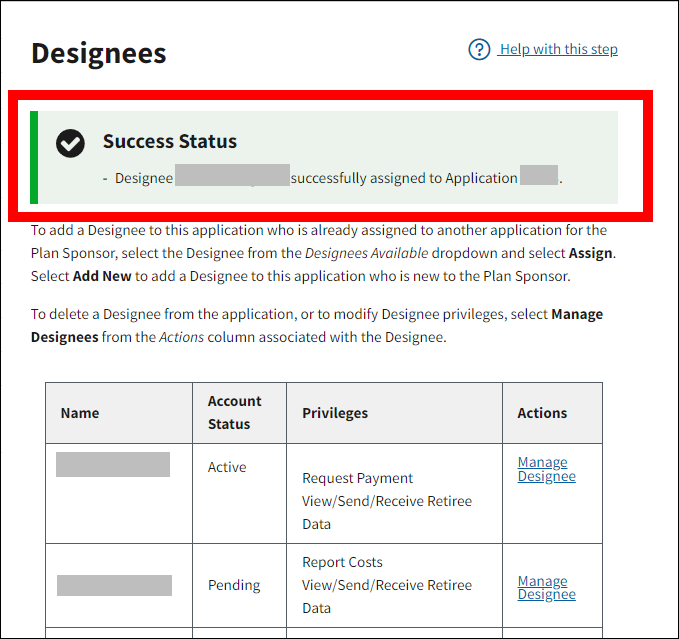
On the Designees page:
-
A Success message will display on the Designees page stating that the Designee has been assigned to the application. Payment-related privileges assigned to the Designee for the application can also be confirmed on the Payment Requesters page or the Identify Cost Reports page depending on the privilege.
Or
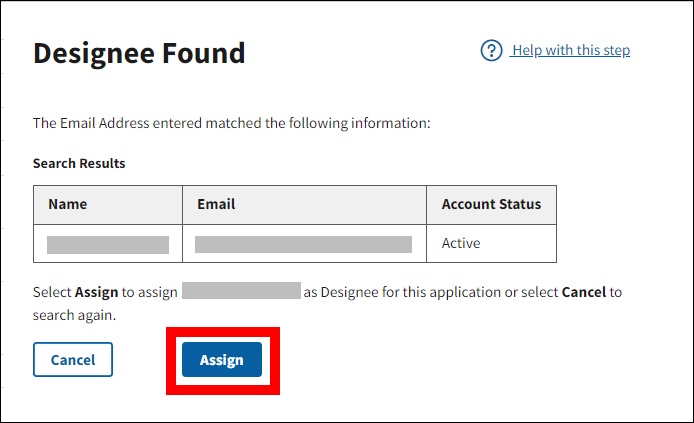
If Designee Found, on the Designee Found page:
-
Select Assign or select Cancel to return to the Add New Designee page.
On the Designee Privileges page:
-
In the Costs and Payment section:
- Select the Request Payment checkbox to assign the Designee as a Payment Requester for the application.
- Ensure the Report Costs checkbox is deselected.
Note: Only one Costs and Payment checkbox can be selected for the Designee.
-
Select Save.
On the Designees page:
-
A Success message will display on the Designees page stating that the Designee has been assigned to the application. Payment-related privileges assigned to the Designee for the application can also be confirmed on the Payment Requesters page or the Identify Cost Reports page depending on the privilege.
Add Existing Plan Sponsor Designee(s) and Assign Request Payment Privilege
On the Payment Setup page:
-
Select Payment Requesters.
On the Payment Requesters page:
-
Select Designees.
On the Designees page:
-
Review the Designees table. This table displays all Designees currently assigned to the application.
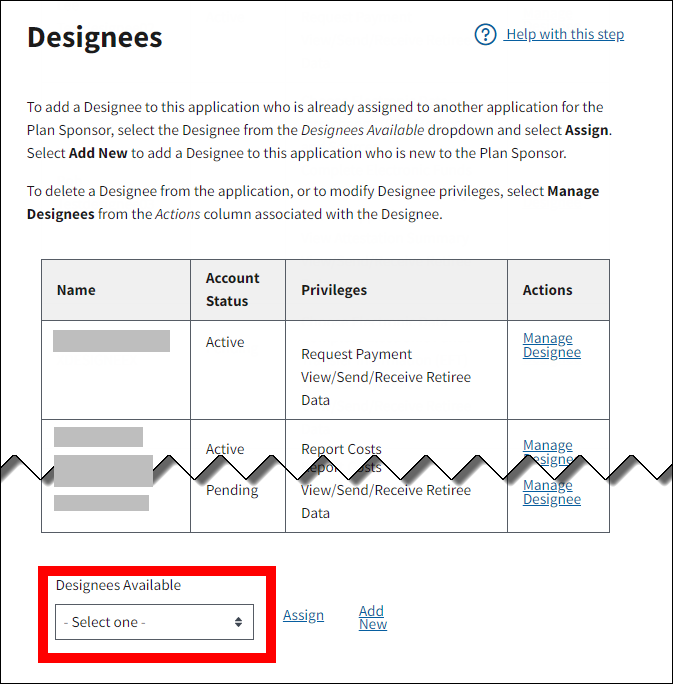
-
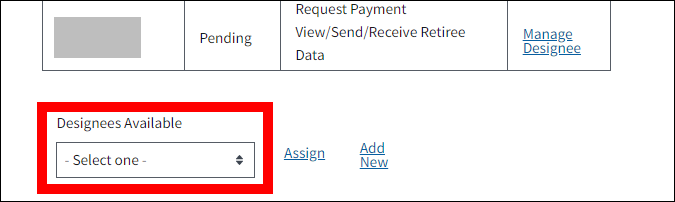
Select the Designees Available dropdown menu to see a list of available Designees associated with the Plan Sponsor account who are not currently assigned to the application.
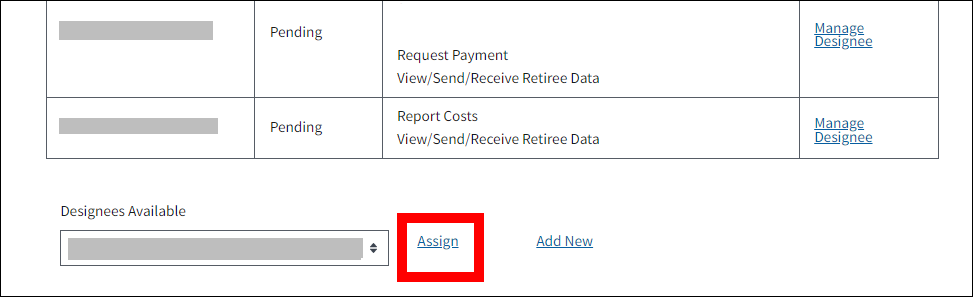
-
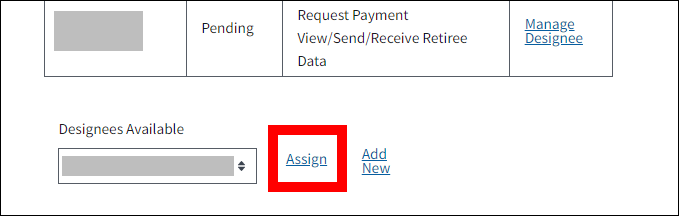
Select a Designee from the Designees Available dropdown menu, then select Assign.
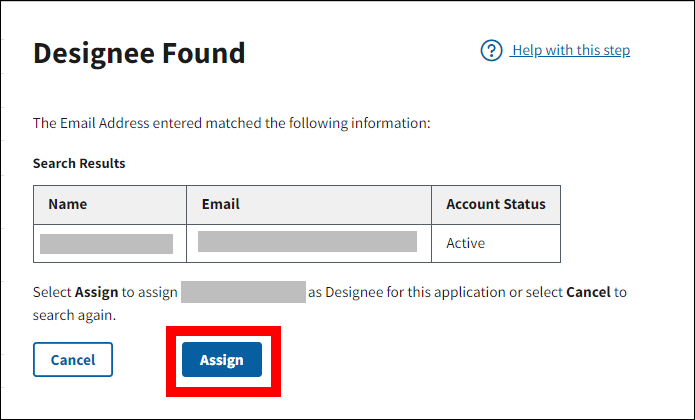
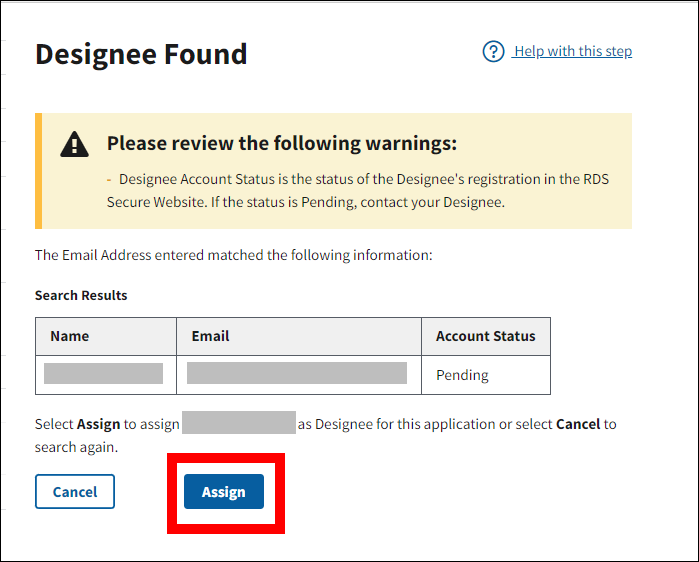
On the Designee Found page:
-
Select Assign to assign the Designee to this application, or select Cancel to search again.
On the Designee Privileges page:
-
In the Costs and Payment section:
- Select the Request Payment checkbox to assign the Designee as a Payment Requester for the application.
- Ensure the Report Costs checkbox is deselected.
Note: Only one Costs and Payment checkbox can be selected for the Designee.
-
Select Save.
On the Designees page:
-
A Success message will display on the Designees page stating that the Designee has been assigned to the application. Payment-related privileges assigned to the Designee for the application can also be confirmed on the Payment Requesters page and the Identify Cost Reports page depending on the privilege.
Complete Payment Setup: Identify Cost Reporters
In this step, the Plan Sponsor will view the individuals that have been granted the Report Costs privilege and choose to assign Plan Sponsor Designees, Vendors, and Vendor Designees as cost reporters for the application. If the Account Manager has already been assigned the Report Costs privilege for the application, assignment of Plan Sponsor Designee Cost Reporters, Vendor Cost Reporters, and Vendor Designee Cost Reporters is optional.
A Designee can be assigned either the Report Costs or the Request Payment privilege, but not both privileges on the same application. A Designee must be assigned the Report Costs privilege in this step to report costs for the application to CMS' RDS Center.
A Vendor may report cost data using Data Entry or Connect:Direct. A Vendor is required to request a Vendor ID from CMS' RDS Center. Each Vendor ID has a pre-associated cost data submission method as specified by the Vendor. For example, a Vendor utilizing each method for different applications might have Vendor ID A12345 to report costs via Connect:Direct for one, and Vendor ID A56789 to report costs via Data Entry for the other.
A Vendor ID is required to assign a Vendor Cost Reporter or associate a Designee with a Vendor during Payment Setup. The Vendor ID is an identification number assigned to a Vendor by CMS' RDS Center as a form of verification of the Vendor's contract with the Plan Sponsor. To obtain the Vendor ID, contact the Vendor directly for this information. Verify with the Vendor which cost reporting submission method they should use for each application. The Vendor ID may vary depending on whether the Vendor is reporting costs by Data Entry or Connect:Direct.
A Vendor that wishes to receive Quick Access Reports (QAR) for consolidated cost reporting information may specify one individual who has a current and active RDS Secure Website account to be a Vendor Composite Report Recipient. The Vendor should contact their EDI Representative to facilitate this process. For more information, refer to the Quick Access Report (QAR) User Guide. Vendor Designees are required if a Vendor is reporting by the Data Entry method, but are not required for Connect:Direct submission.
The Retiree Drug Subsidy (RDS) Community Information Group (CIG) recommends Plan Sponsors assign at least one Vendor Designee the Report Costs privilege so they can verify that cost reports submitted via Connect:Direct have been accepted.
Add New Plan Sponsor Designee(s) and Assign Report Costs Privilege
On the Payment Setup page:
-
Select Identify Cost Reporters.
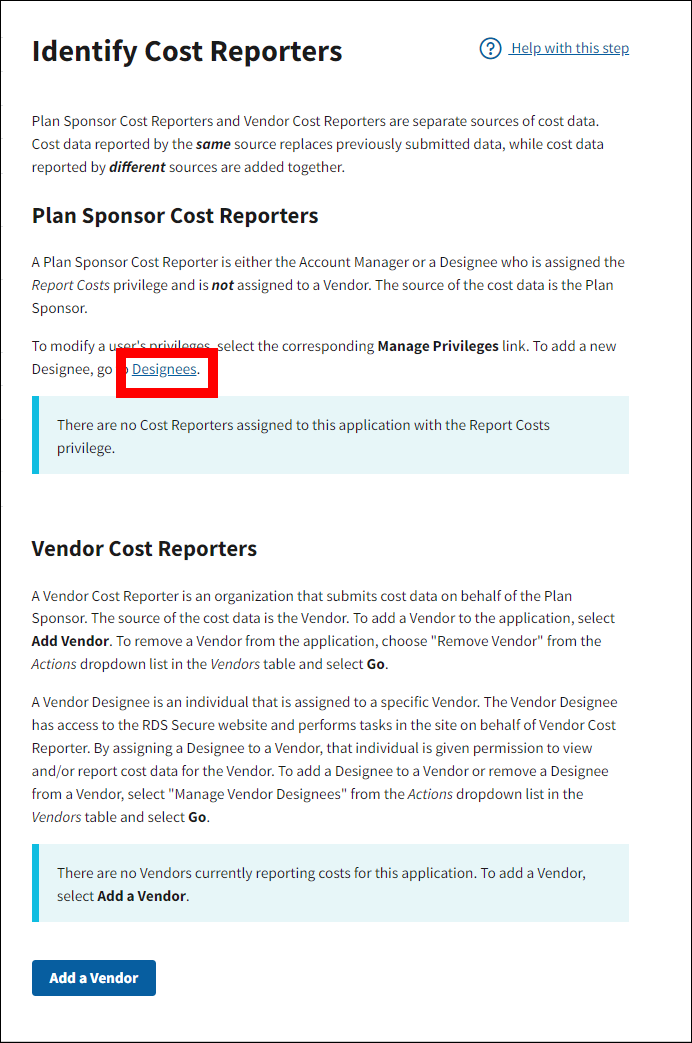
On the Identify Cost Reporters page:
-
Select Designees.
On the Designees page:
-
Select Add New.
On the Add New Designee page:
-
Enter an Email Address and select Search to determine if this individual is an established RDS Secure Website user, or select Cancel to return to the Designees page.
One of the following scenarios will occur:
- Designee Cannot Be Used: Please correct the following errors- The email addressed entered was found in the RDS SWS associated with an active user holding a different RDS Secure Website user role. This user cannot be assigned as a Designee.
- Designee Not Found: The Email address you entered can be used. Enter the required information to assign a new Designee.
- Designee Found: The Email address you entered can be used. Enter the required information to assign a new Designee.
If Designee Cannot Be Used, on the Add New Designee page:
- An error message will display stating that the Email Address entered was found in the RDS Secure Website associated with an active user holding a different RDS Secure Website user role. This user cannot be assigned as a Designee.
-
Enter a different Email Address and select Search, or select Cancel to return to the Designees page.

Or
If Designee Not Found, on the Designee Assignment Permitted page:
An asterisk (*) indicates a required field.
- *Enter the First Name.
- *Enter the Last Name.
- *Enter the Pass Phrase.
- *Re-enter Pass Phrase.
-
Select Invite, or select Cancel to return to the Add New Designee page.

On the Designee Privileges page:
-
In the Costs and Payment section:
- Select the Report Costs checkbox to assign the Designee as a Cost Reporter for the application.
- Ensure the Request Payment checkbox is deselected.
Note: Only one Costs and Payment checkbox can be selected for the Designee.
-
Select Save.
On the Designees page:
-
A Success message will display on the Designees page stating that the Designee has been assigned to the application. Payment-related privileges assigned to the Designee for the application can also be confirmed on the Payment Requesters page or the Identify Cost Reports page depending on the privilege.
Or
If Designee Found, on the Designee Found page:
-
Select Assign or select Cancel to return to the Add New Designee page.
On the Designee Privileges page:
-
In the Costs and Payment section:
- Select the Report Costs checkbox to assign the Designee as a Cost Reporter for the application.
- Ensure the Request Payment checkbox is deselected.
Note: Only one Costs and Payment checkbox can be selected for the Designee.
-
Select Save.
On the Designees page:
-
A Success message will display on the Designees page stating that the Designee has been assigned to the application. Payment-related privileges assigned to the Designee for the application can also be confirmed on the Payment Requesters page or the Identify Cost Reports page depending on the privilege.
Add Existing Plan Sponsor Designee(s) and Assign Report Costs Privilege
On the Payment Setup page:
-
Select Identify Cost Reporters.

On the Identify Cost Reporters page:
-
Select Designees.
On the Designees page:
-
Review the Designees table. This table displays all Designees currently assigned to the application.
-
Select the Designees Available dropdown menu to see a list of available Designees associated with the Plan Sponsor account who are not currently assigned to the application.
-
Select a Designee from the Designees Available dropdown menu, then select Assign.
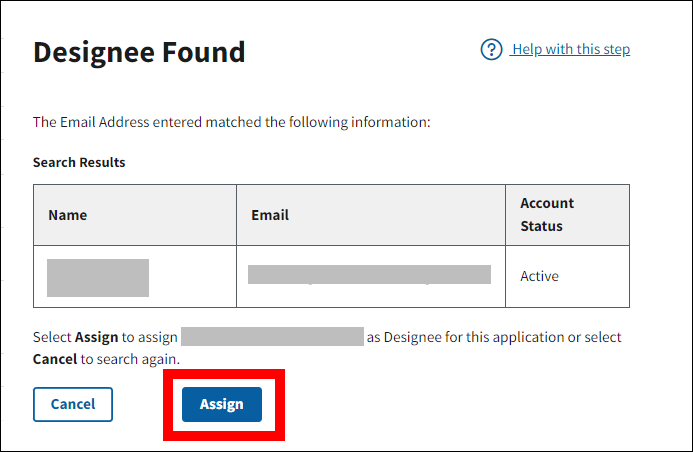
On the Designee Found page:
-
Select Assign to assign the Designee to this application, or select Cancel to search again.
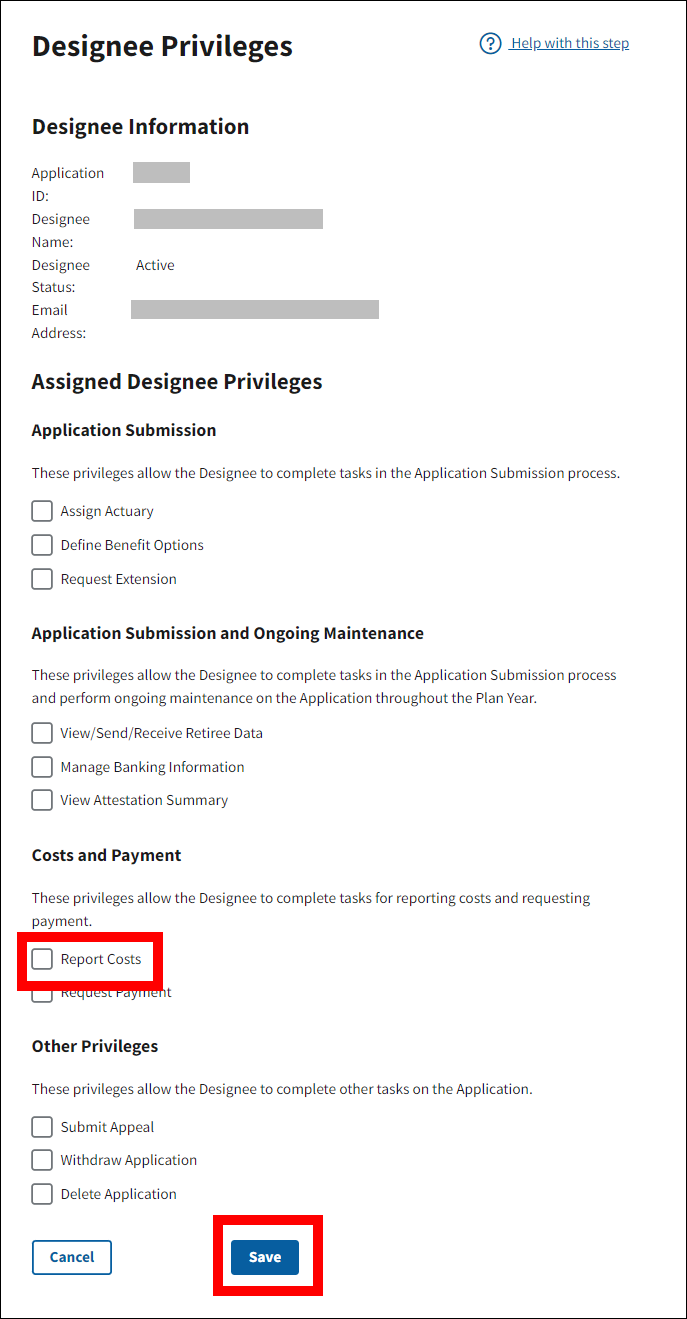
On the Designee Privileges page:
-
In the Costs and Payment section:
- Select the Report Costs checkbox to assign the Designee as a Cost Reporter for the application.
- Ensure the Request Payment checkbox is deselected.
Note: Only one Costs and Payment checkbox can be selected for the Designee.
-
Select Save.
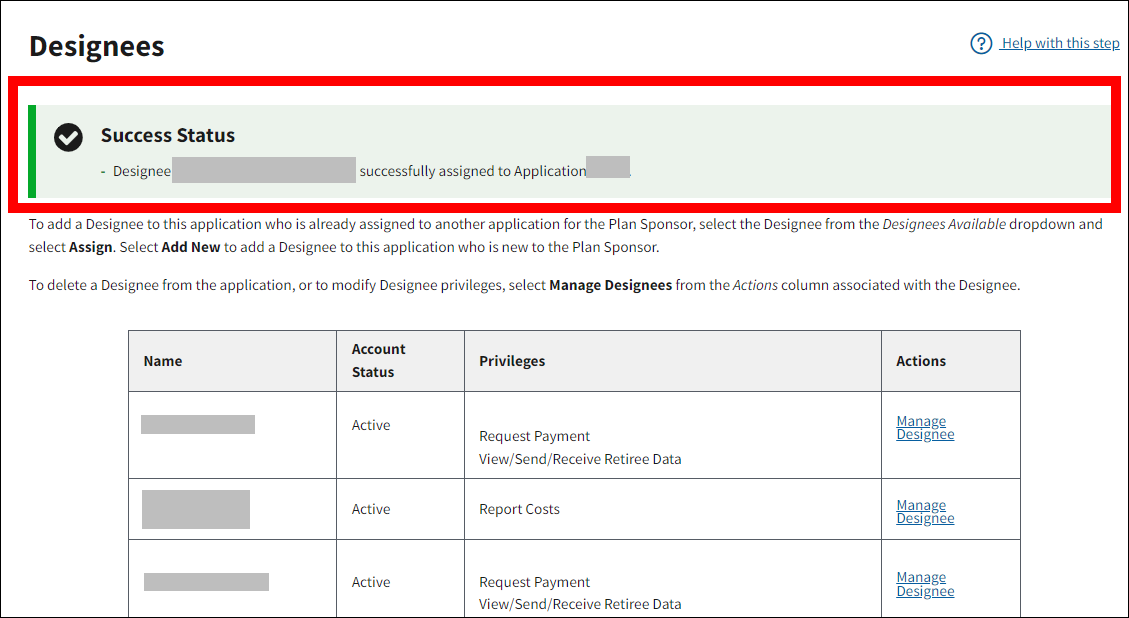
On the Designees page:
-
A Success message will display on the Designees page stating that the Designee has been assigned to the application. Payment-related privileges assigned to the Designee for the application can also be confirmed on the Payment Requesters page and the Identify Cost Reports page depending on the privilege.
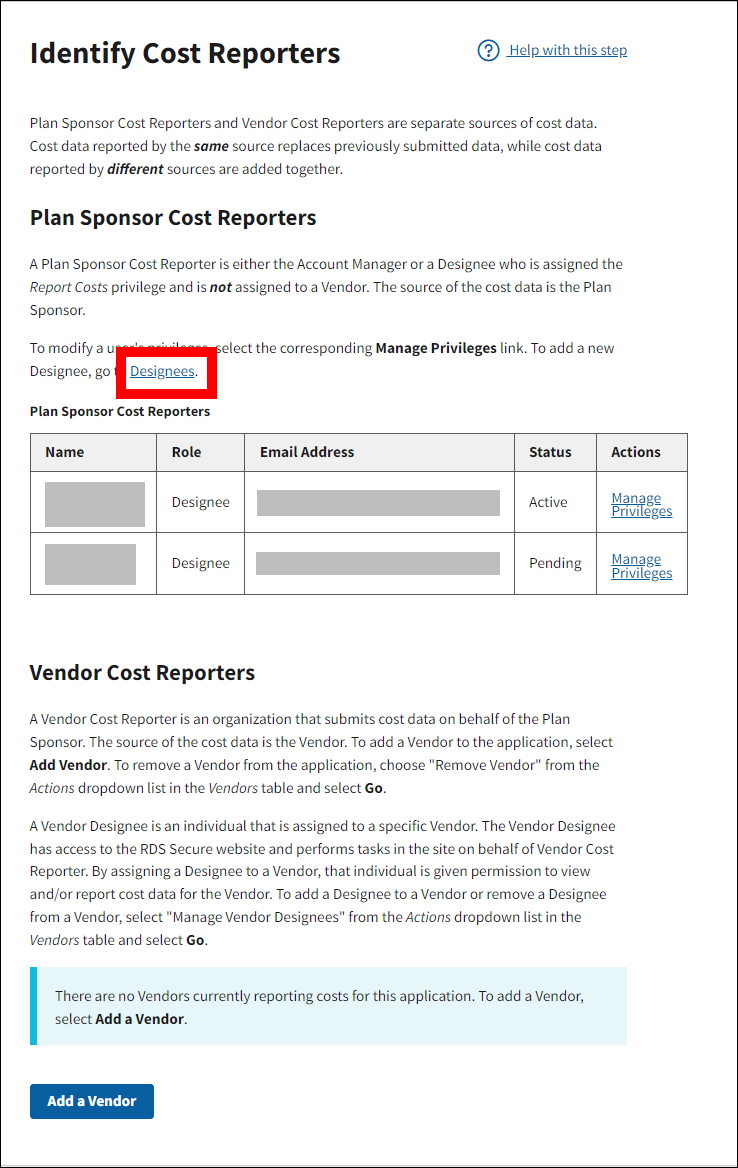
Add Vendor Cost Reporter(s)
On the Payment Setup page:
-
Select Identify Cost Reporters.

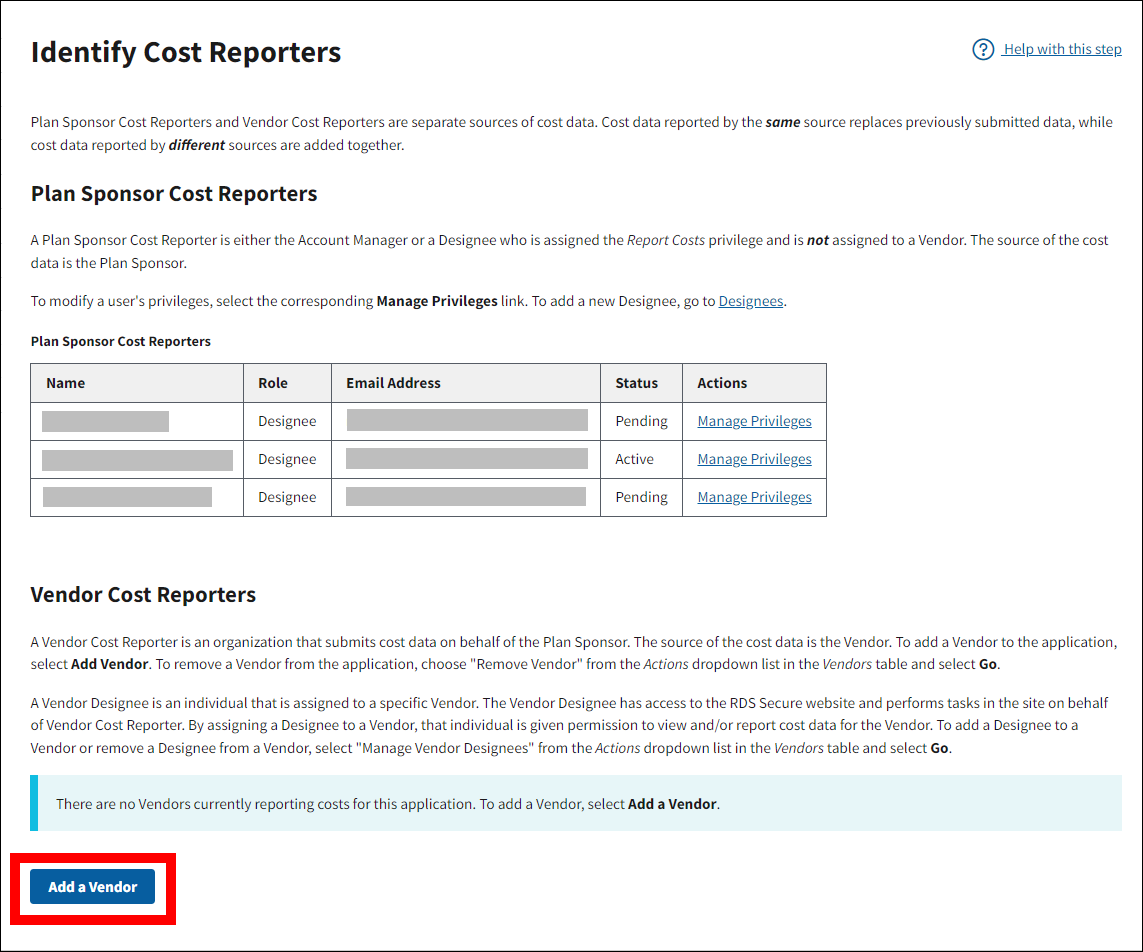
On the Identify Cost Reporters page:
-
Select Add a Vendor.
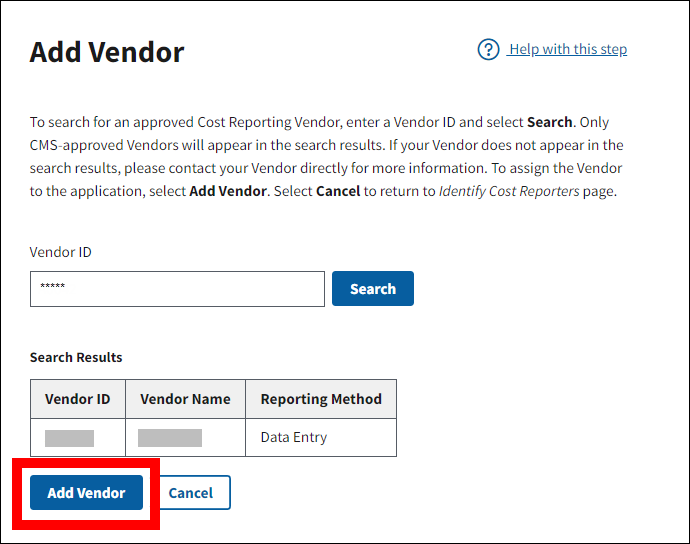
On the Add Vendor page:
-
Enter the Vendor ID and then select Search.
Note: Only CMS-approved Vendors will appear in the search results. If your Vendor does not appear in the search results, please contact your Vendor directly for more information.
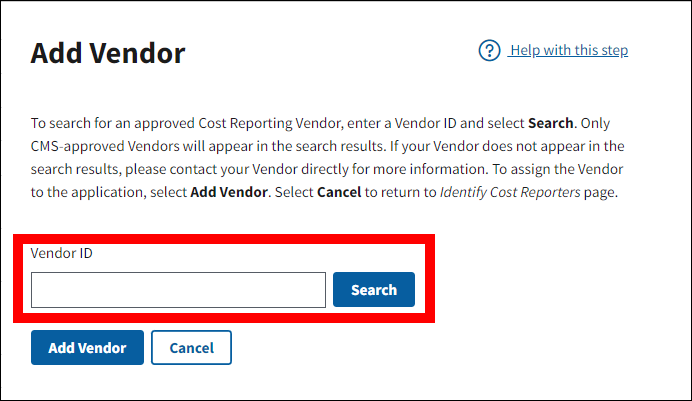
-
If the Vendor ID was found and the Vendor ID, Vendor Name, and Reporting Method displayed in the Search Results are correct, select Add Vendor. If the Vendor information is not correct, re-enter the Vendor ID and select Search, or select Cancel to return to the Identify Cost Reporters page.
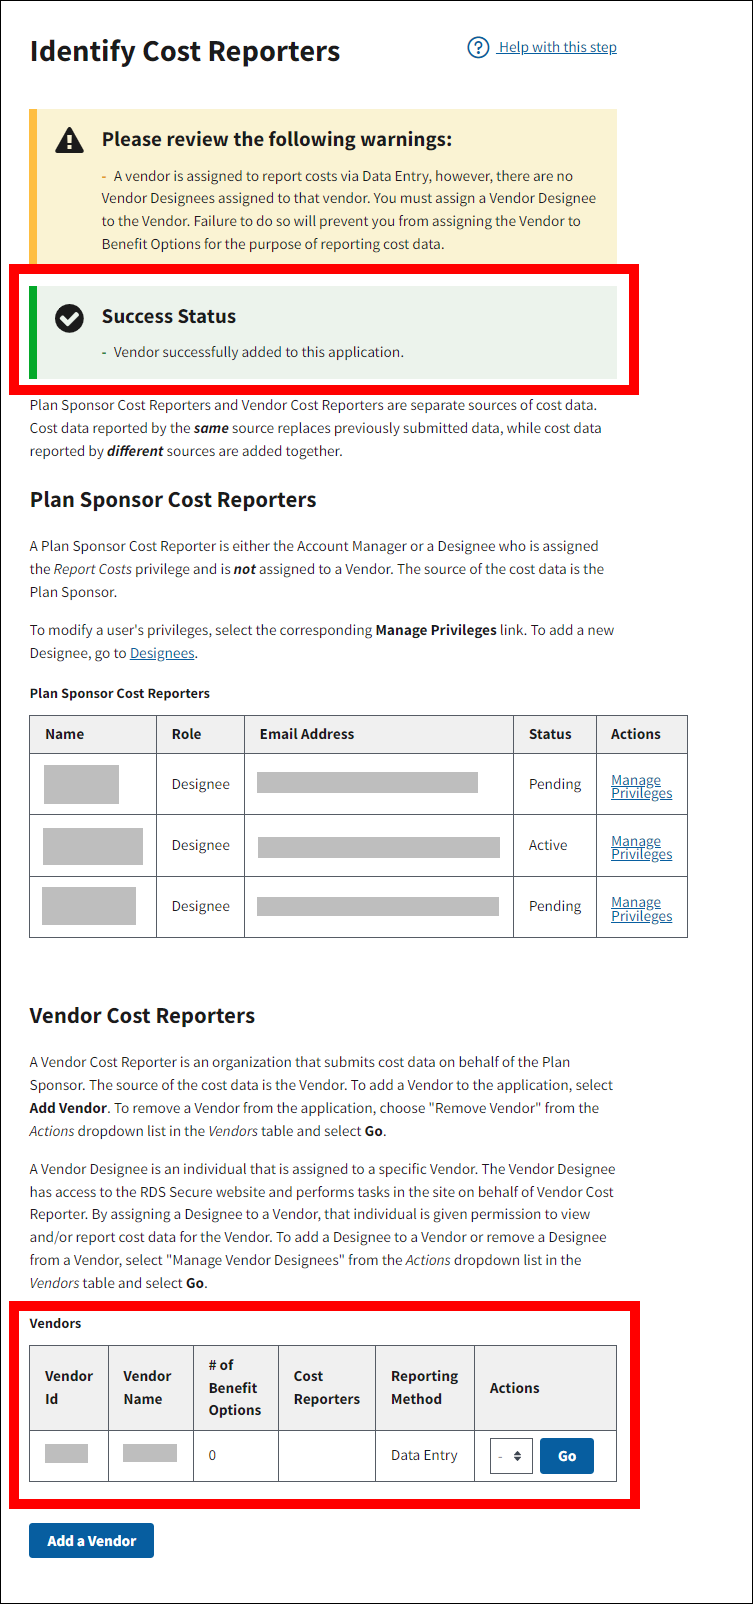
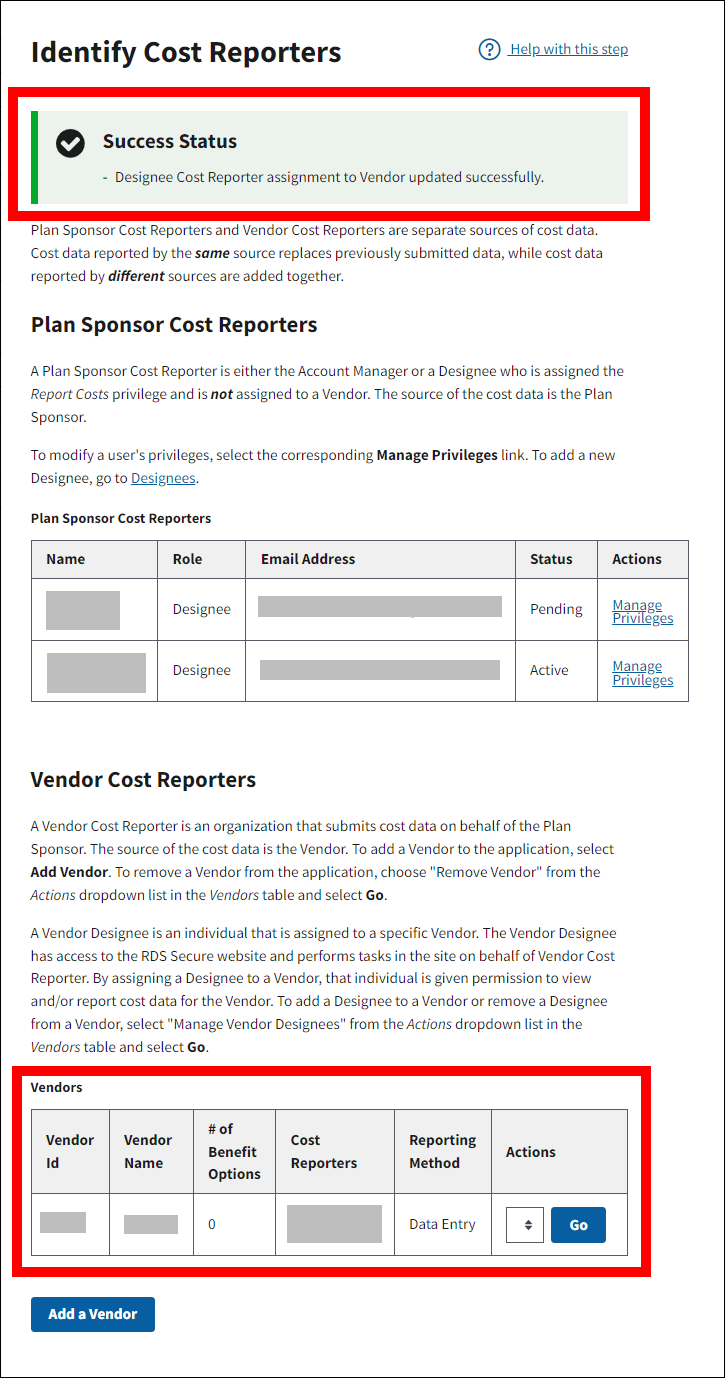
On the Identify Cost Reporters page:
-
A Success message will display on the Identify Cost Reporters page stating that the Vendor Cost Reporter has been added to the application and the Vendors table refreshes to display the Vendor’s information.
Manage Vendor Designee(s)
On the Payment Setup page:
-
Select Identify Cost Reporters.

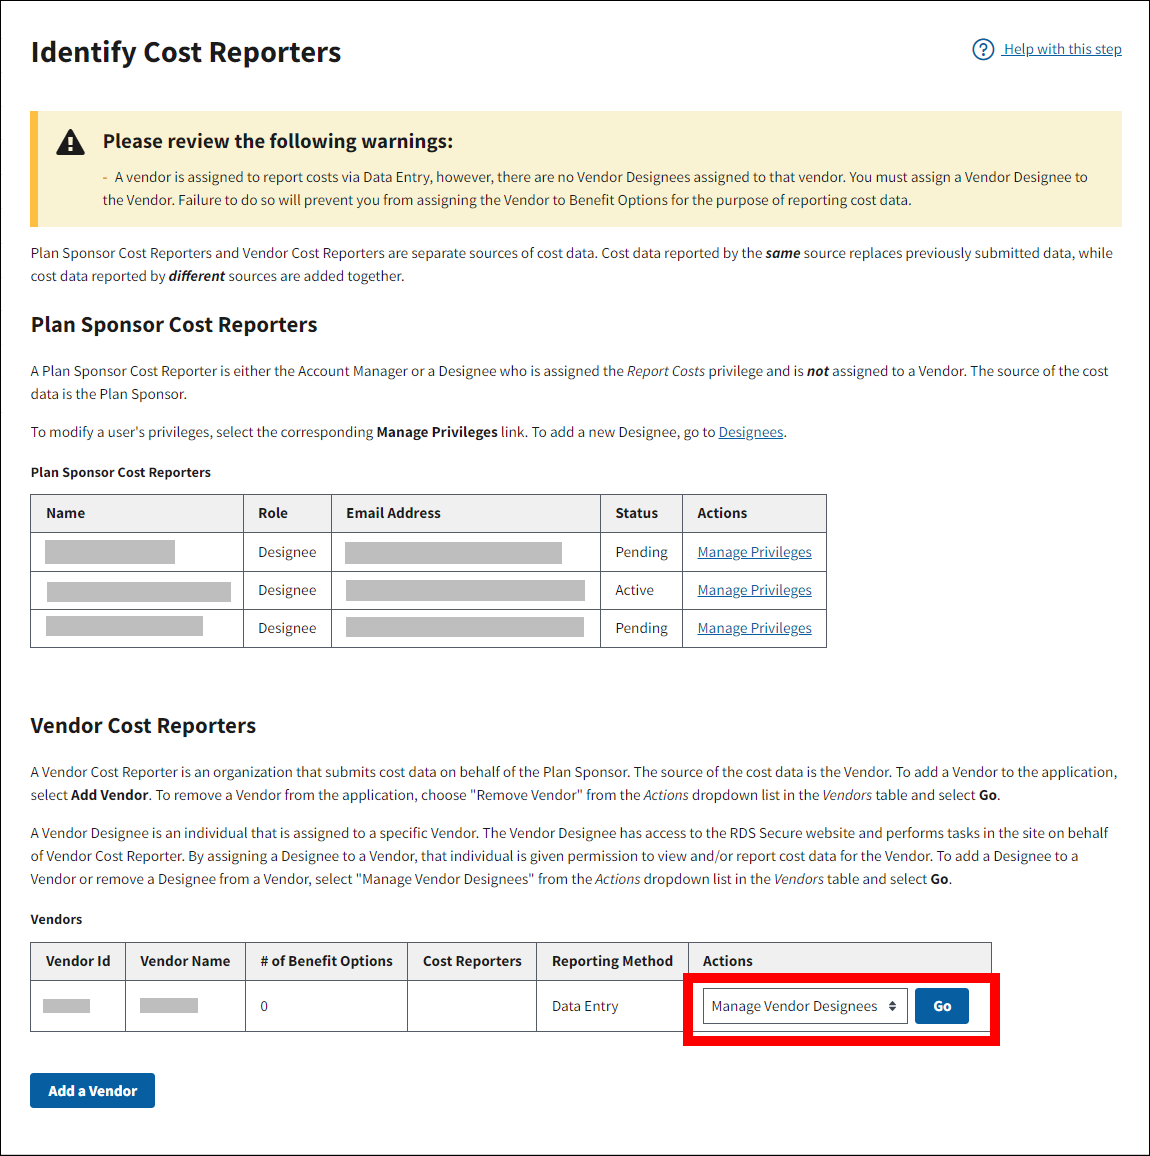
On the Identify Cost Reporters page:
-
To add or remove a Vendor Designee, select Manage Vendor Designee from the corresponding Actions dropdown in the Vendors table and select Go.
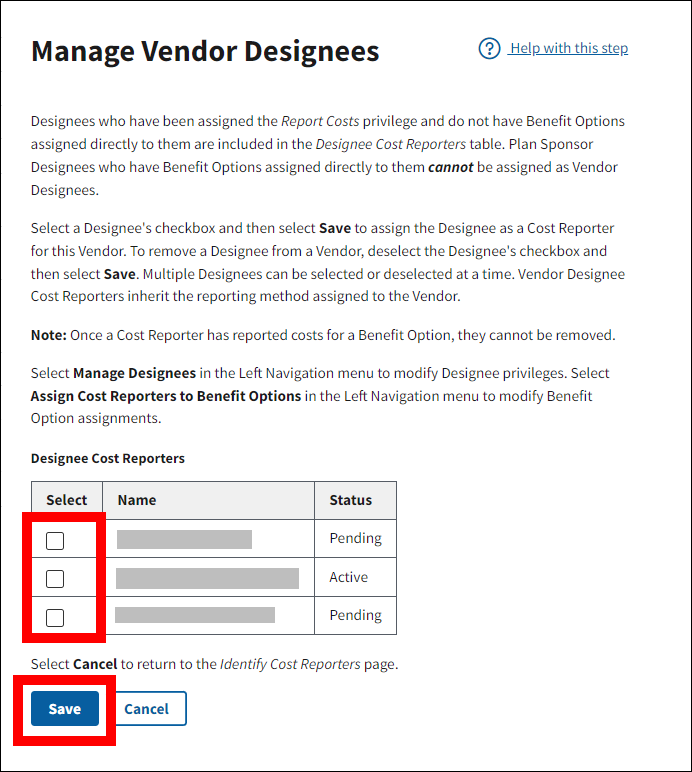
On the Manage Vendor Designees page:
-
Select a Designee’s checkbox and then select Save to assign the Designee as a Vendor Designee Cost Reporter for this Vendor. The Vendor Designee inherits the reporting method assigned to the Vendor. You can assign multiple Designees at a time. If the desired Designee is not listed, select Manage Designees to add a Designee. Select Cancel to return to the Identify Cost Reporters page.
On the Identify Cost Reporters page:
-
A Success message will display on the Identify Cost Reporters page stating that the Vendor Designee has been added to the application and the Vendors table refreshes to display the Vendor Designee’s information.
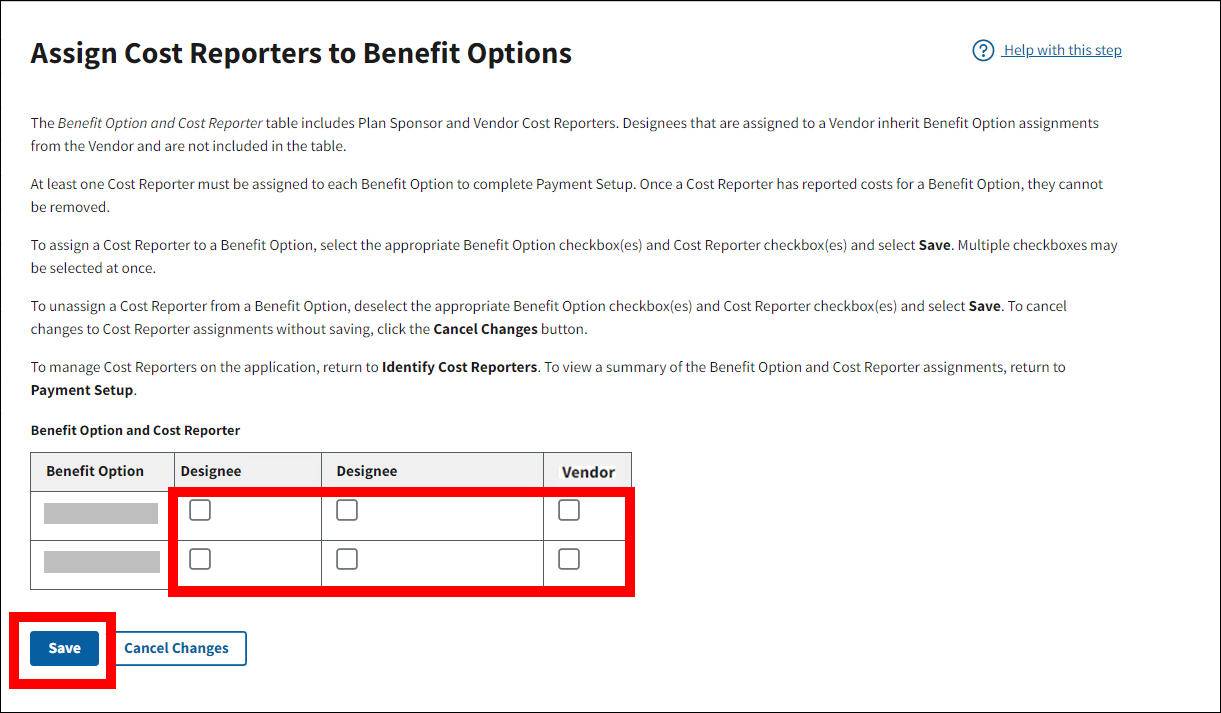
Complete Payment Setup: Assign Cost Reporters to Benefit Options
In this step, the Plan Sponsor is required to report to CMS' RDS Center who is providing the cost data for each Benefit Option. Benefit Options can be assigned to Plan Sponsor Cost Reporters and/or Vendor Cost Reporters.
On the Payment Setup page:
-
Select Assign Cost Reporters to Benefit Options.
On the Assign Cost Reporters to Benefit Options page:
-
To assign a Cost Reporter to a Benefit Option, select the appropriate checkbox(es) for the corresponding Benefit Option and Cost Reporter and select Save, or select Cancel Changes to revert to the previously saved Cost Reporter assignments. To unassign a Cost Reporter from a Benefit Option, deselect the appropriate checkbox(es) for the corresponding Benefit Option and Cost Reporter and select Save, or select Cancel Changes to revert to the previously saved Cost Reporter assignments.
-
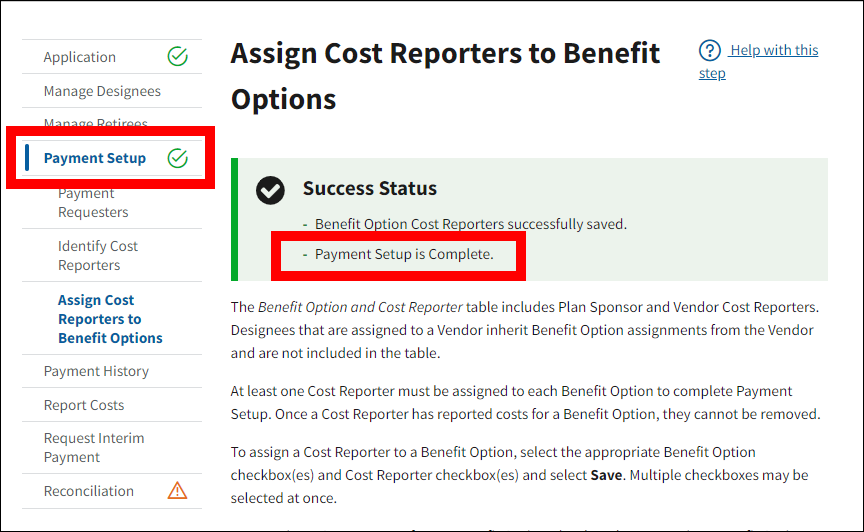
A Success message will display on the Assign Cost Reporters to Benefit Options page stating that Benefit Option Cost Reporters have been saved to the application.
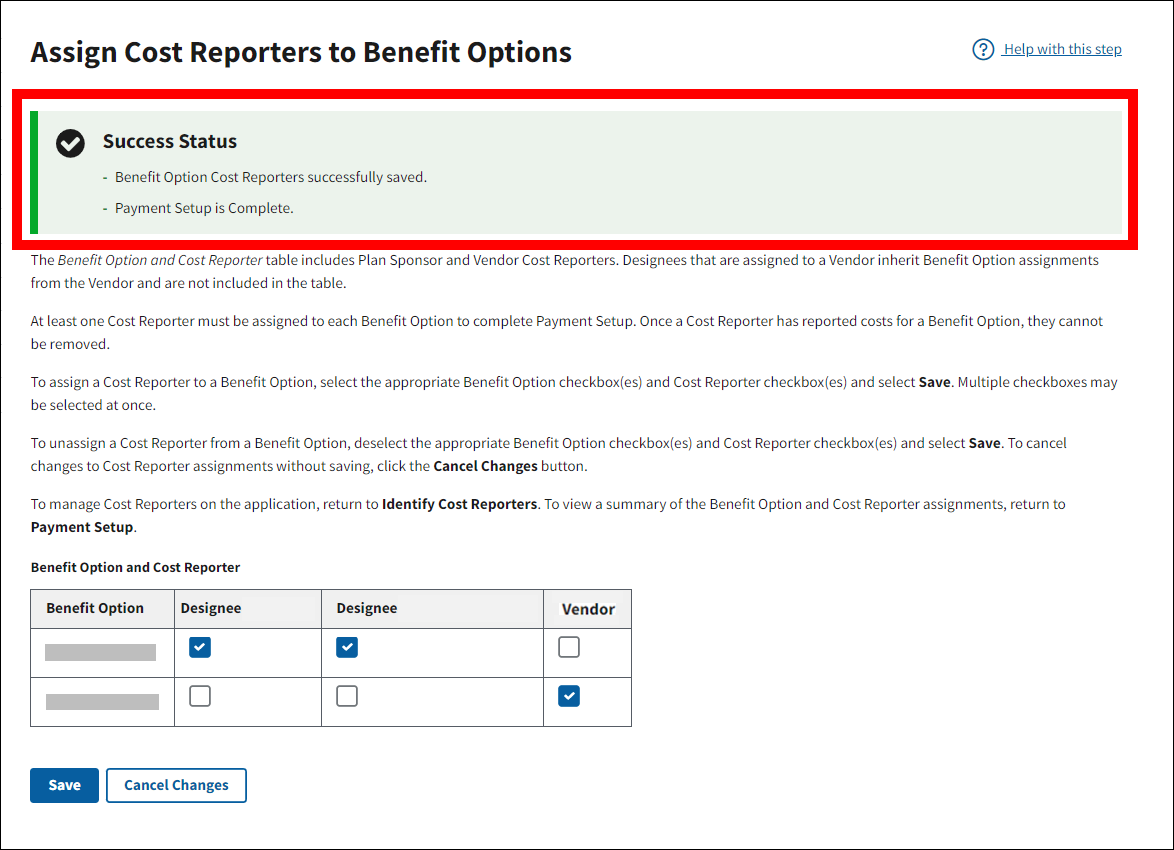
-
If all required Payment Setup steps are complete, a Success message will display on the Assign Cost Reporters to Benefit Options page stating that Payment Setup is complete.
Manage Designees: Change Payment/Cost Privilege
On the Payment Setup page:
-
Select Payment Requesters.
On the Payment Requesters page:
-
Review the Plan Sponsor Payment Requesters table. The Plan Sponsor Payment Requesters table displays all individuals who have been granted the Request Payment privilege by the Plan Sponsor. These individuals are not permitted to report costs.
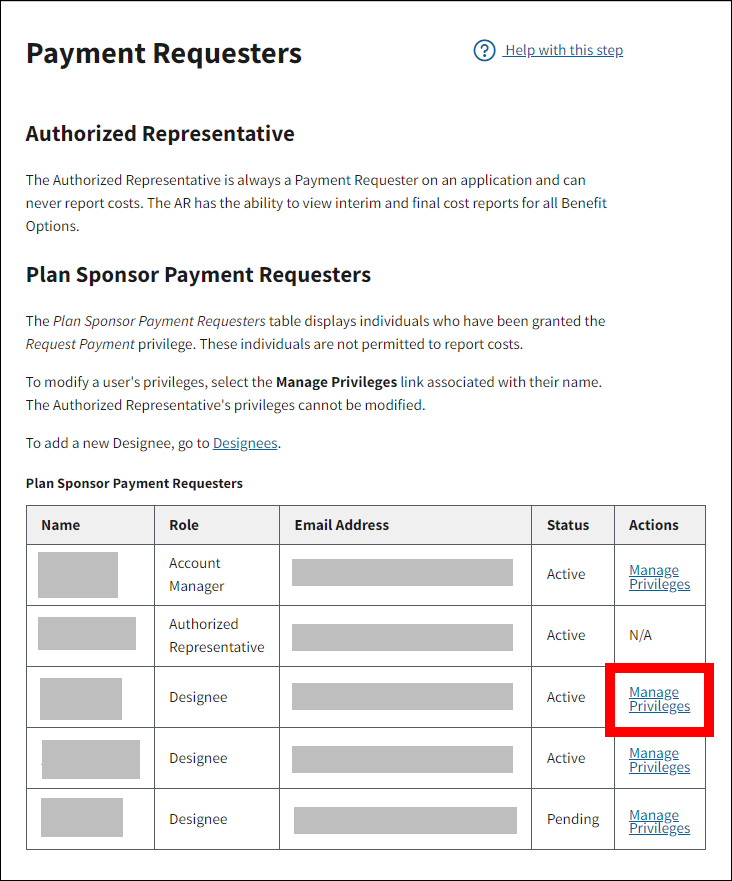
-
If you wish to change an existing Designee’s privileges from Request Payment to Report Costs, select the Manage Privileges link associated with the Designee’s name.
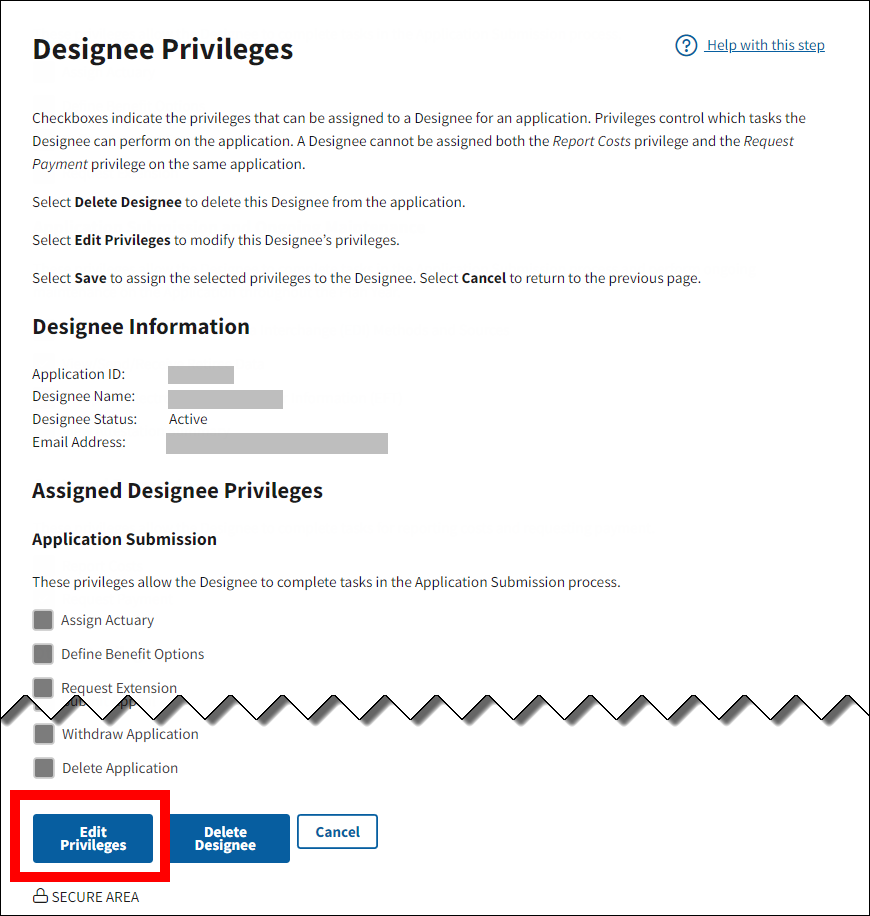
On the Designee Privileges page:
-
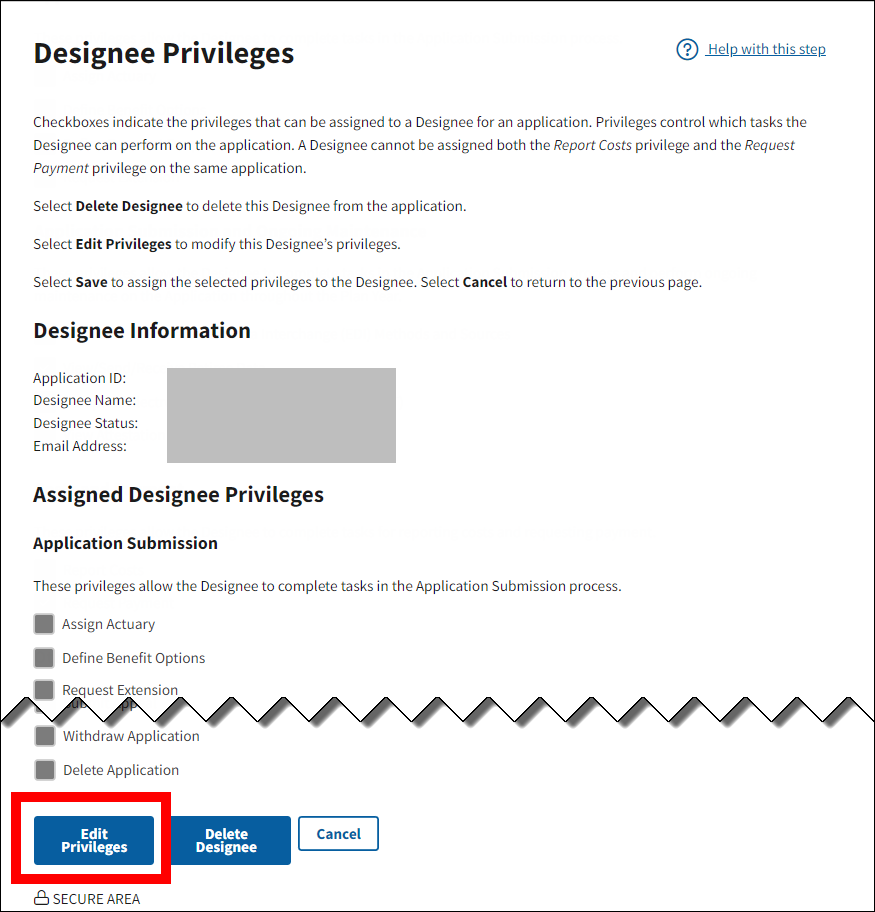
Review the Costs and Payment privileges currently assigned to the Designee in read-only mode, then select Edit Privileges.
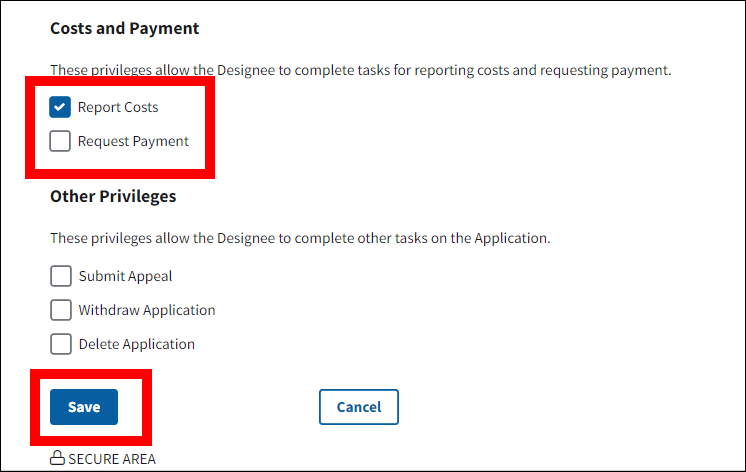
-
In the Costs and Payment section, select the Report Costs checkbox and deselect the Request Payment checkbox to assign the Designee as a Cost Reporter for the application.
Note: Only one Costs and Payment checkbox can be selected for each Designee.
-
Select Save.
- A Success message will display on the Designee Privileges page stating that the Designee’s privileges have been updated. Payment-related privileges assigned to the Designee for the application can also be confirmed on the Payment Requesters page or the Identify Cost Reports page depending on the privilege.
-
Select Cancel to return to the Payment Requesters page.

On the Payment Requesters page:
-
Select Identify Cost Reporters.
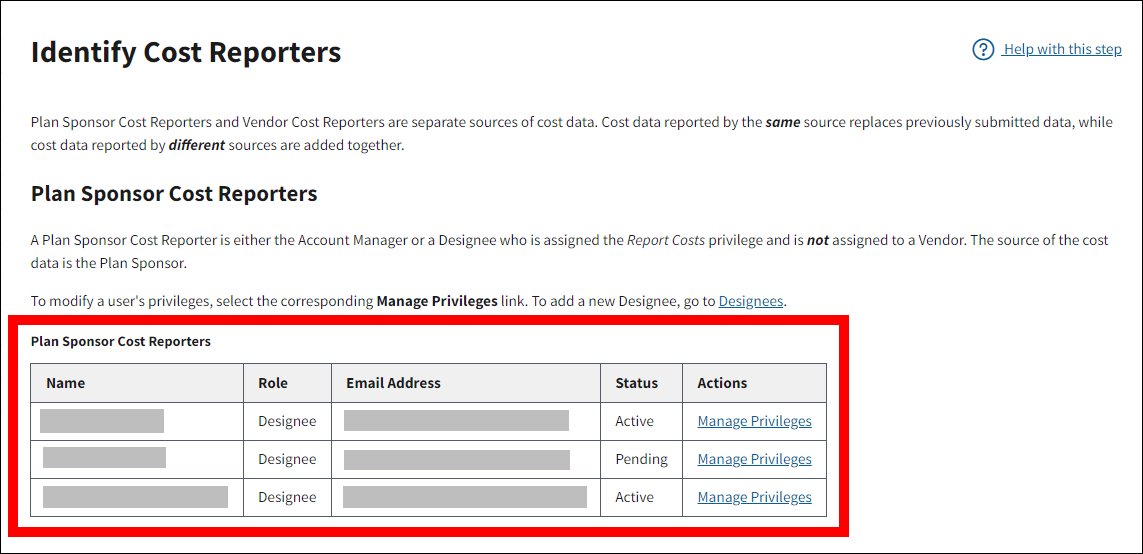
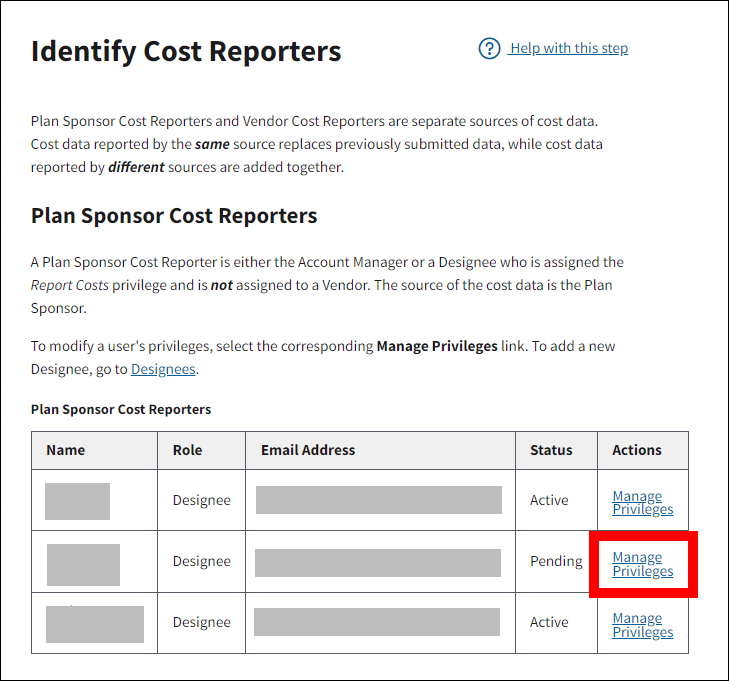
On the Identify Cost Reporters page:
-
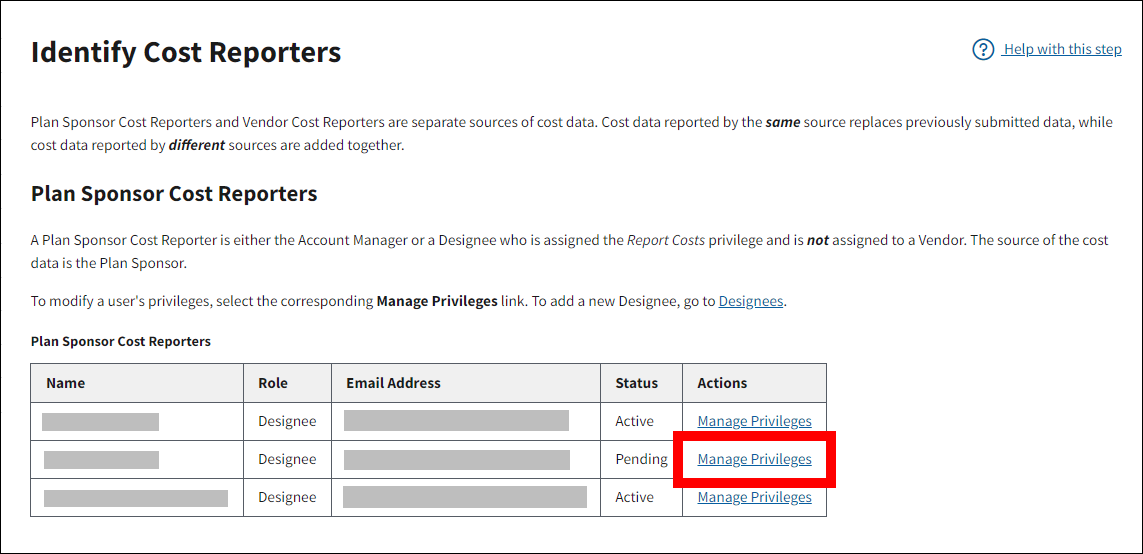
Review the Plan Sponsor Cost Reporters table. The Plan Sponsor Cost Reporters table displays all individuals who have been granted the Report Costs privilege by the Plan Sponsor, who are not assigned to a Vendor. These individuals are not permitted to request payment.
-
If you wish to change an existing Designee’s privileges from Report Costs to Request Payment, select the Manage Privileges link from the Actions column associated with the Designee’s name.
On the Designee Privileges page:
-
Review the Costs and Payment privileges currently assigned to the Designee in read-only mode, then select Edit Privileges.
-
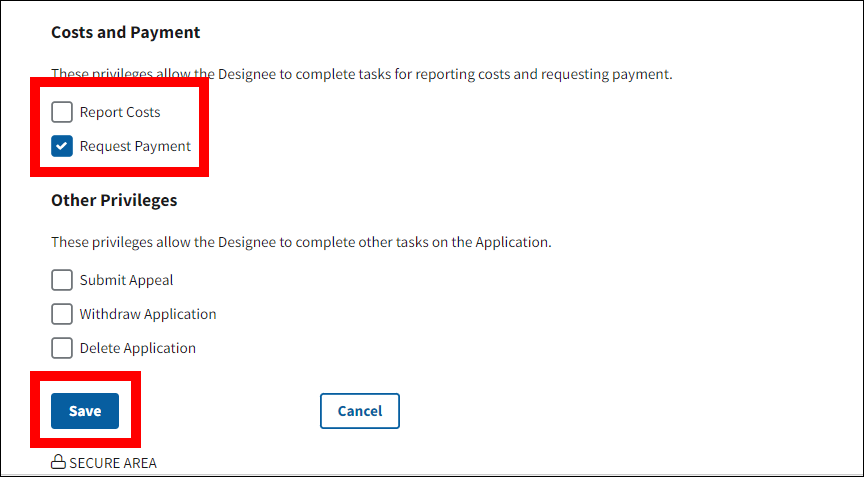
In the Costs and Payment section, select the Request Payment checkbox and deselect the Report Costs checkbox to assign the Designee as a Payment Requester for the application.
Note: Only one Costs and Payment checkbox can be selected for the Designee.
-
Select Save.
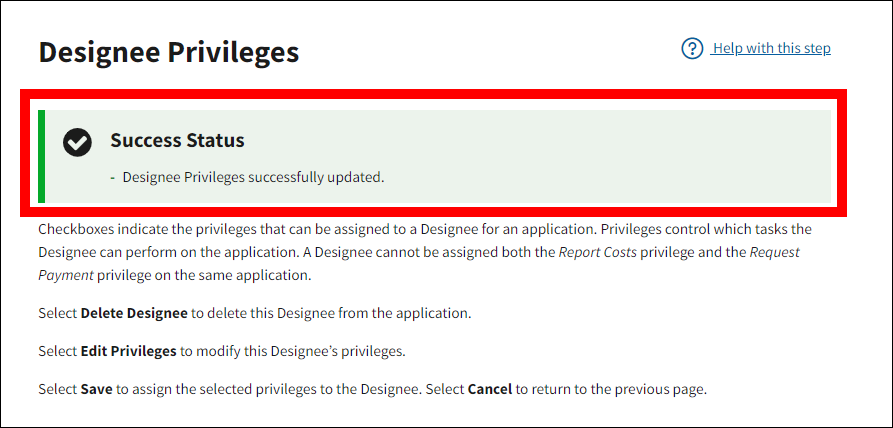
- A Success message will display on the Designee Privileges page stating that the Designee’s privileges have been updated. Payment-related privileges assigned to the Designee for the application can also be confirmed on the Payment Requesters page or the Identify Cost Reports page depending on the privilege.
-
Select Cancel to return to the Identify Cost Reporters page.
Manage Designees: Delete a Designee
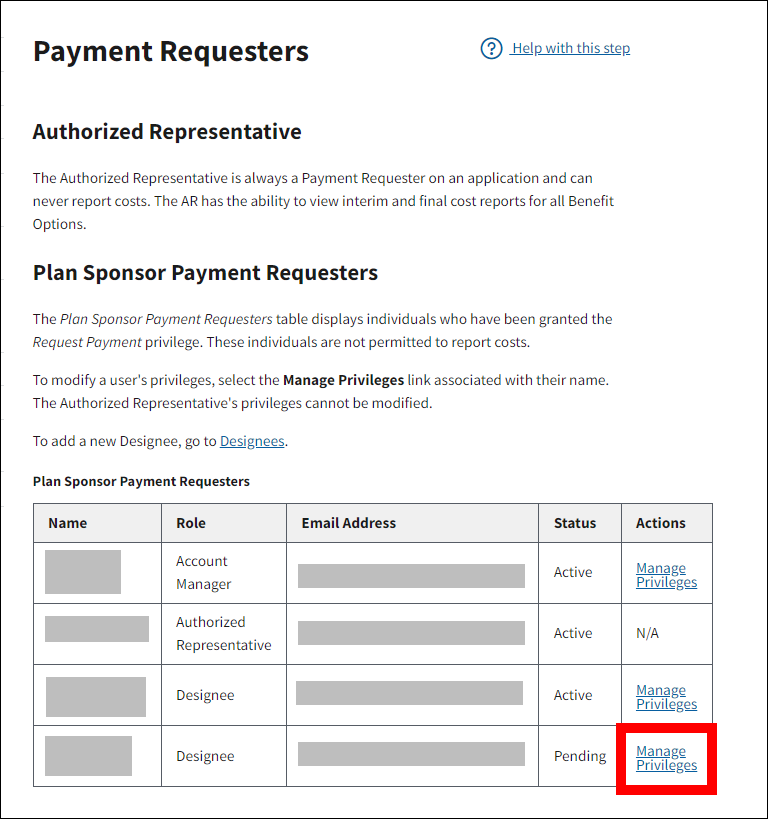
During Payment Setup, you can delete a designee from any page displaying the Designee’s name by selecting the Manage Privileges link from the Actions column associated with the Designee’s name.
Note: If the Designee is assigned to a Vendor, the Vendor assignment must first be removed before deleting the Designee. If the Designee is assigned to one or more Benefit Options but has not reported costs, the assignments must be removed before deleting the Designee. If the Designee has reported costs, the Designee can be deleted without removing the assignments.
To delete a Designee Payment Requester, on the Payment Requestors page:
-
Select the Manage Privileges link from the Actions column associated with the Designee’s name.
On the Designee Privileges page:
-
Select Delete Designee.

-
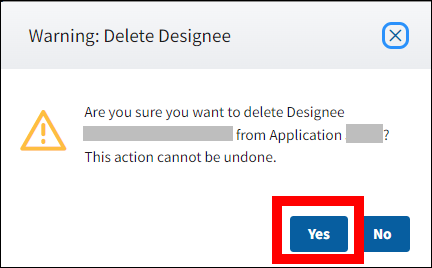
The Warning: Delete Designee pop-up message will display. Select Yes to delete this Designee, or select No to return to the Designee Privileges page.
On the Manage Designee page:
-
A Success message will display on the Manage Designees page stating that the Designee has been deleted from the application. The page also displays the names of any Active Designees associated with the Plan Sponsor account.
To delete a Designee Cost Reporter, on the Identify Cost Reporters page:
-
Select the Manage Privileges link from the Actions column associated with the Designee’s name.
On the Designee Privileges page:
-
Select Delete Designee.

-
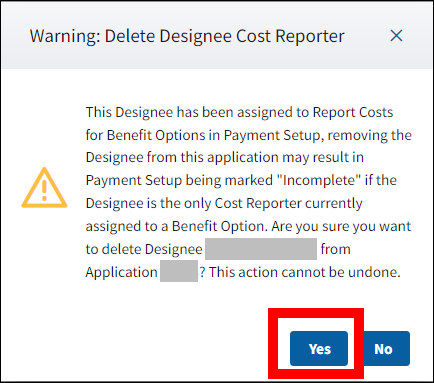
The Warning: Delete Designee Cost Reporter pop-up message will display. Select Yes to delete this Designee, or select No to return to the Designee Privileges page.
On the Manage Designee page:
-
A Success message will display on the Manage Designees page stating that the Designee has been deleted from the application. The page also displays the names of any Active Designees associated with the Plan Sponsor account.

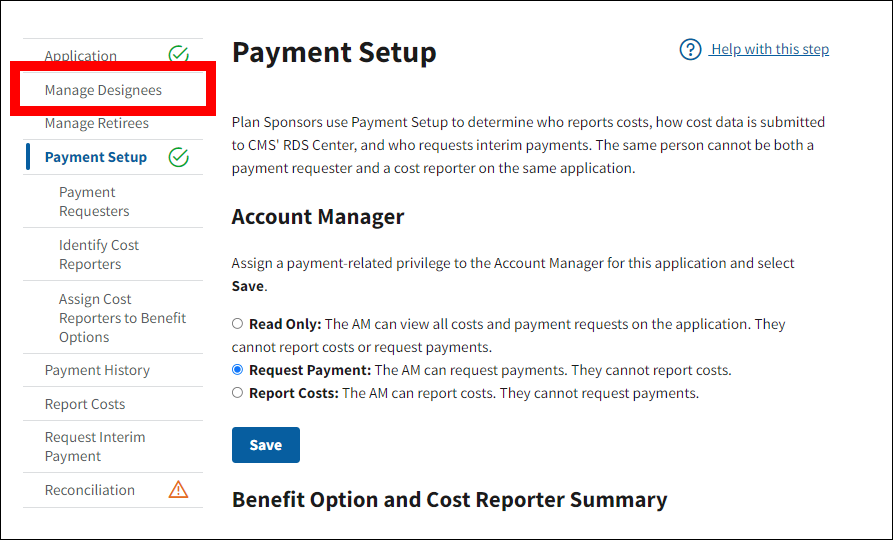
To delete a Designee using the Left Navigation section on any Payment Setup page:
-
Select Manage Designees.
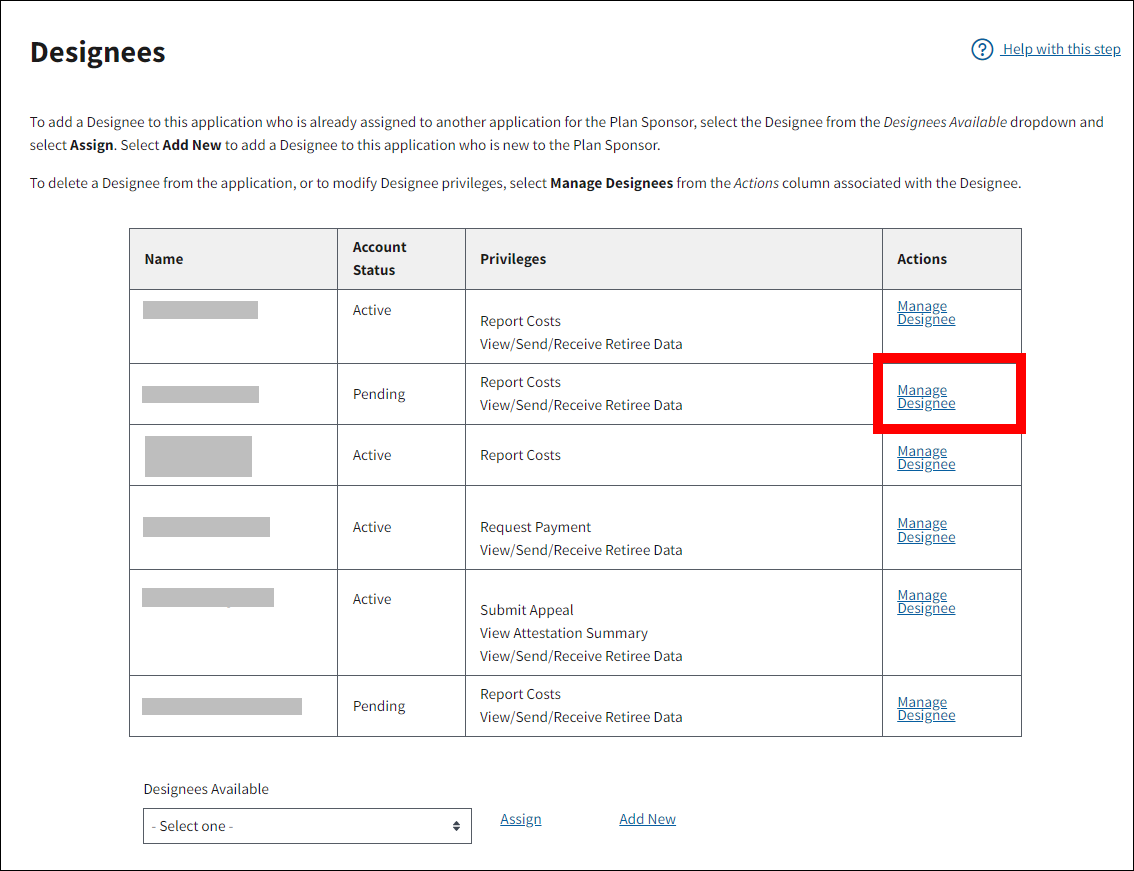
On the Designees page:
-
Select the Manage Designee link associated with the Designee’s name.
On the Designee Privileges page:
-
Select Delete Designee to delete the Designee, or select Cancel to return to the Designees page.

-
The Warning: Delete Designee Cost Reporter pop-up message will display. Select Yes to delete this Designee, or select No to return to the Designee Privileges page.

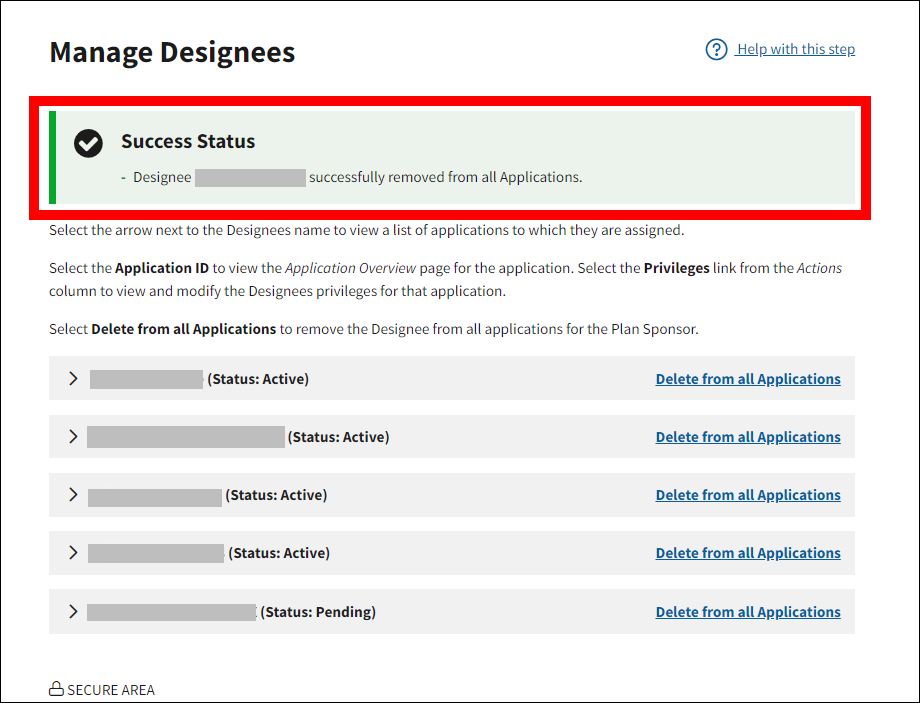
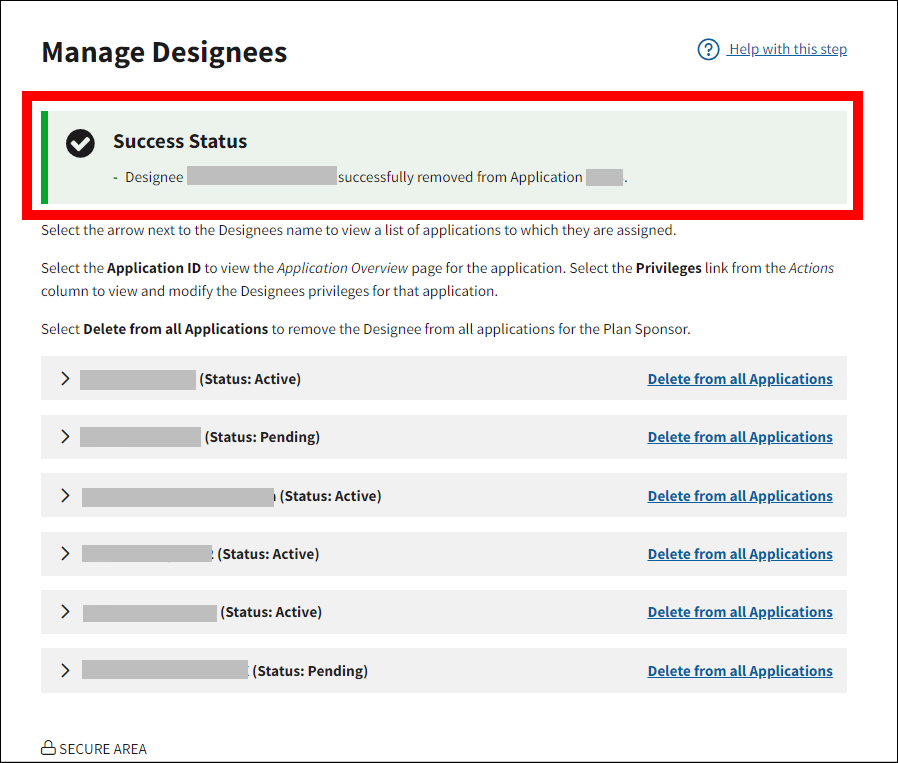
On the Manage Designees page:
-
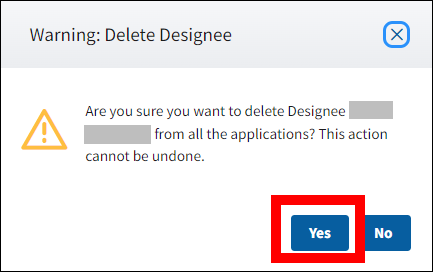
A Success message will display on the Manage Designees page stating that the Designee has been deleted from the application. The page also displays the names of any Active Designees associated with the Plan Sponsor account. To delete a Designee from all of the Plan Sponsor’s applications, select Delete from All Applications.

-
The Warning: Delete Designee pop-up message will display. Select Yes to delete this Designee from all applications for this Plan Sponsor, or select No to return to the Manage Designees page.
-
A Success message will display on the Manage Designees page stating that the Designee has been deleted from all applications for this Plan Sponsor. The page also displays the names of any Active Designees associated with the Plan Sponsor account.