


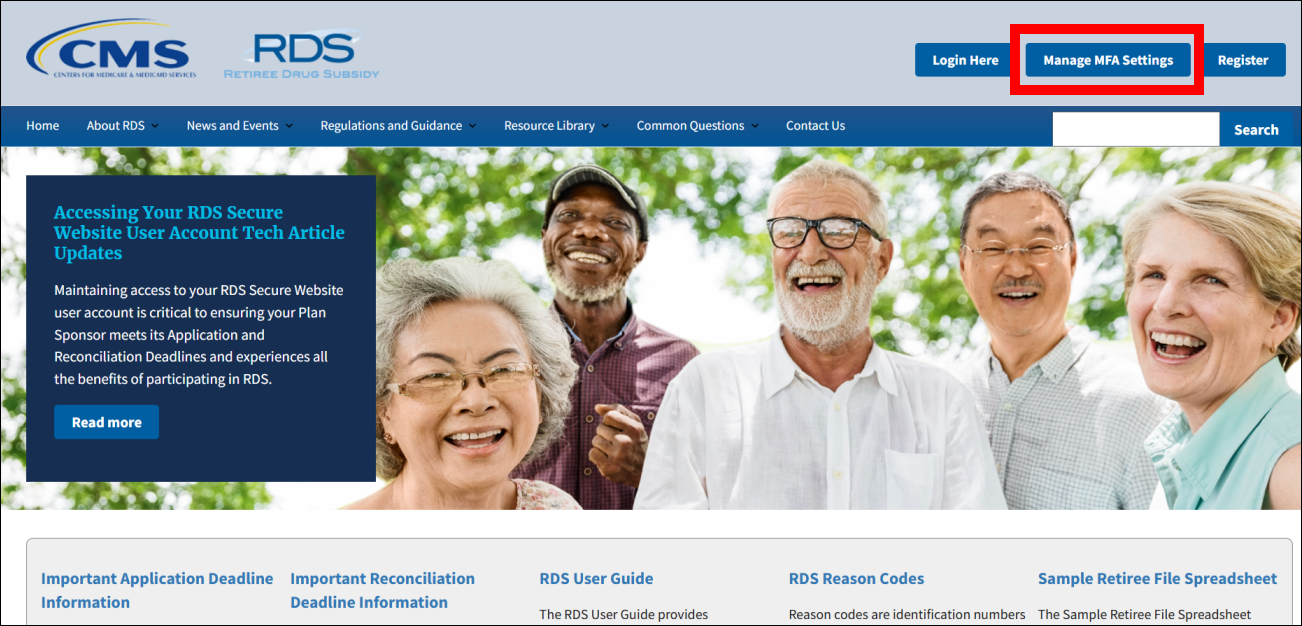
Overview
Watch a short step-by-step video on how to activate your Multi-Factor Authentication.
Refer to the MFA Activation Quick Start Guide for a process diagram.
This section provides an overview of Multi-Factor Authentication (MFA):
- Introduction to Multi-Factor Authentication
- Federal Law Governing User Account Access Information Sharing
- Google Authenticator
- Google Authenticator Device Options
- The QR Code and the Secret Key
- One-Time Access Token
- Text-Enabled Device
Introduction to Multi-Factor Authentication (MFA)
Updated Federal security policies require that each RDS Secure Website account must activate Multi-Factor Authentication (MFA) prior to accessing the RDS Secure Website. Users must enter their Login ID, Password, and MFA token to access the Secure Website. MFA may be configured on only one device at a time. CMS' RDS Center has implemented Google Authenticator as the independent token generation software for the RDS Secure Website. Google Authenticator is a free application that is available for download to an iOS or Android device. Refer to Google Authenticator (GA) for additional information.
Multi-Factor Authentication (MFA), also known as two-step or two-factor authentication, is a security enhancement that allows you to provide two pieces of evidence, or “factors”, to confirm your identity when logging in to your RDS Secure Website account. These credentials fall into two categories: something you know (i.e., your Login ID and Password) and something you have (i.e., your personal device).
MFA helps protect you by adding an additional layer of security to your account, making it harder for someone else to log in as if they were you. Your information, your organization's information, and your beneficiaries' information is safer because criminals would need to steal both your Login ID and Password, and your text-enabled device, to access your account and get access to the financial information, Protected Health Information (PHI), and Personally Identifiable Information (PII) present within the RDS Secure Website.
New RDS SWS users must have completed Registration and have received the user account confirmation email before activating MFA. Existing users whose accounts are in Pending or Expired status are prohibited from activating or managing their MFA configuration. Active users are permitted to activate and manage their MFA settings. Inactive, Disabled, and Locked users are also permitted to activate and manage their MFA settings, however other Secure Website content is not accessible until the account issue is resolved. Refer to User Management for guidance on these processes.
The RDS Secure Website requires all users to login with their MFA configuration: you are required to enter the time-sensitive unique token generated by Google Authenticator, in addition to your RDS Login ID and Password, to access the RDS Secure Website. Activation only needs to be completed once for each new Secure Website account unless you are setting up a new device or you need to reset your current MFA configuration. You may log into the RDS Secure Website immediately upon activating MFA.
CMS' RDS Center has also implemented a one-time access token that can be sent to your registered email address or your registered text-enabled device in the event that your RDS MFA device is lost, damaged, or not working, and you are unable to reset your MFA configuration and need immediate access to the RDS Secure Website. Consequently, you will be prompted to provide a text-enabled device number to CMS' RDS Center during the MFA Activation process. Providing a text-enabled device number is optional. However, if you do not register a text-enabled device with your RDS user account, one-time tokens and user account management notifications cannot be provided to you via text (SMS) message. For text (SMS) messages, there is no charge from CMS' RDS Center, however standard rates from your carrier may apply. Refer to your device's plan for guidance.
Federal Law Governing User Account Access Information Sharing
Individuals are responsible for maintaining and protecting their RDS Secure Website account access. It is a violation of Federal law to share or transfer user accounts or Login and Password information. Do not share the QR code, Secret Key, Google Authenticator token, one-time token or any other account information with anyone. Activate your MFA configuration with your own personal device, not the device of another person.
If a security violation has been suspected by the RDS Center, the compromised account shall be terminated. If the user requires access to the Secure Website again, they will be required to be invited to each Plan Sponsor account and/or application for which they perform work and complete registration again, including being required to activate a new MFA configuration for the new account.
CMS' RDS Center shall not share your personal information with any third-party, except for disclosures required by law.
Due to the sensitive nature of this data, users should contact the RDS Center directly should assistance be required. One individual should not contact the RDS Center on another individual's behalf. Do not include any Protected Health Information (PHI), as defined in the Health Insurance Portability and Accountability Act (HIPAA), or Personally Identifiable Information (PII) in the correspondence, such as Login ID, Password, MBI, SSN, DOB, etc.
Google Authenticator (GA)
Google Authenticator (GA) is a free, secure, independent third-party token generator application (app). It implements multi-factor verification services using a time-based one-time token for authenticating users. Google Authenticator provides a 6-digit one-time token which users are required to provide to the RDS Secure Website when logging in to the site, in addition to their RDS Login ID and Password. MFA may be configured on only one device at a time.
No data is transmitted with the Google Authenticator app; all tokens are stored locally on your own device and the app does not communicate with the RDS Secure Website or your Secure Website account. The RDS Secure Website will accept the token that is currently displayed in your Google Authenticator application; these tokens change every 30 seconds. You can use the Google Authenticator application to receive codes even if you don't have an Internet connection or mobile service.
During the MFA Activation and MFA Reset processes, the RDS Secure Website includes links to download Google Authenticator for an Android or an iOS device. Note that these links will take you to an external page not controlled by CMS' RDS Center. You may also manually navigate to these websites at any time or download the app directly from your device. Refer to the instructions associated with your chosen device for assistance in downloading the app.
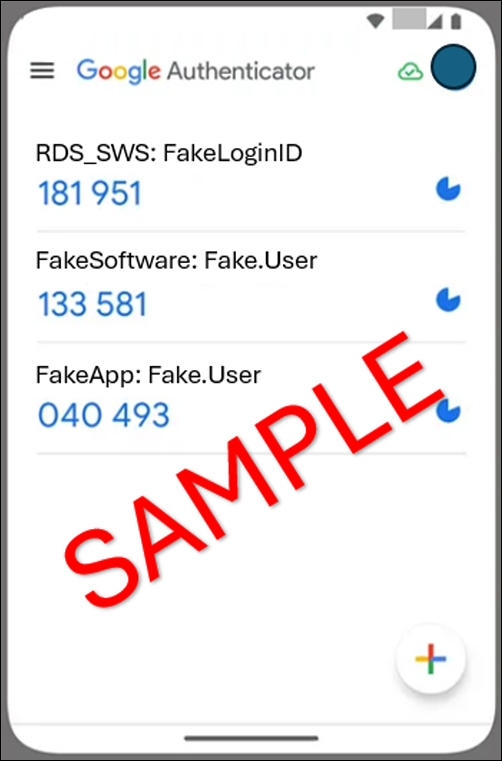
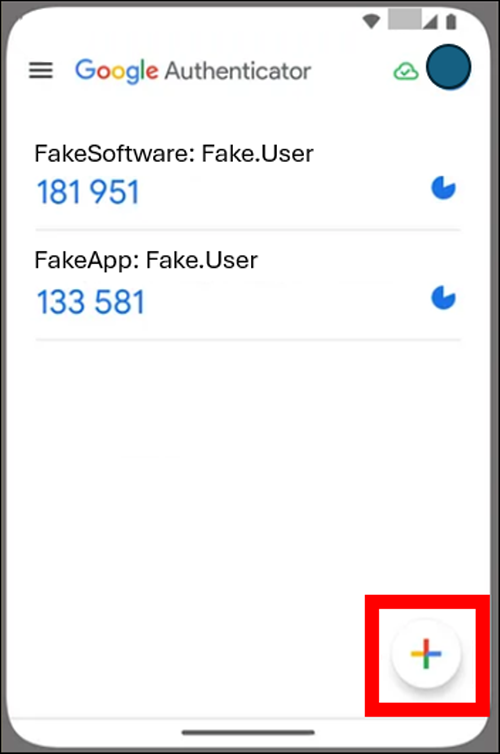
Google Authenticator has the capability to generate unique tokens for multiple websites or applications all within the same Google Authenticator app. Therefore, if you already use Google Authenticator for another website, application, mobile service, or email account, you can simply add the RDS Secure Website to your existing Google Authenticator application; there is no need to install a separate Google Authenticator for each service it is used for. This is an example of the Google Authenticator app.
If you have already activated MFA for your RDS Secure Website account, you can replace the current configuration in the event that you obtain a new mobile device, if your existing device experiences issues that require a factory reset, if your existing MFA token for the RDS Secure Website stops working, or for any other reason. Once replaced, tokens generated by previous RDS Secure Website instances within the Google Authenticator app on your device will no longer work. To avoid confusion, CMS' RDS Center recommends removing any previous versions of the RDS Secure Website profile within your Google Authenticator app once the new configuration is activated. Refer to the instructions associated with your chosen device for assistance.
Google Authenticator Device Options
Google Authenticator is a free application that is available for download to an iOS or Android device. If you would like to be able to scan the QR code with your device's camera, ensure you allow Google Authenticator access to your device's camera. Refer to the instructions associated with your chosen device for assistance.
The QR Code and the Secret Key
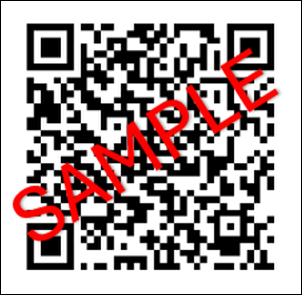
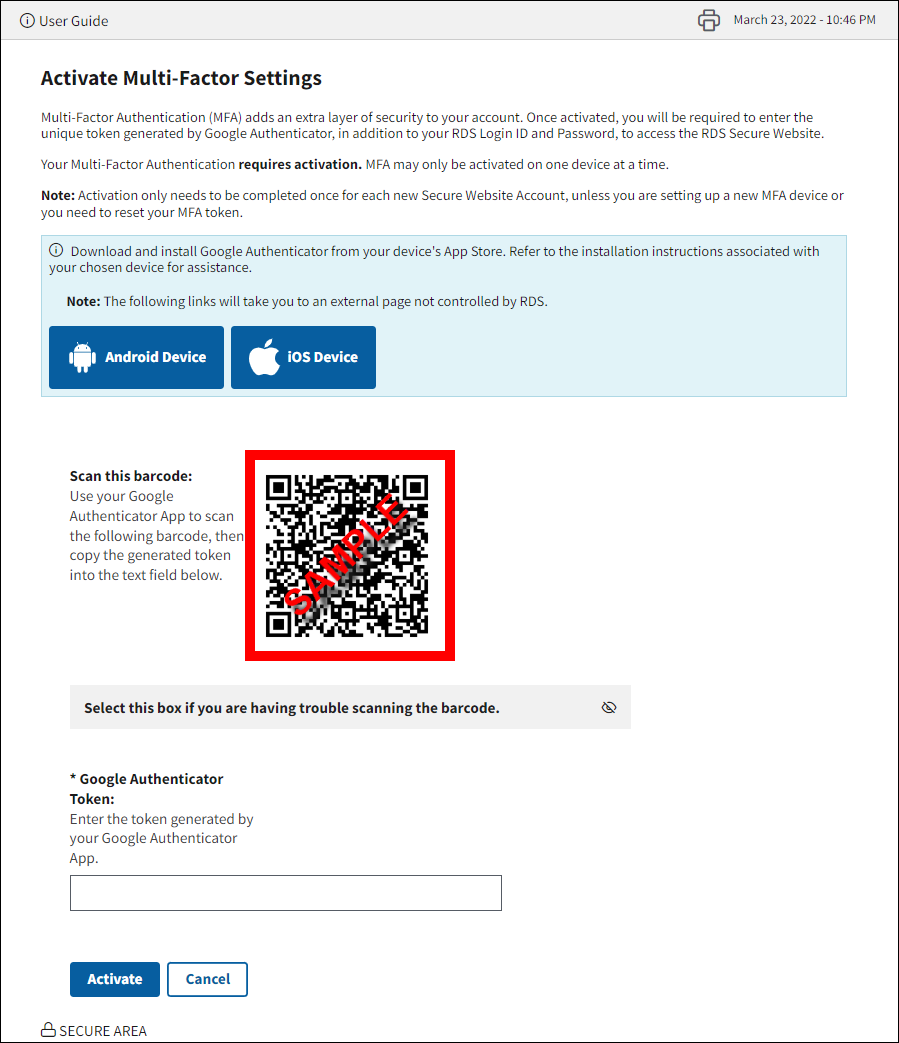
The QR code (i.e., Quick Response Code) is a barcode used by the RDS Secure Website to associate your registered user account to the Google Authenticator application on your chosen device. The QR code consists of a unique pattern of black squares arranged in a square grid on a white background. Each QR code is unique; when an RDS Secure Website user navigates to the Activate Multi-Factor Settings page, a unique QR code is displayed. This is an example of a QR code.
During the MFA Activation and MFA Reset processes, a unique QR code is generated by the RDS Secure Website. You can use your device's camera to scan the QR code into the Google Authenticator app of your device. Refer to the instructions associated with your chosen device for assistance.
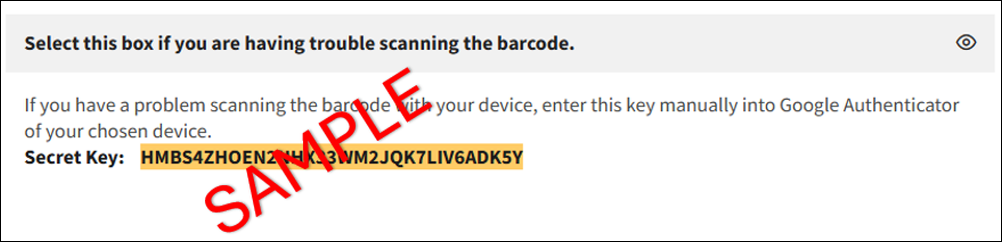
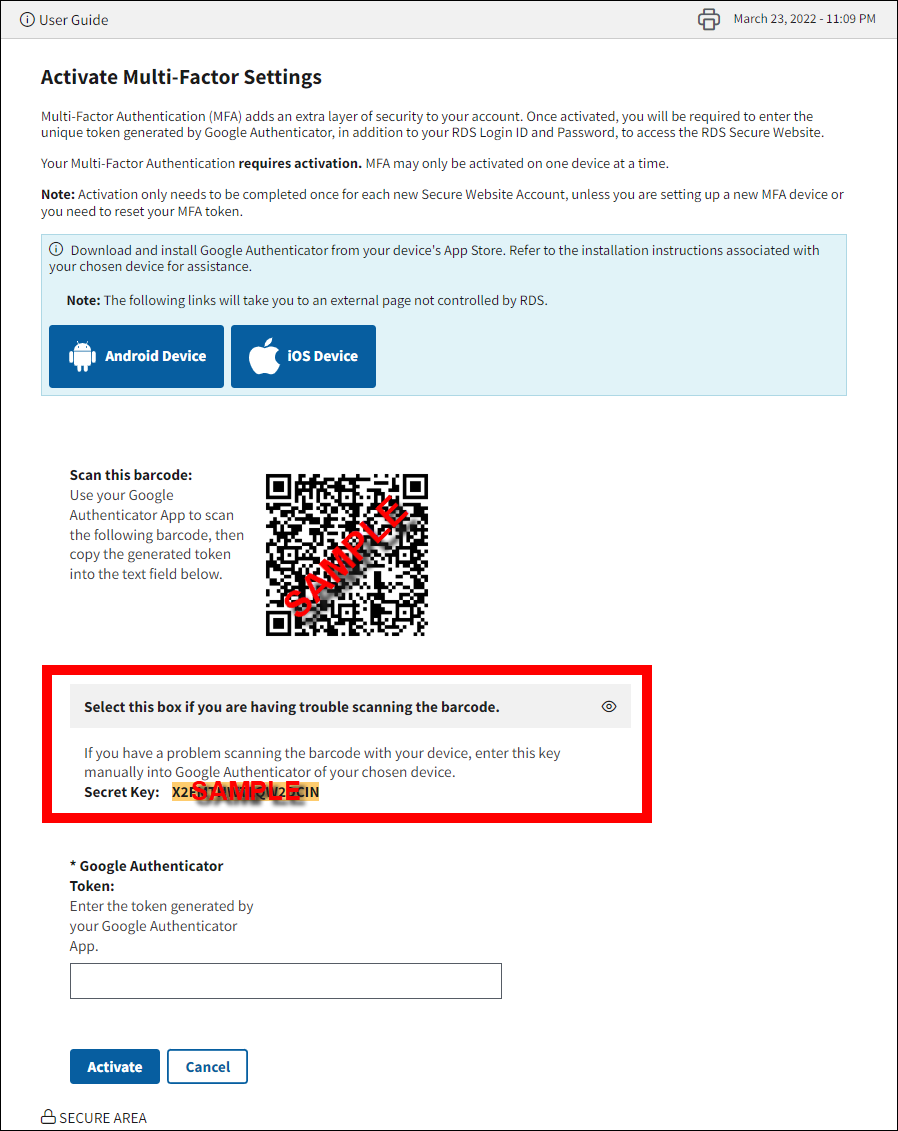
The Secret Key is a unique string of alpha-numeric characters that is associated with the unique QR code generated by the RDS Secure Website. If you are having trouble scanning the QR code into your mobile device, you may manually enter the Secret Key associated with that QR code into your Google Authenticator app instead. Just as each QR code is unique, when an RDS Secure Website user navigates to the Activate Multi-Factor Settings page, the Secret Key changes to match the new QR code. This is an example of the Secret Key.
Important: After you scan the QR code or enter the Secret Key into Google Authenticator, and Google Authenticator displays the 6-digit token for you to enter in the Secure Website to sync the applications, you must ensure that you enter the 6-digit token while on that same page, within the same browsing session. You cannot navigate away from that page and return to complete it later.
Each time you visit the Activate Multi-Factor Authentication page, a new QR code and Secret Key are generated. Consequently, you must enter the 6-digit token from the same browsing session in order for activation to be successful.
If you attempted to activate MFA and it wasn’t successful and your browsing session has closed, the QR code and Secret Key are invalidated. You should remove any previous configuration(s) of Google Authenticator from your device and start the process over to ensure you are entering the token value associated to the current, most recent QR code or Secret Key. Ensure that the 6-digit token you are entering is associated with the QR code or Secret Key of the same browsing session. For security reasons, the Secure Website will not accept a 6-digit token from a previous configuration.
Note also that if you are following the step-by-step instructions and the Secure Website will not accept the 6-digit Google Authenticator token to sync the applications, your phone’s clock may be out of sync with Google Authenticator’s clock. Refer to your device’s instructions for guidance.
One-Time Access Token
If your RDS MFA device is lost, damaged, or not working and you are unable to reset your MFA configuration but need immediate access to the RDS Secure Website, CMS' RDS Center will allow you to request a one-time access token.
Important: Keep your registered personal information up to date. One-time access tokens will only be provided to your registered email address or your registered text-enabled device. For security reasons, users are prohibited from modifying their email address and their text-enabled device number during the process to request a one-time token. Refer to Manage Register User Information for guidance on updating your registered information.
Users may only log into the RDS Secure Website using the one-time access token function three consecutive times. This security policy applies to all users regardless of the token’s delivery method: whether users request the token to be sent to their registered email address or to their registered text-enabled number, users may only log into the Secure Website three consecutive times with one-time tokens. The count is not reset until a user logs into the website with the Google Authenticator token from their personal device.
Stated another way, if a user has logged into the RDS Secure Website with a one-time access token three consecutive times, regardless of how much time elapses between uses and regardless of the delivery method (i.e., email or text (SMS) message), the user is prohibited from requesting additional one-time tokens until they log into the Secure Website with their standard Google Authenticator token on their personal device.
If the Google Authenticator token on a user’s personal device is not working, the user must reset their MFA configuration to establish a new Google Authenticator credential with the RDS Secure Website. If a user has used all three of their one-time tokens, they must reset their MFA configuration and log into the Secure Website with their new Google Authenticator profile before being allowed to request additional one-time tokens. Refer to MFA Reset Instructions for guidance on this process.
One-time access tokens are only active for 10 minutes after the request has been made. If more time has elapsed, the token expires, and the user must request a new token. Expired tokens do not count towards the three allowable consecutive one-time token uses.
Text-Enabled Device
A text-enabled device is any device that has the capability to receive text (SMS) messages for user account management purposes, such as one-time tokens for Multi-Factor Authentication (MFA) and notifications for Request Forgotten Login ID, Forgot Password, Change Password If Account Is Locked, and Enable Your User Account. This may be your MFA device, such as a smartphone, another back-up device, such as a text-enabled landline, or any other accessory that is capable of receiving text (SMS) messages.
If you encounter an issue with either your MFA device or the token it generates that prevents you from being able to log into the RDS Secure Website, but you need to access the site immediately, you may request a one-time token be sent to your registered email address or registered text-enabled device of your choice. Consequently, you will be prompted to provide a text-enabled device number to CMS' RDS Center during the MFA Activation process.
Providing a text-enabled device number is optional. However, if you do not register a text-enabled device with your RDS user account, one-time tokens and user account management notifications cannot be provided to you via text (SMS) message. The text-enabled number must be registered with CMS' RDS Center prior to requesting the one-time token. For security reasons, users may not provide a text-enabled number during the process to request the one-time token, nor may they edit it during this process.
For text (SMS) messages, there is no charge from CMS' RDS Center, however standard rates from your carrier may apply. Refer to your device's plan for guidance.
If you provided a text-enabled device number to CMS' RDS Center and would like to update that number, you may do so by following the guidance provided in the Reset Text-Enabled Device Number Instructions section. Only Active users are permitted to modify their text-enabled number. Inactive, Locked, and Disabled users are prohibited from modifying the text-enabled device number. Refer to User Management for guidance on resolving account issues.
Step-by-Step Instructions
Watch a short step-by-step video on how to activate your Multi-Factor Authentication.
Refer to the MFA Activation Quick Start Guide for a process diagram.
Ensure you complete the activation or reset processes in a timely manner. Federal security policies require software applications to terminate the browsing session after a set period of inactivity. If you attempted to activate MFA and it wasn’t successful and your browsing session has closed, the QR code and Secret Key are invalidated. You should remove any previous configuration(s) of Google Authenticator from your device and start the process over to ensure you are entering the token value associated to the current, most recent QR code or Secret Key. Ensure that the 6-digit token you are entering is associated with the QR code or Secret Key of the same browsing session. For security reasons, the Secure Website will not accept a 6-digit token from a previous configuration.
This section provides step-by-step instructions for managing Multi-Factor Authentication (MFA) settings:
- First Time MFA Activation Instructions
- MFA Reset Instructions
- Reset Text-Enabled Device Number Instructions
- Request a One-Time Token Instructions
First Time MFA Activation Instructions
This section provides step-by-step instructions to activate you Multi-Factor Authentication settings for the first time.
- Complete user account Registration and receive your user account confirmation email. If you are already a registered user with an active account, see the alternate guidance in instruction 2b.
-
Click the MFA Activation hyperlink embedded in your user account confirmation email.
2b. Alternately, you may navigate to the RDS Program Website and select Manage MFA Settings.
-
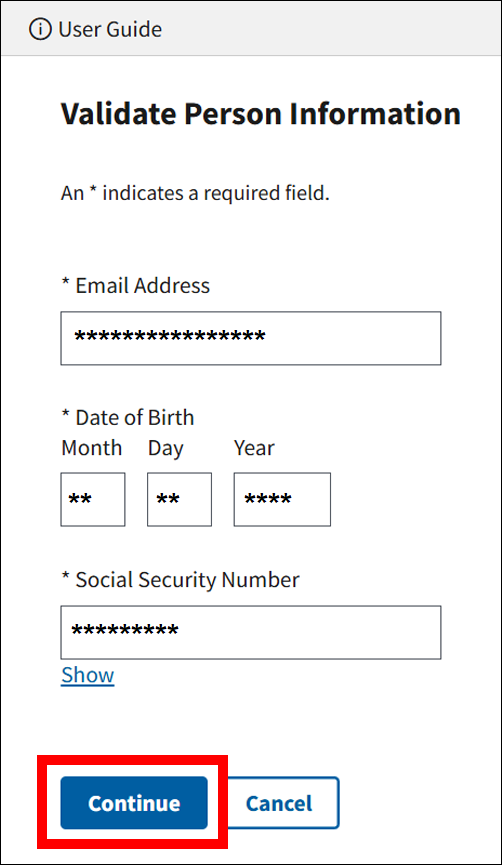
On the resulting Validate Person Information page, enter the Email Address, Date of Birth, and Social Security Number associated with your active account and select Continue.
- If your account is Inactive, refer to Verify Email Address for guidance on resolving your account issue.
On the resulting Register Text-Enabled Device page, select Continue to provide the RDS Center with your text-enabled device number. Close the browser to cancel the process. You may also select Skip to forgo providing a text-enabled number and instead navigate directly to Step 7 of these instructions to continue activating MFA.
Note: Providing a text-enabled device number is optional. However, if you do not register a text-enabled device with your RDS user account, one-time tokens and user account management notifications cannot be provided to you via text (SMS) message. CMS' RDS Center is only permitted to send a one-time token via text to the registered text-enabled device associated with your user account, or your registered email address. We are not permitted to send the one-time access token to a text-enabled device or email address that is not registered to your user account. Your text-enabled device number and email address are not permitted to be updated during the one-time token process.
-
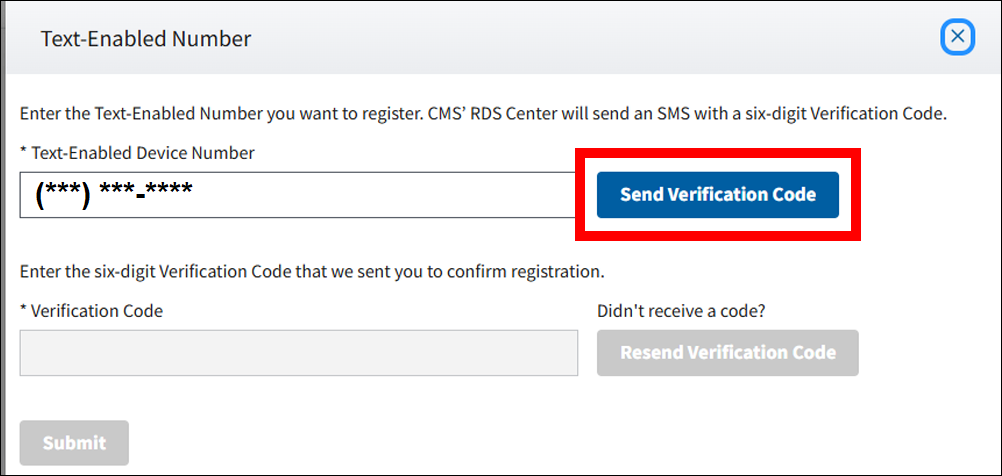
On the resulting Text-Enabled Number pop-up window, enter your text-enabled device number and select the Send Verification Code button.
-
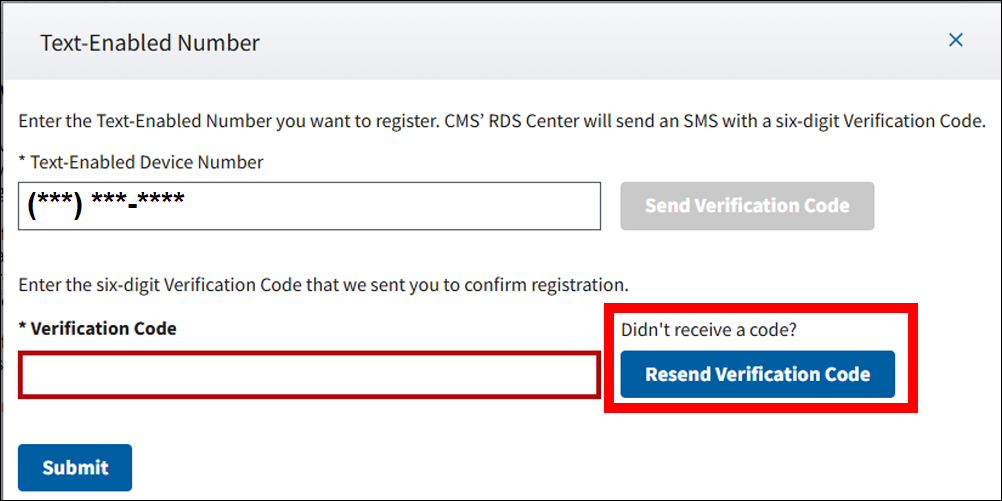
On the same Text-Enabled Number pop-up window, enter the verification code that is sent to your text-enabled device and select Submit. The code may take a few minutes to be received.
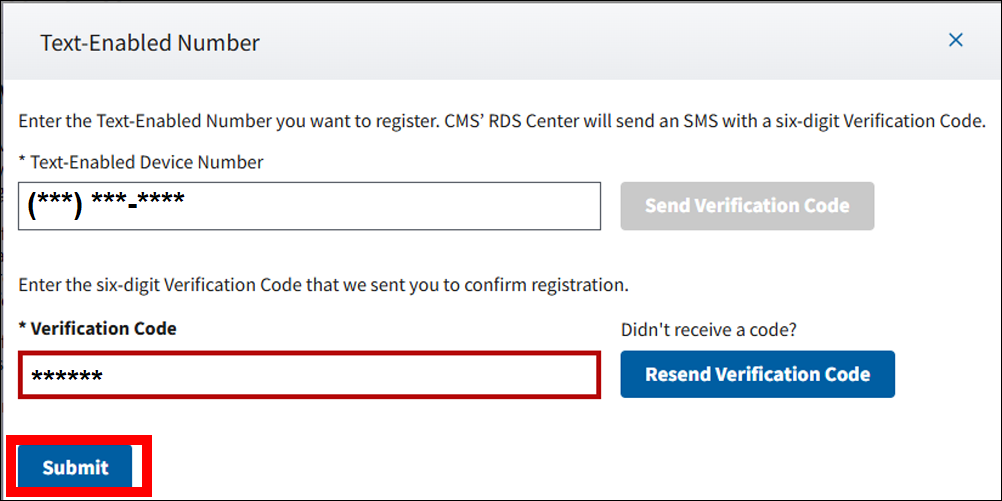
If you do not receive the code after a few minutes, you may select the Resend Verification Code button to have another code sent to your device. Any previous codes will be invalidated.
If you need to change the number you provided, you may edit the text-enabled device number and select the Resend Verification Code button to have the code sent to the new updated number you entered. Any previous codes will be invalidated.
-
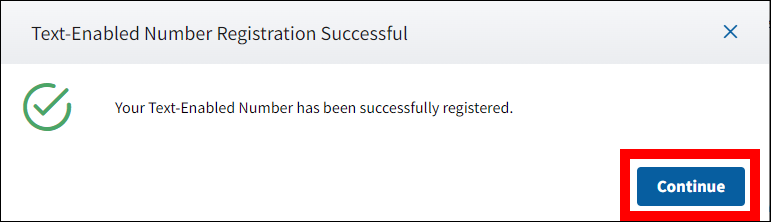
On the resulting Text-Enabled Number Registration Successful pop-up window, select Continue to proceed to the Activate Multi-Factor Settings page. The Text-Enable Number Registration Successful message is the confirmation that you successfully registered your text-enabled number; a separate confirmation email will not be generated.
-
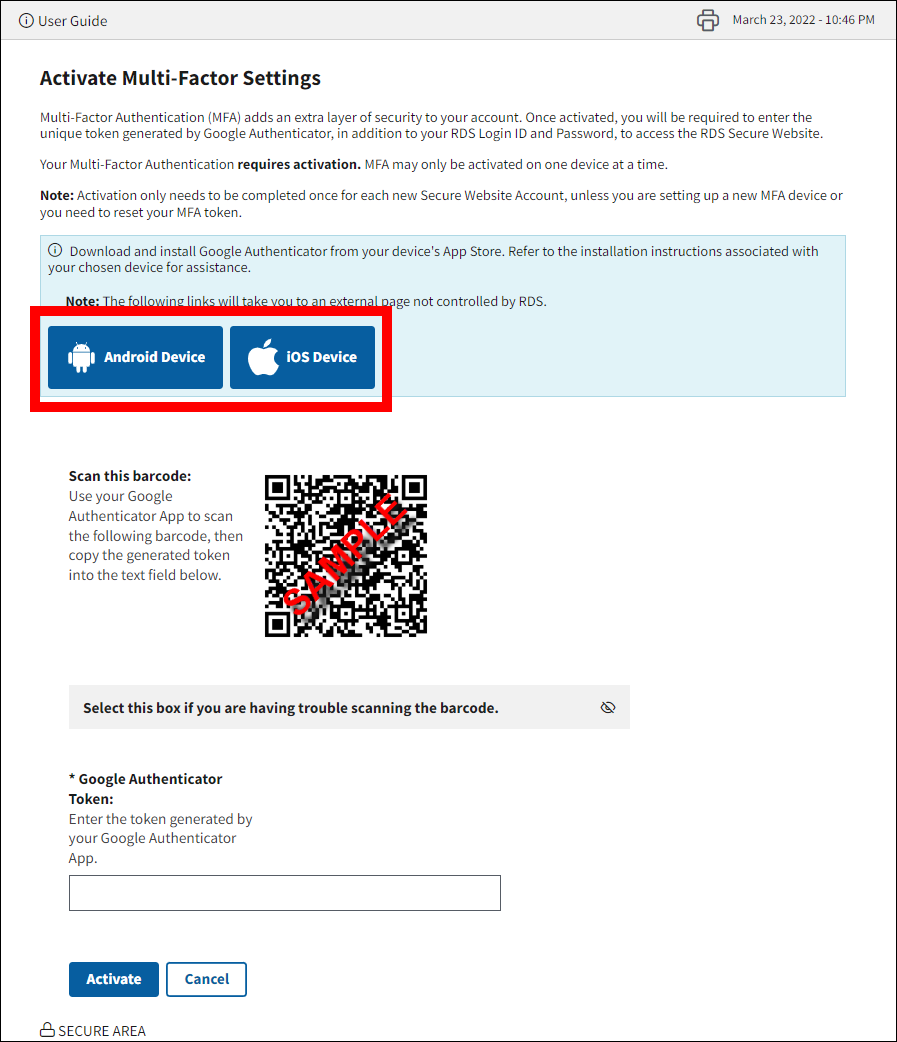
On the resulting Activate Multi-Factor Settings page, download Google Authenticator for your chosen device using the Android Device or iOS Device buttons and open the application once successfully installed. If you already have Google Authenticator installed, open the application on your device.
Note: The iOS Device button will only open in Apple devices or Windows PCs that have iTunes installed.
-
Using the Google Authenticator app on your device, scan the QR code. The general process for scanning a QR code with your device's camera is listed in Steps i-v.
Note: The images in this section are for educational purposes only and may not reflect the version of Google Authenticator installed on your device. The exact text and images displayed on your device may vary depending on the brand/model of device you use, the version of your operating system, or the version of the Google Authenticator app installed on your device.
- Download and open Google Authenticator on your device.
-
Select the ‘+' sign within the Google Authenticator app on your device. If you don't use Google Authenticator for any other services, you will not see any other services listed.
-
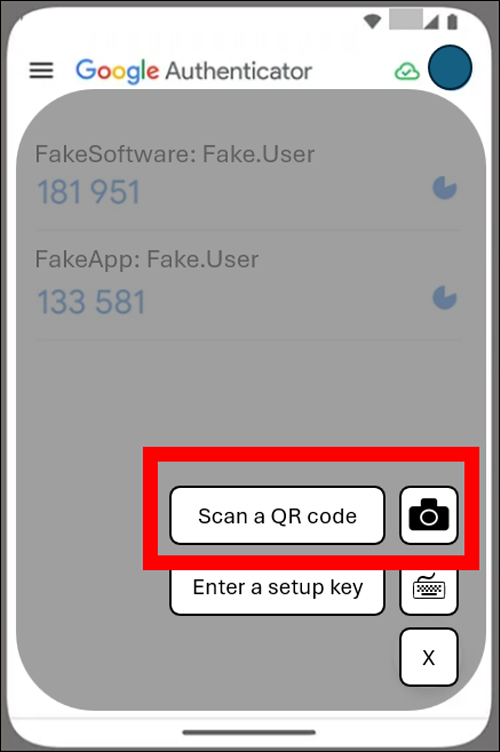
Select 'Scan a QR code' from the Google Authenticator app on your device.
-
Hold your device's camera up to your computer screen so that the QR code displayed in the Secure Website is within the outlined area on your mobile device's screen. Ensure you have granted Google Authenticator access to your device's camera. Refer to the instructions associated with your device for guidance.
-
If you are having trouble scanning the QR code, unhide the Secret Key by clicking anywhere in the Select this box if you are having trouble scanning the barcode box.
Select ‘Enter a setup key' from the Google Authenticator app on your device.
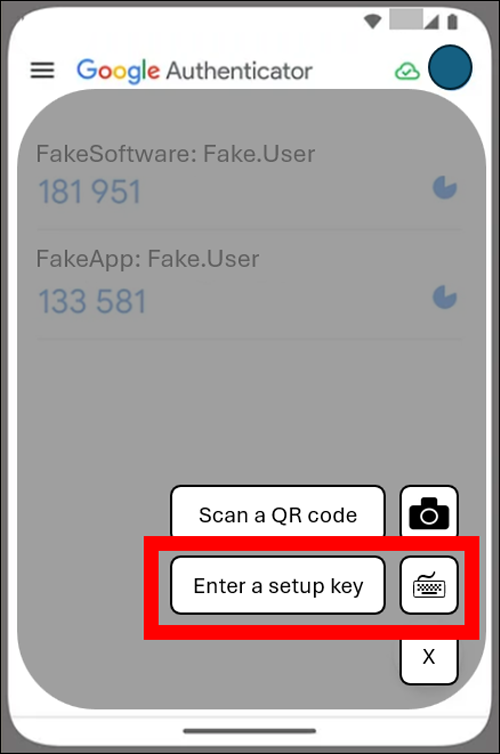
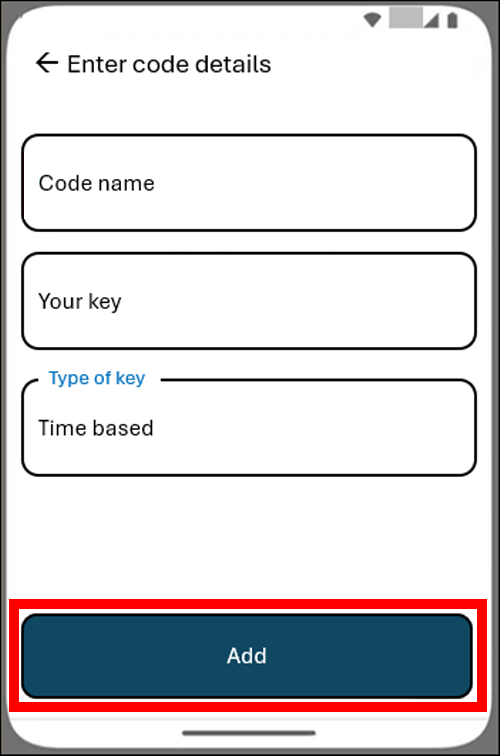
Manually enter the Secret Key into your Google Authenticator app and select 'Add'.
-
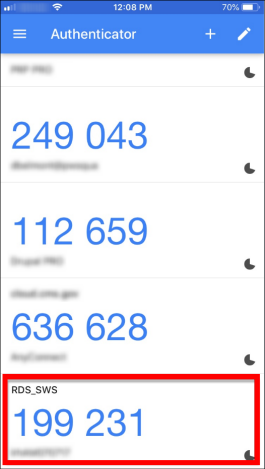
Once your user account is successfully synced with Google Authenticator, either by scanning the QR code or by manually entering the Secret Key, Google Authenticator will be updated with a new entry for your RDS Secure Website user account.
-
Once you have successfully synced your RDS Secure Website account to your Google Authenticator app, enter the 6-digit token generated by the app on your device into the Google Authenticator Token field of the Secure Website and select Activate.

-
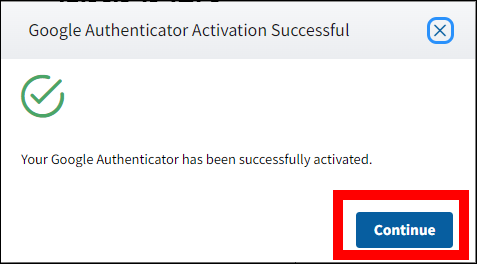
Select Continue from the Google Authenticator Activation Successful pop-up window to be returned to the Login page. The Google Authenticator Activation Successful message is the confirmation that you successfully activated MFA; a separate confirmation email will not be generated.
Note that if you are following the step-by-step instructions and you cannot get the Secure Website to accept the 6-digit Google Authenticator token to sync the applications, your phone’s clock might be out of sync with Google Authenticator's clock. Refer to your device’s instructions for guidance.
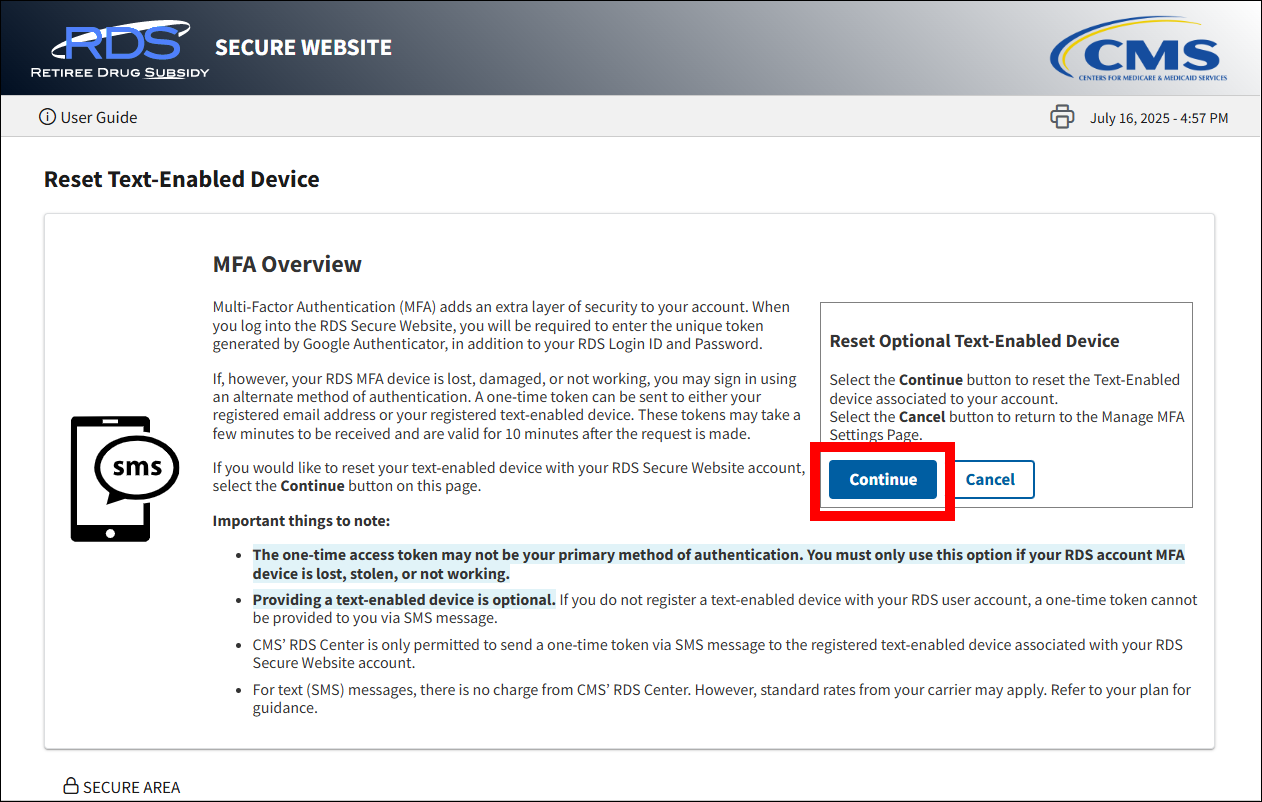
MFA Reset Instructions
This section provides step-by-step instructions to reconfigure your Multi-Factor Authentication settings.
Watch a short step-by-step video on how to reset your Multi-Factor Authentication.
Refer to the MFA Reset Quick Start Guide for a process diagram.
Note: These instructions are associated with updating the MFA and Google Authenticator configurations on your personal device, not updating your text-enabled number, if you have provided one. Modifying your text-enabled number instructions are available below in the Reset Text-Enabled Device Number Instructions section.
-
Navigate to the RDS Program Website and select Manage MFA Device Settings.
-
On the resulting Validate Person Information page, enter the Email Address, Date of Birth, and Social Security Number associated with your active account and select Continue.
- If your account is Inactive, refer to Verify Email Address for guidance on resolving your account issue.
-
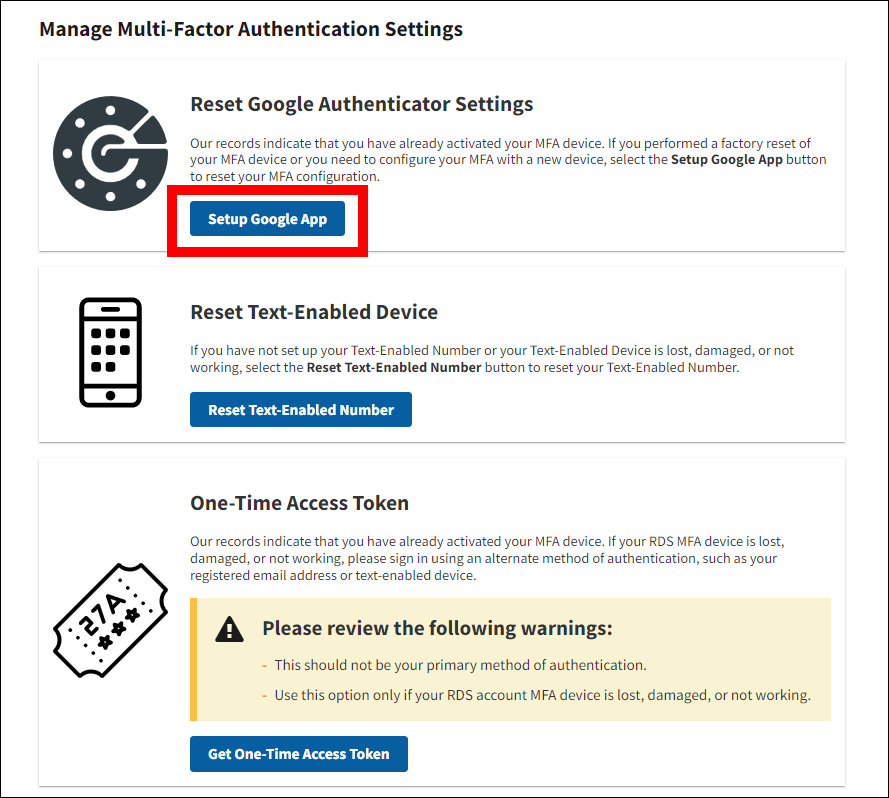
On the resulting Manage Multi-Factor Authentication Settings page, select the Setup Google App button from within the Reset Google Authenticator Settings section.
-
On the resulting Activate Multi-Factor Settings page, download Google Authenticator for your chosen device using the Android Device or iOS Device buttons and open the application once successfully installed. If you already have Google Authenticator installed, open the application on your device.
Note: The iOS Device button will only open in Apple devices or Windows PCs that have iTunes installed.
-
Using the Google Authenticator app on your device, scan the QR code. The general process for scanning a QR code with your device's camera is listed in Steps i-v.
Note: The images in this section are for educational purposes only and may not reflect the version of Google Authenticator installed on your device. The exact text and images displayed on your device may vary depending on the brand/model of device you use, the version of your operating system, or the version of the Google Authenticator app installed on your device.
- Download and open Google Authenticator on your device.
-
Select the '+' sign within the Google Authenticator app on your device.
-
Select 'Scan a QR code' from the Google Authenticator app on your device.
-
Hold your device's camera up to your computer screen so that the QR code displayed in the Secure Website is within the outlined area on your mobile device's screen. Ensure you have granted Google Authenticator access to your device's camera. Refer to the instructions associated with your device for guidance.
-
If you are having trouble scanning the QR code, unhide the Secret Key by clicking anywhere in the Select this box if you are having trouble scanning the barcode box.
Select 'Enter a setup key' from the Google Authenticator app on your device.
Manually enter the Secret Key into your Google Authenticator app and select 'Add'.
-
Once your user account is successfully synced with Google Authenticator, either by scanning the QR code or by manually entering the Secret Key, Google Authenticator will be updated with a new entry for your RDS Secure Website user account. The RDS Center recommends removing any previous instances of the RDS Secure Website within Google Authenticator to avoid confusion.
-
Once you have successfully synced your RDS Secure Website account to your Google Authenticator app, enter the 6-digit token generated by the app on your device into the Google Authenticator Token field of the Secure Website and select Activate.
-
Select Continue from the Google Authenticator Activation Successful pop-up window to be returned to the Login page. The Google Authenticator Activation Successful message is the confirmation that you successfully activated MFA; a separate confirmation email will not be generated.
Note that if you are following the step-by-step instructions and you cannot get the Secure Website to accept the 6-digit Google Authenticator token to sync the applications, your phone’s clock might be out of sync with Google Authenticator’s clock. Refer to your device’s instructions for guidance.
Reset Text-Enabled Device Number Instructions
This section provides step-by-step instructions to reset your Text-Enabled Device Number.
-
Navigate to the RDS Program Website and select Manage MFA Device Settings.
-
On the resulting Validate Person Information page, enter the Email Address, Date of Birth, and Social Security Number associated with your active account and select Continue.
- If your account is Inactive, refer to Verify Email Address.
-
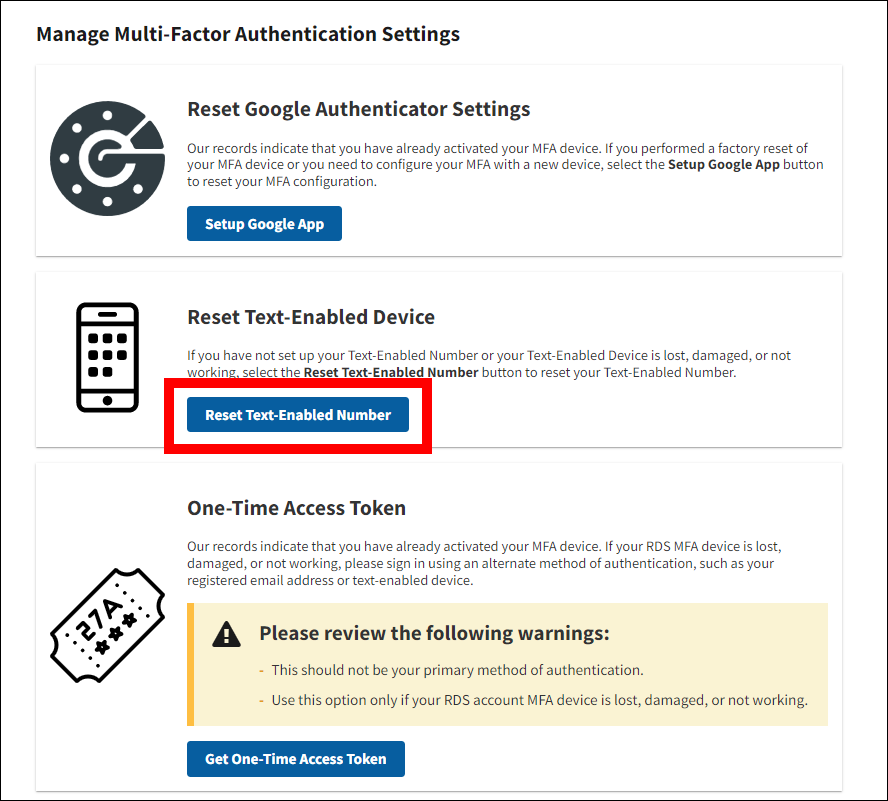
On the resulting Manage Multi-Factor Authentication Settings page, select the Reset Text-Enabled Number button from within the Reset Text-Enabled Device section.
-
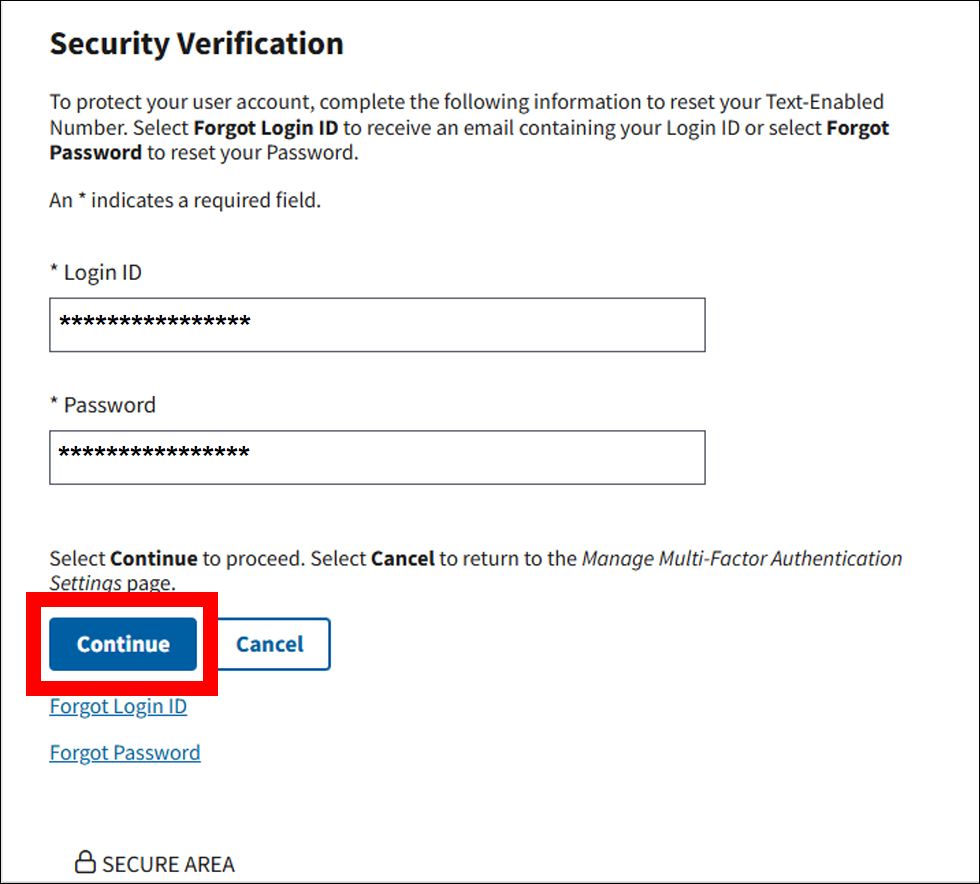
On the resulting Security Verification page, enter the Login ID and Password associated with your active account and select Continue. Entering your information incorrectly too many times will lock your account.
- If your account is Locked, refer to Change Password If Account Is Locked.
- If your account is Disabled, refer to Enable Your User Account.
-
On the resulting Text-Enabled Number pop-up window, enter your text-enabled device number and select the Send Verification Code button.
-
On the same Text-Enabled Number pop-up window, enter the verification code that is sent to your text-enabled device and select Submit. The code may take a few minutes to be received.
If you do not receive the code after a few minutes, you may select the Resend Verification Code button to have another code sent to your device. Any previous codes will be invalidated.
If you need to change the number you provided, you may edit the text-enabled device number and select the Resend Verification Code button to have the code sent to the new updated number you entered. Any previous codes will be invalidated.
-
On the resulting Text-Enable Number Registration Successful pop-up window, select Continue to proceed to the Login page. The Text-Enable Number Registration Successful message is the confirmation that you successfully reset your text-enabled number; a separate confirmation email will not be generated.
Request a One-Time Token Instructions
This section provides step-by-step instructions to request a one-time access token. A one-time access token can only be requested once MFA has been activated.
-
Navigate to the RDS Program Website and select Manage MFA Settings.
-
On the resulting Validate Person Information page, enter the Email Address, Date of Birth, and Social Security Number associated with your active account and select Continue.
- If your account is Inactive, refer to Verify Email Address for guidance on resolving your account issue.
-
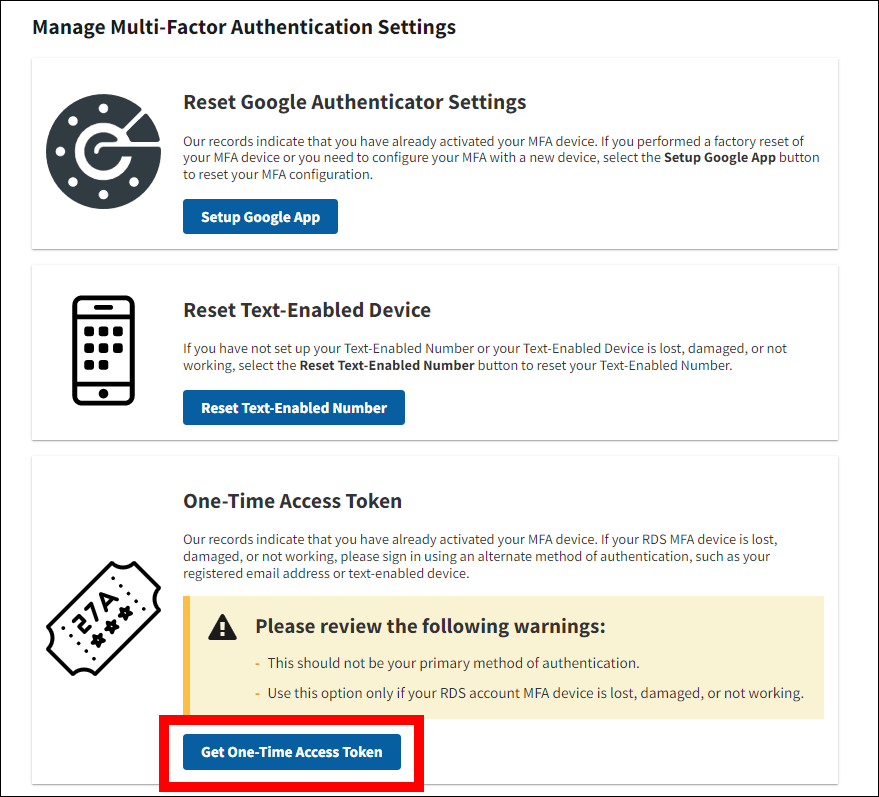
On the resulting Manage Multi-Factor Authentication Settings page, read the important warnings and select the Get One-Time Access Token button from within the One-Time Access Token section.
For security reasons, users are only allowed to use a one-time token to log into the Secure Website three consecutive times. After your third use of a one-time token (even if you log in with an MFA token from your personal device in between uses), you are prohibited from requesting a new one-time token until you log in with the MFA token from your personal device.
If you have used all three of your consecutive one-time tokens, the Get One-Time Access Token button will not be displayed. You must log into the Secure Website with the Google Authenticator MFA token from your personal device to reset the one-time token count back to zero and re-enable the Get One-Time Access Token button. Refer to MFA Reset Instructions for assistance on updating your MFA Google Authenticator token configuration, should that be necessary.
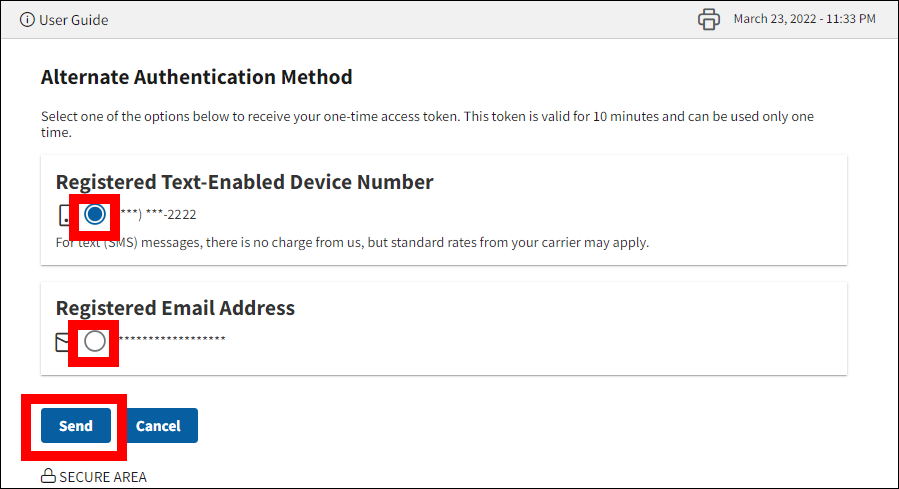
-
On the resulting Alternate Authentication Method page, select the delivery method for your one-time access token and then select Send. Only one option may be selected at a time. For security reasons, your Email Address and Text-Enabled Device Number (if provided) are not permitted to be changed during this process. If you did not provide a Text-Enabled Device Number, you will not see that as an option.
- Refer to Manage Registered User Information for guidance on updating your Email Address.
- Refer to Reset Text-Enabled Device Number Instructions for guidance on providing a Text-Enabled Device Number for the first time if you originally skipped it during MFA activation, and for updating your Text-Enabled Device Number if you already provided it during MFA activation.
-
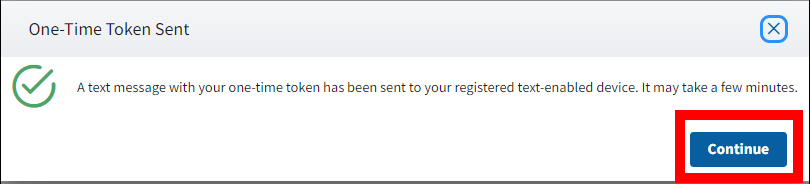
On the resulting One-Time Token Sent pop-up window, select Continue to be returned to the Login page. You may use the one-time access token as soon as you receive it. The tokens are valid for 10 minutes and may be used only once. One-time access tokens that are not used to log in and simply expire are not counted toward the allowable three consecutive one-time token logins.
Troubleshooting
Error Message Descriptions and Resolutions
Use the following table to assist in resolving errors associated with activating and managing your Multi-Factor Authentication (MFA) configurations.
| Message Text | Message Type | Condition | Resolution |
|---|---|---|---|
| Invalid Value/Field is required. | Error | Required field(s) left empty and/or field(s) contains invalid data. | Populate all required fields with valid data. |
| <Field Name> is required. Enter a valid value in the <Field Name> field. | Error | Required field(s) left empty and/or field(s) contains invalid data. | Populate all required fields with valid data. |
| The Email Address, Social Security Number, and Date of Birth you entered do not match CMS' RDS Center's records. Re-enter your information. | Error | Email Address, Social Security Number, and Date of Birth combination do not match CMS' RDS Center's records. |
|
| You have exceeded the allowed number of attempts to validate your information. Contact CMS' RDS Center for assistance. | Error | User exceeded the allowed number of attempts to provide their Email Address, Social Security Number, and Date of Birth on record. | Close the browser and try again. If you are still unable to enter the correct Email Address, Social Security Number, and Date of Birth combination associated you're your active user account, contact CMS' RDS Center for assistance. |
| Google Authenticator token is invalid. Enter a valid value in the Google Authenticator Token field. | Error | The Google Authenticator token that was entered in the Google Authenticator Token field does not match the current valid Google Authenticator token. |
Refer to First Time MFA Activation Instructions, the MFA Activation Quick Start Guide, the Resetting Your Multi-Factor Authentication (MFA) technical article, and/or your device's instructions for assistance. |
| The Verification Code is invalid. Enter a valid value in the Verification Code field. | Error | The Verification Code that was entered in the Verification Code field does not match the Verification Code that was sent to your personal text-enabled device. | Enter the Verification Code that is displayed on your personal text-enabled device. |
| The Login ID or Password is incorrect. If you do not enter the Login ID and Password correctly, your Login ID will be locked. | Error | Login ID and Password combination do not match CMS' RDS Center's records. |
|
| You did not enter the Login ID and Password correctly. The Login ID is locked. Select Forgot Password to reset your Password. | Error | User exceeded the allowed number of attempts to provide their Login ID and Password on record. | Select Forgot Password to reset your Password. Refer to Change Password If Account Is Locked. |
| The Login ID is locked. If you have forgotten your Login ID, select Forgot Login ID to receive an email or text (SMS) message containing your Login ID, or select Forgot Password to reset your Password. | Error | User exceeded the allowed number of attempts to provide their Login ID and Password on record. | Select Forgot Password to reset your Password. Refer to Change Password If Account Is Locked. |
| Your account has been disabled due to inactivity. To re-enable your account, select the Enable Account link in your RDS Secure Website User Account Disabled email or text (SMS) message. To send the email/text (SMS) message again, select Re-send. | Error | User account is disabled due to inactivity (i.e., not logging into the Secure Website within the last 180 days). | Select the Enable Account link in your “RDS Secure Website User Account Disabled” email/text (SMS) message. To send the email/text (SMS) message again, select Re-send from within the error message that is displayed. The email will be sent to your registered email address. Refer to Manage Registered User Information for guidance on updating your Email Address. The text (SMS) message will be sent to your registered Text-Enabled Device Number. Refer to Reset Text-Enabled Device Number Instructions for guidance on updating your Text-Enabled Device Number. |
Field Formats
Use the following tables to assist in completing form fields associated with activating and managing your Multi-Factor Authentication (MFA) configurations.
- Validate Person Information Field Formats
- Text-Enabled Number Field Formats
- Activate Multi-Factor Settings Field Formats
- Security Verification Field Formats
Validate Person Information Field Formats
| Field Name | Required or Optional | Size Limit | Character Requirements | Notes |
|---|---|---|---|---|
| Email Address | Required | 1-255 Characters | Alpha, Numeric, and Special Characters Allowed |
|
| Date of Birth | Required |
|
Numeric Only |
|
| Social Security Number | Required | Exactly 9 Characters | Numeric Only |
|
Text-Enabled Number Field Formats
| Field Name | Required or Optional | Size Limit | Character Requirements | Notes |
|---|---|---|---|---|
| Text-Enabled Device Number | Required | Exactly 10 Characters | Numeric Only | Must be able to receive text/SMS messages |
| Verification Code | Required | Exactly 6 Characters | Numeric Only | Must match the 6-digit code sent to the text-enabled device provided. This code is only valid while the user remains in the Text-Enabled Number pop-up window. If the user leaves the window, the code expires and the user should select Continue from the Register Text-Enabled Device page to provide a new number. |
Activate Multi-Factor Settings Field Formats
| Field Name | Required or Optional | Size Limit | Character Requirements | Notes |
|---|---|---|---|---|
| Google Authenticator Token | Required | Exactly 6 Characters | Numeric Only | Must match the 6-digit code currently displayed for RDS in the Google Authenticator application (app) of your personal device. This code is only valid for the 30 seconds the code is displayed. If the code changes before the Secure Website accepts the value entered by the user, the user should re-enter the new code that is displayed and select Activate before it changes. |
Security Verification Field Formats
| Field Name | Required or Optional | Size Limit | Character Requirements | Notes |
|---|---|---|---|---|
| Login ID | Required | 15 Characters Max |
|
|
| Password | Required | 14 Characters Max |
|
|