


Overview
This section provides an overview of the user roles and information required to create a new Plan Sponsor Account.
- Introduction to Becoming a Plan Sponsor
- RDS Secure Website User Roles
- Required Organization Registration Information
- Required Authorized Representative Information
- Required Account Manager Information
- Supporting Documentation
- What's Next After Creating a Plan Sponsor Account?
Introduction to Becoming a Plan Sponsor
The Retiree Drug Subsidy (RDS) Program allows companies and organizations to apply for subsidy of drug costs. For information on qualifying retirees for subsidy, refer to Qualifications for the RDS Program.
Organizations and companies that participate in the RDS Program are called Plan Sponsors. Unless there is a significant business need to have multiple accounts, there may only be one RDS Plan Sponsor account per Employer Identification Number (EIN). Before registering to become a Plan Sponsor, consider which individuals to assign RDS Secure Website user roles and gather the required Registration information.
Important: Users should not create new Plan Sponsor accounts to bypass the Account Manager or Authorized Representative Role Reassignment process. If an individual is required to replace an existing Account Manager or Authorized Representative for an existing Plan Sponsor account that will continue to be used in the future, users must follow the guidance in the Reassign the Account Manager and Authorized Representative Roles section.
RDS Secure Website User Roles
There are two user roles assigned during the Plan Sponsor Registration process: the Account Manager and the Authorized Representative. All registered users must have a U.S. Social Security Number.
Consider the following responsibilities when choosing individuals to fulfill these two roles:
Account Manager Responsibilities
The purpose of the Account Manager is to initiate and manage the Plan Sponsor account.
The Account Manager needs to dedicate sufficient time for management tasks in the RDS Program Lifecycle, such as assigning and managing users, reporting costs, requesting payment, and managing retirees.
For more information about the Account Manager, refer to Register as an RDS Secure Website User.
Authorized Representative Responsibilities
The purpose of the Authorized Representative is to verify and sign the Plan Sponsor Agreement and Reconciliation Agreement.
The Authorized Representative has a significantly less active role than the Account Manager.
The Authorized Representative is granted the legal authority to bind the Plan Sponsor to the terms of the Plan Sponsor Agreement. The Authorized Representative typically delegates application and Reconciliation tasks to the Account Manager or Designees.
For more information about the Authorized Representative, refer to Register as an RDS Secure Website User.
Required Organization Registration Information
Gather the following organization contact and identification information before you register.
Plan Sponsor Information
- Employer Identification Number (EIN)
- Also known as the Federal Employer Tax Identification Number
- Should be unique per Plan Sponsor account
- Must be ten characters and must be entered in "00-0000000" format
- A dash after the second number is required
- Organization Name
- Also known as the legal organization name
- Must be associated with the Employer Identification Number
- Organization Name field allows a maximum of 50 characters, including spaces
- If the entire legal organization name does not fit in the field, enter it without abbreviation, until the character limit is reached.
- Example: Entering the Legal Organization Name.
- Legal Organization Name: First America American Autoworkers Union Local Chapter 47
- Correct Entry: First America American Autoworkers Union Local Cha
- Incorrect Entry: First Amer American Autowkers Union Local Chapt 47
- Legal Organization Name: First America American Autoworkers Union Local Chapter 47
- Phone Number
- Must be 10 numbers
- Extension (optional)
- Website (optional)
- Organization Type
- Select from: Commercial, Government, Nonprofit, Religious, or Union
Plan Sponsor Address (must be associated with Employer Identification Number [EIN])
- Street Line 1
- Street Line 2 (optional)
- City
- State
- Zip Code
Required Authorized Representative Information
- Email Address (must be in a valid format)
- First Name
- Middle Initial (optional)
- Last Name
Required Account Manager Information
Account Manager Information
- First Name (must be associated with Social Security Number)
- Middle Initial (optional)
- Last Name (must be associated with Social Security Number)
- Date of Birth (must be associated with Social Security Number)
- U.S. Social Security Number
- Phone Number (must be 10 numbers)
- Extension (optional)
- Job Title
- Email Address (must be in a valid format)
Account Manager Mailing Address
- Street Address 1
- Street Address 2 (optional)
- City
- State
- Zip Code
For more information, refer to Register as an RDS Secure Website User.
Supporting Documentation
If the EIN associated with the request for a new Plan Sponsor ID cannot be verified by our automated validation process, the company or organization must provide supporting documentation in order to successfully complete Plan Sponsor Account Registration.
CMS’ RDS Center will contact the prospective Plan Sponsor via email to notify them of the validation failure and request the necessary documentation. The prospective Plan Sponsor must then respond in a timely manner; digital copies of documentation must be provided as email attachments to RDS@cms.hhs.gov.
Supporting documentation can be obtained by calling the Internal Revenue Service (IRS) at 1-800-829-4933. If CMS’ RDS Center does not receive the required documentation in a timely manner or is still unable to validate the information provided, the Plan Sponsor Account Registration will be rejected.
The following forms of documentation are accepted:
- IRS Form 147C
- Assignment of Employer Identification Number letter
- This letter is the response to the SS-4 Form application
- The top right of this document states “Form: SS-4” and includes a “CP 575” notice number
- Letter from the US Department of Treasury (must include the Plan Sponsor Name, address, and EIN)
- Certificate of Amendment of Articles of Incorporation
The following forms of documentation are not accepted:
- IRS Form 5500
- The SS-4 Form application
Note: The Plan Sponsor Name on the form must be an exact match to the legal name on record with CMS' RDS Center.
When CMS' RDS Center receives supporting documentation, this information will be reviewed, and a determination email will be sent to the Plan Sponsor.
What's Next After Creating a New Plan Sponsor Account?
CMS' RDS Center processes and validates the Plan Sponsor and Account Manager Registration information. When this process is successfully completed, the Account Manager receives an email notification confirming the Registration and prompting them to activate Multi-Factor Authentication (MFA). Refer to Multi-Factor Authentication for additional information.
Once MFA has been activated, the Account Manager can then access the RDS Secure Website using their Login ID, Password, and MFA token. If the Account Manager does not receive an email within five business days, contact CMS' RDS Center.
The Authorized Representative receives an email invitation to register with CMS' RDS Center, and a copy of that email is also sent to the Account Manager. The Authorized Representative must follow the instructions in the email invitation to complete Registration. Authorized Representatives that already have an existing account will receive an email notification advising them that they have been added to the new Plan Sponsor account. If the Authorized Representative does not receive an email within five business days, contact CMS' RDS Center.
Step-by-Step Instructions
This section provides step-by-step instructions to complete Plan Sponsor registration.
Select one of the options below based on your current account status.
Important: If you are an existing user with a role type other than Account Manager (i.e., Authorized Representative, Designee, or Actuary), your current account must be terminated before you can register to become an Account Manager. You must be removed from all applications and Plan Sponsor accounts you are assigned to, even applications that have completed Reconciliation in the past. Refer to User Management for guidance on these processes.
New User
If you do not have an existing Account Manager Secure Website account, follow the instructions below:
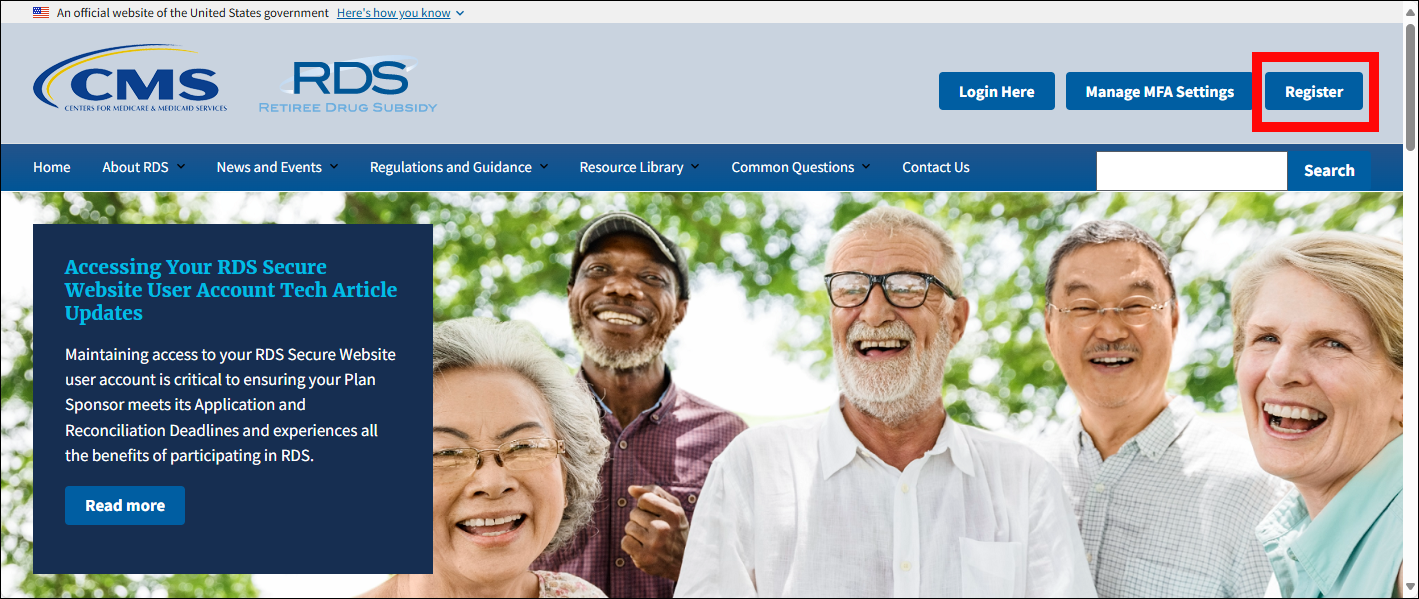
- Navigate to the RDS Program Website home page: http://www.rds.cms.hhs.gov.
-
Select Register.
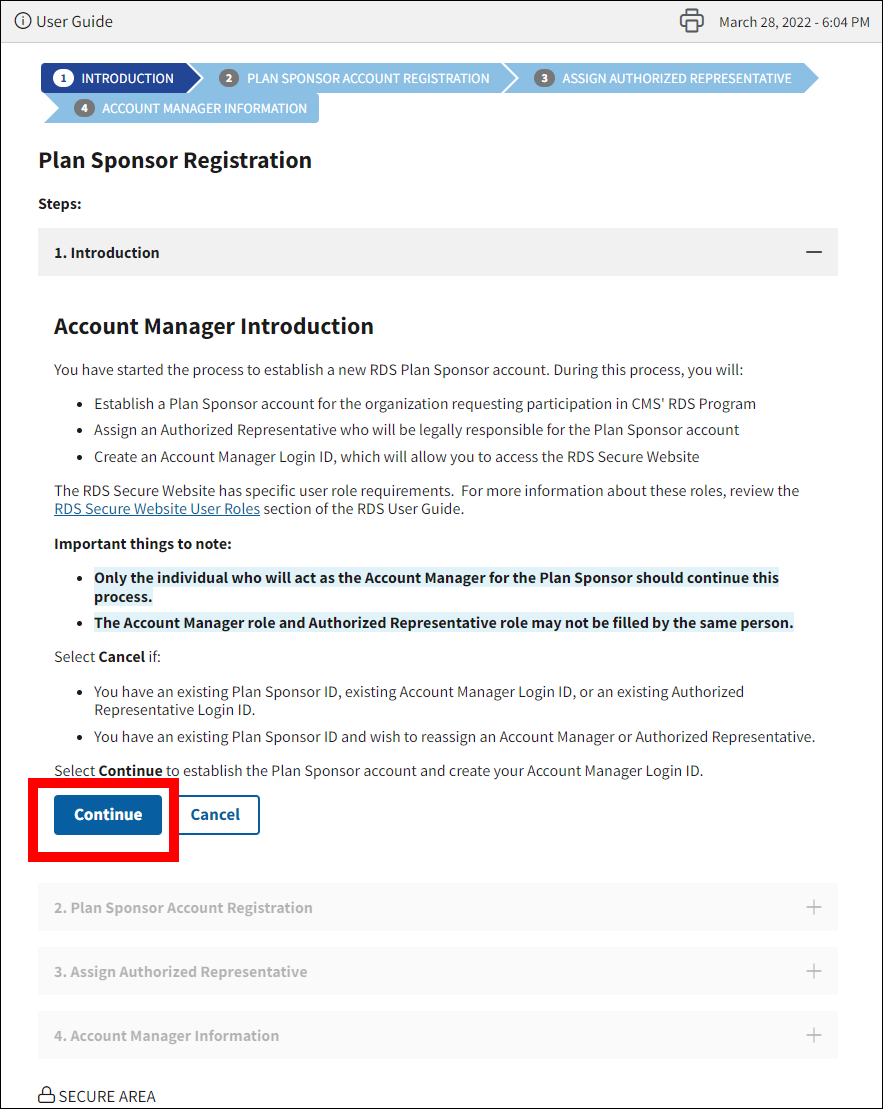
On the Plan Sponsor Registration page, within the Introduction section:
- Review the Account Manager Introduction.
-
Select Continue to proceed or select Cancel to terminate this process and return to the Login page.
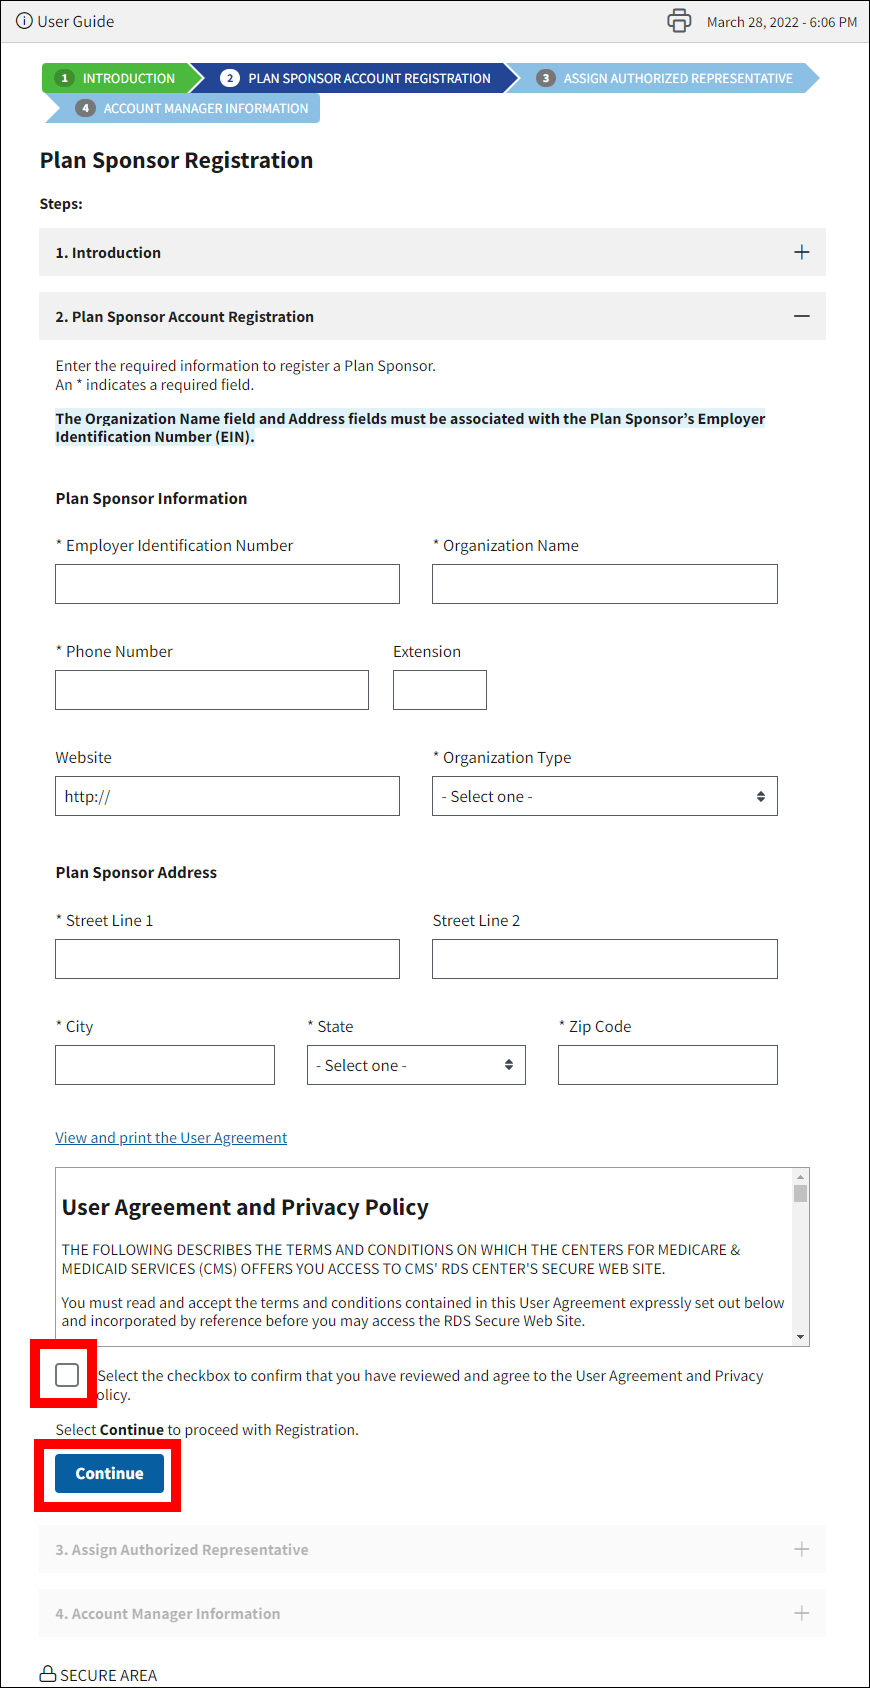
In the Plan Sponsor Account Registration section:
An asterisk (*) indicates a required field.
- *Enter the Employer Identification Number
- *Enter the Organization Name (If the entire legal organization name does not fit in the field, enter it without abbreviation until the character limit is reached.)
- Example: Entering the Legal Organization Name
- Legal Organization Name: First America American Autoworkers Union Local Chapter 47
- Correct Entry: First America American Autoworkers Union Local Cha
- Incorrect Entry: First Amer American Autowkers Union Local Chapt 47
- Legal Organization Name: First America American Autoworkers Union Local Chapter 47
- Example: Entering the Legal Organization Name
- *Enter the Phone Number
- Enter the Organization Website
- *Select the Organization Type
- *Enter Street Line 1
- Enter Street Line 2
- *Enter the City
- *Select the State
- *Enter the Zip Code
- Review the User Agreement. Use the scroll bar to scroll through and view the User Agreement, or select the link to view and print the User Agreement in a new window.
- *Select the checkbox to accept the User Agreement.
-
Select Continue to proceed. Close the browser, or select Cancel from the Introduction section to terminate this process and return to the Login page.
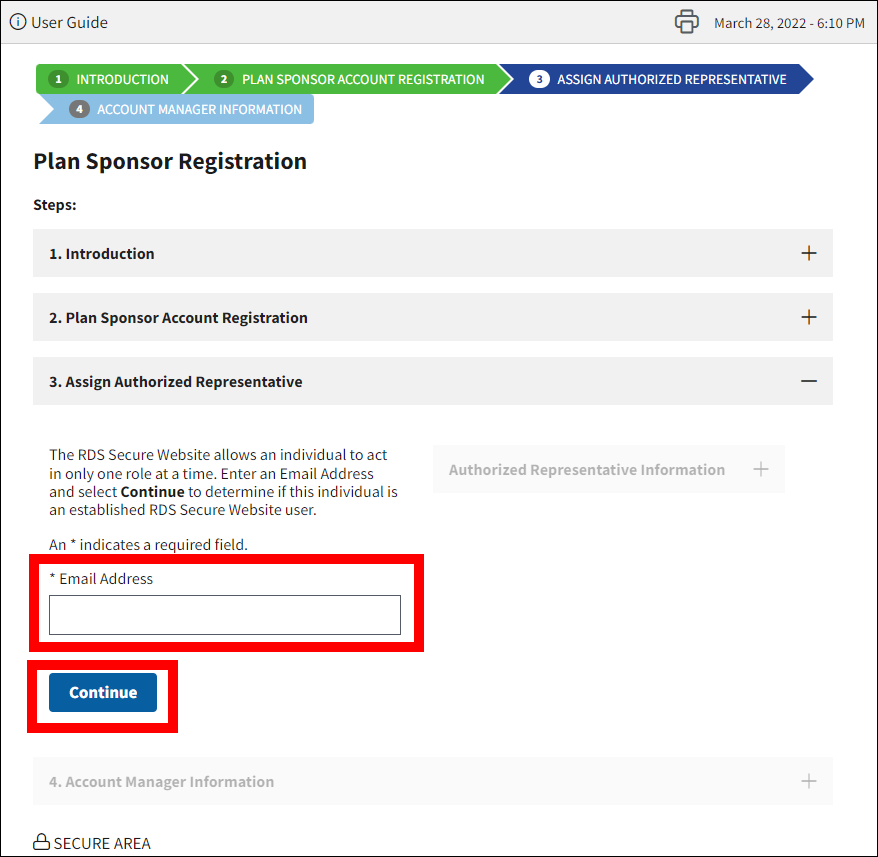
In the Assign Authorized Representative section:
An asterisk (*) indicates a required field.
- *Enter the Email Address for the person who will be invited to be the Authorized Representative.
-
Select Continue to proceed. To terminate this process and return to the Login page, close the browser or select Cancel from the Introduction section.
Note: You will receive one of the following messages in the Authorized Representative Information section based on the Email Address you entered for the Authorized Representative. Follow the instructions for the corresponding message name.
- Authorized Representative Assignment Permitted message
- Authorized Representative Found message
- Authorized Representative Cannot Use message
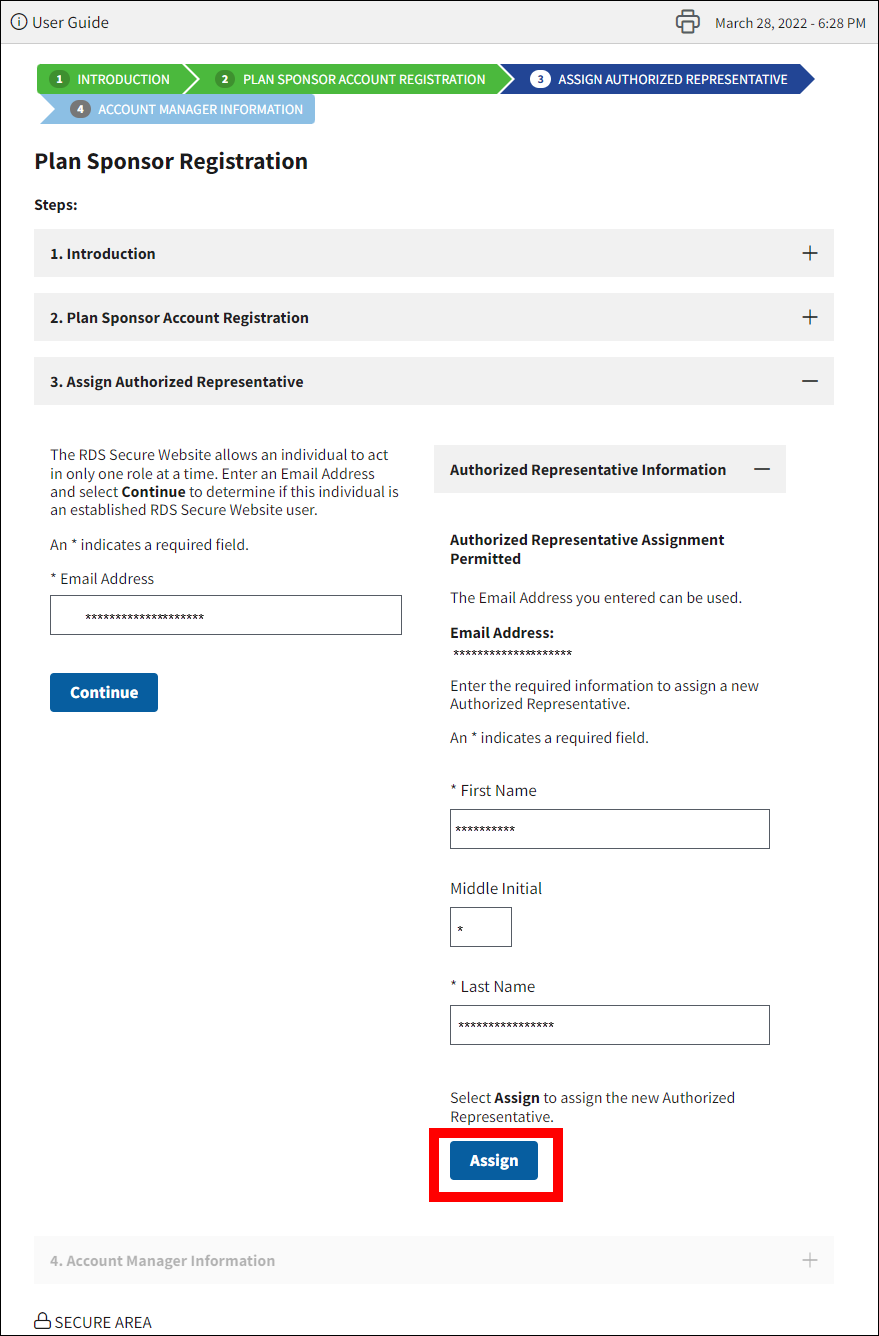
Authorized Representative Assignment Permitted Message
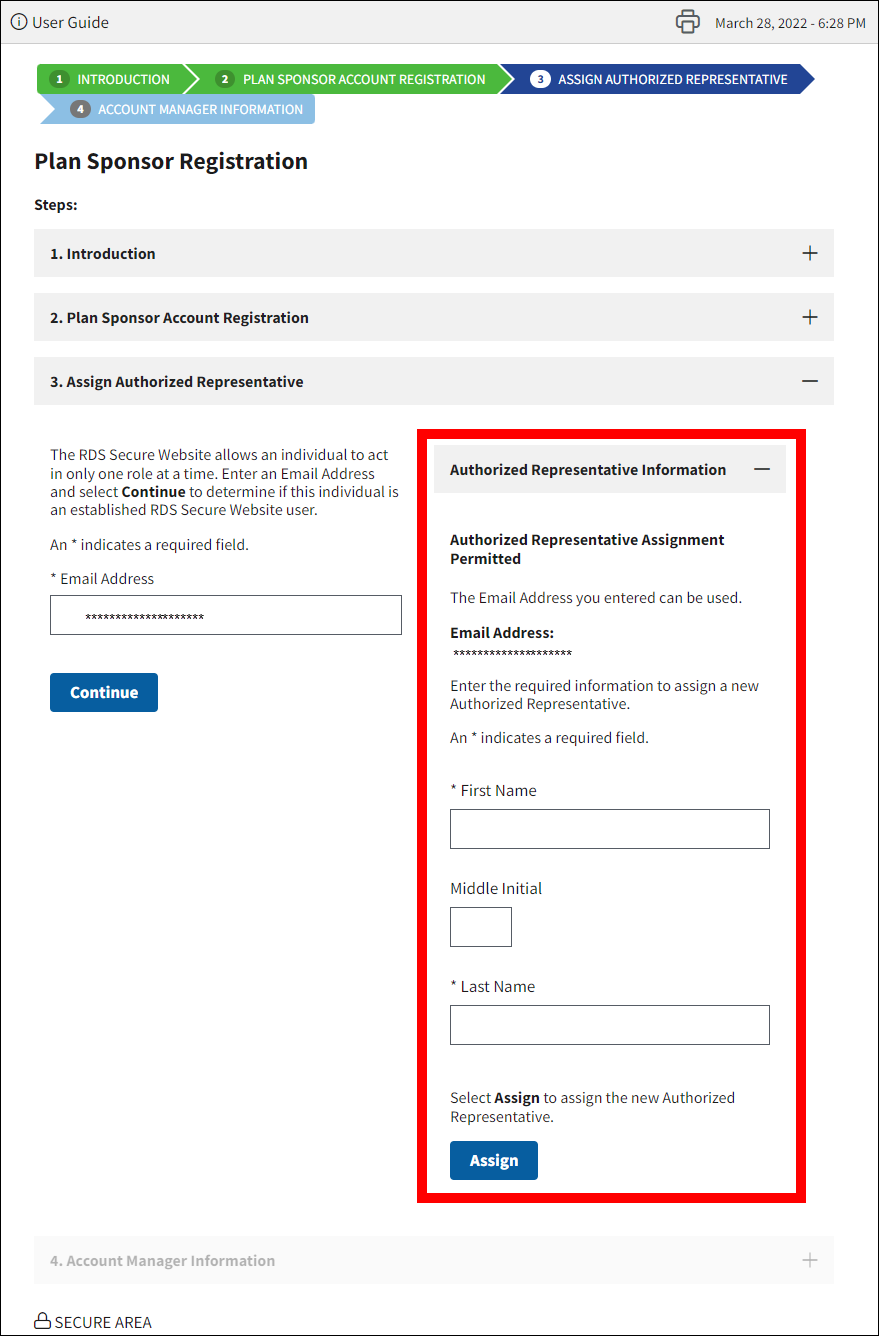
In the Authorized Representative Information section:
An asterisk (*) indicates a required field.
- *Enter the First Name
- Enter the Middle Initial
- *Enter the Last Name.
-
Select Assign New Authorized Representative to appoint this person as the Authorized Representative and continue on to number 5 of this subsection. That individual will receive a Registration email at the address you provided in order to complete Registration and create their RDS Secure Website account. Close the browser, or select Cancel from the Introduction section to terminate this process and return to the Login page.
If you would like to assign a different individual, you may enter a new Email Address in the Email Address field; the Authorized Representative Assignment Permitted message will be removed. Select Continue again to determine if that new user can be assigned as the Authorized Representative.
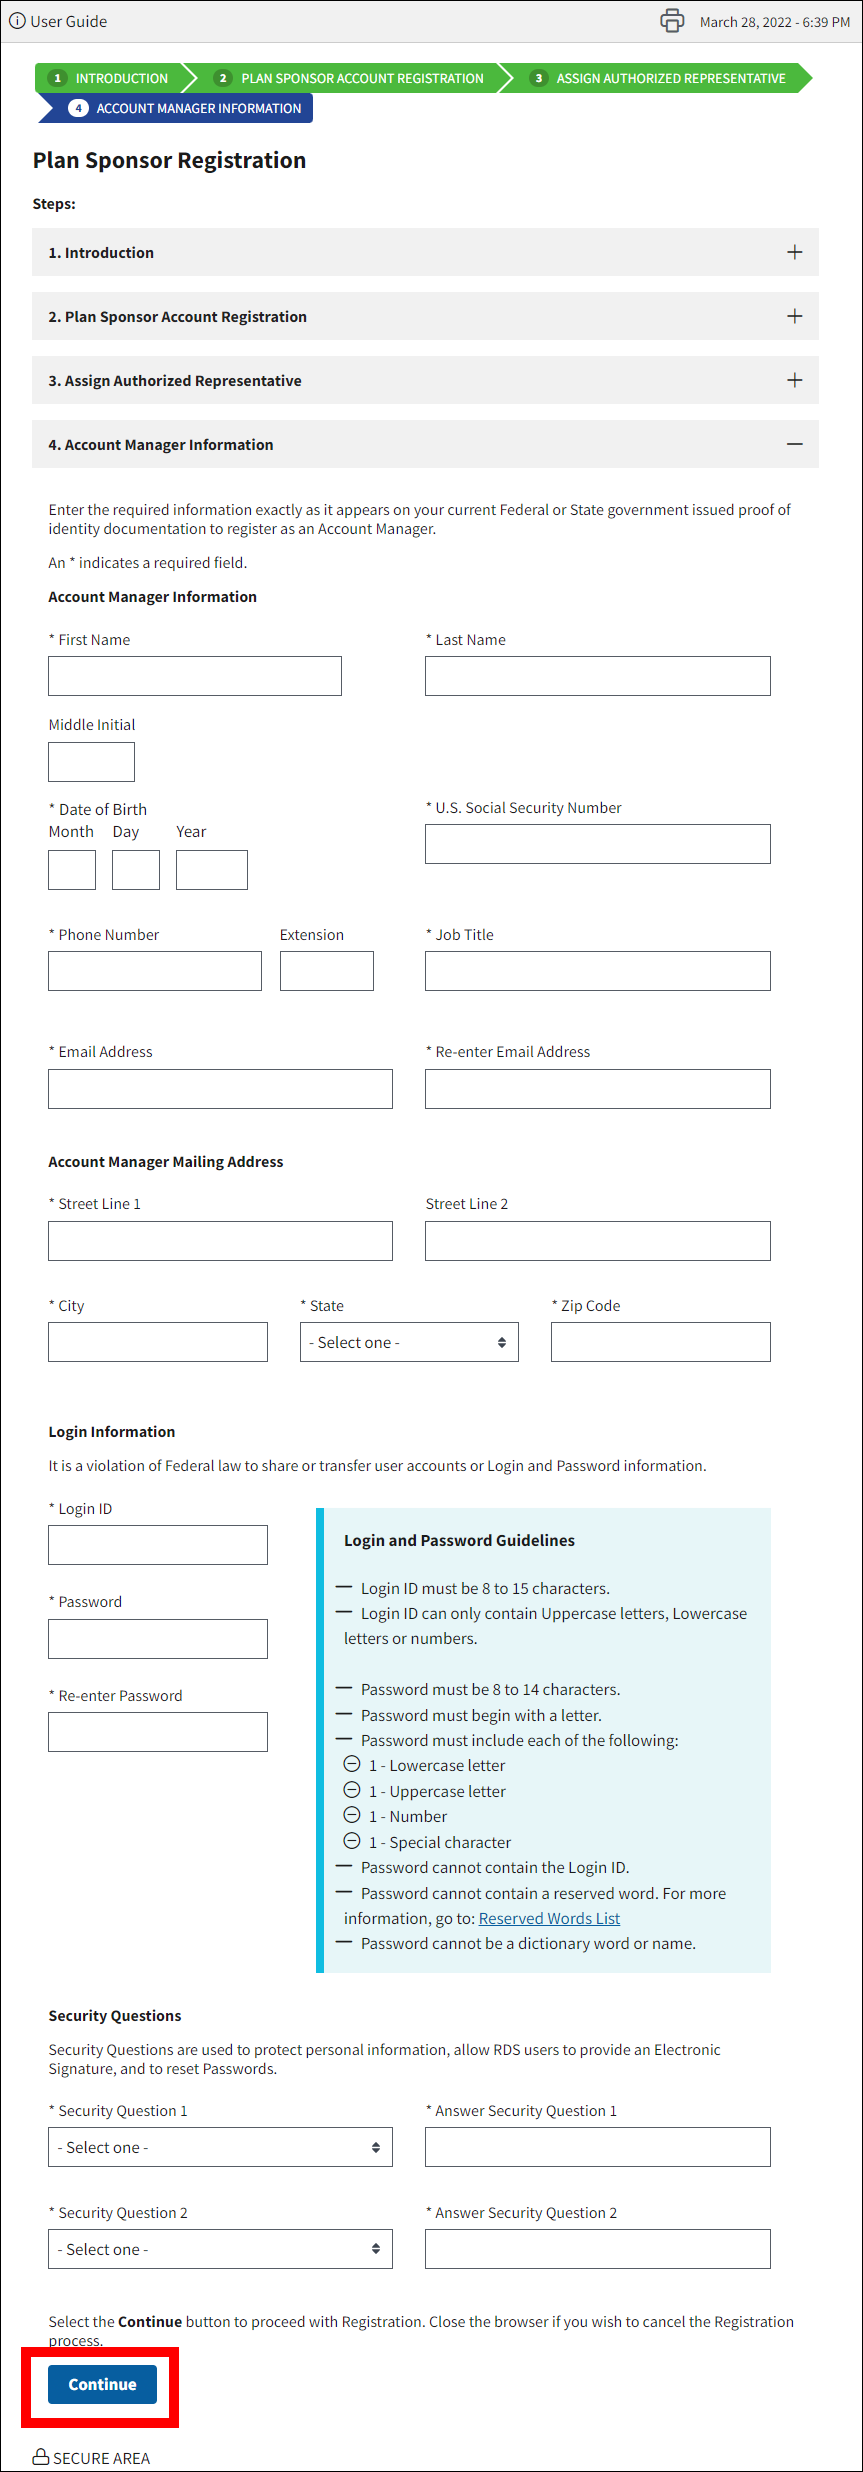
In the Account Manager Information section:
An asterisk (*) indicates a required field.
- *Enter the First Name
- Enter the Middle Initial
- *Enter the Last Name
- *Enter the Date of Birth
- *Enter the Social Security Number
- *Enter the Phone Number
- Enter the Extension
- *Enter the Job Title
- *Enter the Email Address
- *Re-enter the Email Address
- *Enter Street Line 1
- Enter Street Line 2
- *Enter the City
- *Select the State
- *Enter the Zip Code
- *Enter a Login ID based on the Login ID Requirements.
- *Enter a Password based on the Password Requirements.
- *Re-enter Password for verification.
-
*Select Security Questions and enter Answers (these are not case-sensitive fields when you are asked for them within the Secure Website).
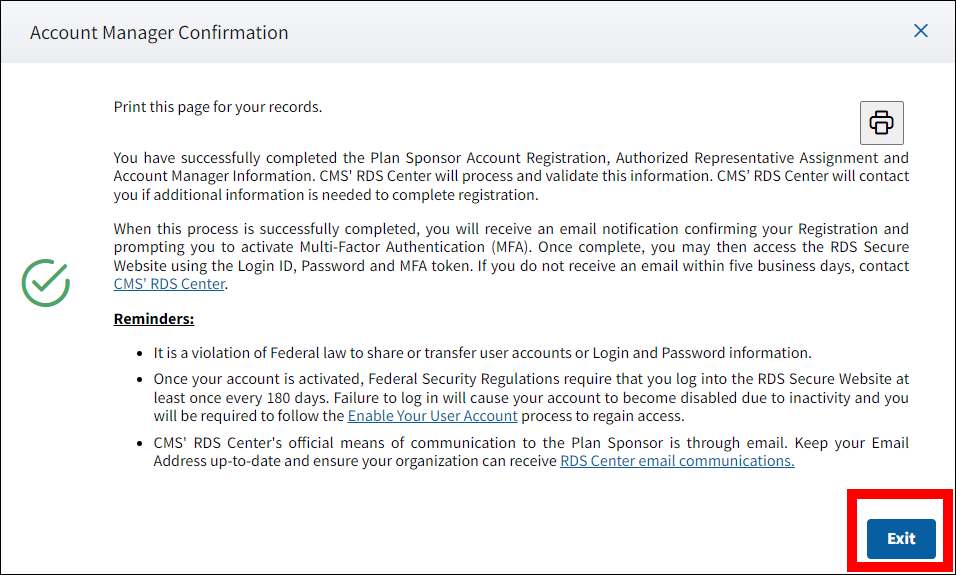
In the Account Manager Confirmation pop-up window:
- Print this page for your records.
- Review the important reminders.
-
Select Exit to return to the RDS Program Website.
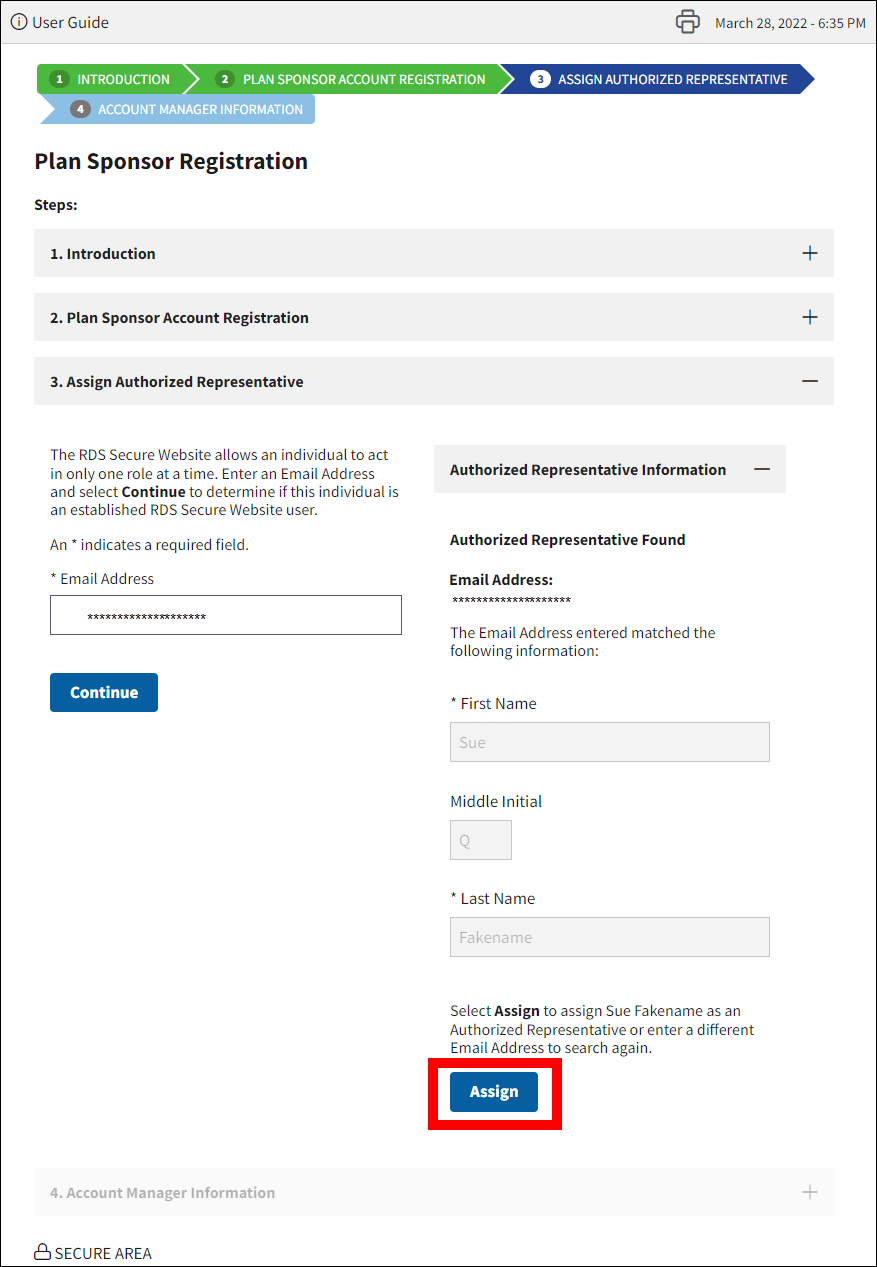
Authorized Representative Found Message
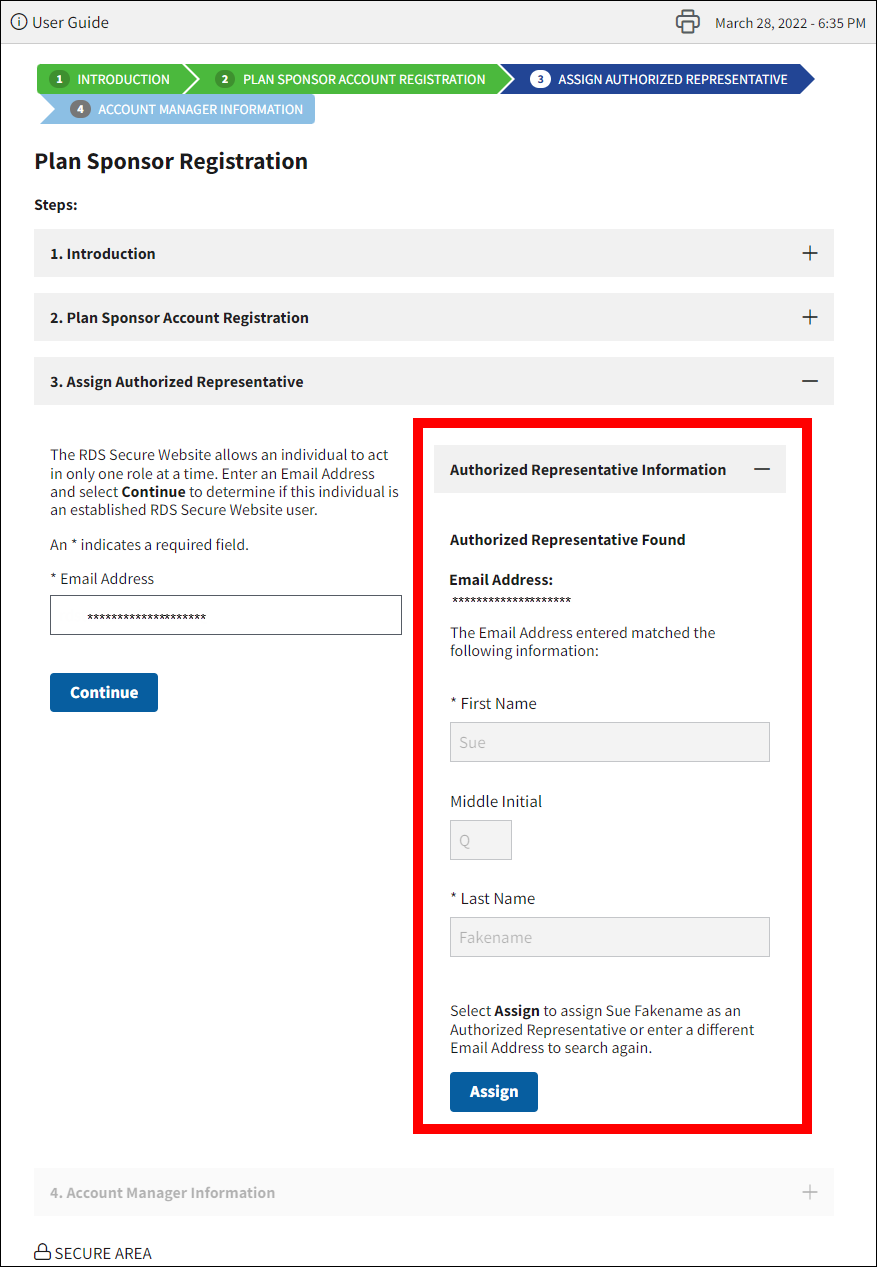
In the Authorized Representative Information section:
-
Select Assign to appoint this person as the Authorized Representative. That individual will receive an email at the address you provided notifying them that they have been invited to the Plan Sponsor account. Close the browser, or select Cancel from the Introduction section to terminate this process and return to the Login page.
If you would like to assign a different individual, you may enter a new Email Address in the Email Address field; the Authorized Representative Assignment Found message will be removed. Select Continue again to determine if that new user can be assigned as the Authorized Representative.
In the Account Manager Information section:
An asterisk (*) indicates a required field.
- *Enter the First Name
- Enter the Middle Initial
- *Enter the Last Name
- *Enter the Date of Birth
- *Enter the Social Security Number
- *Enter the Phone Number
- Enter the Extension
- *Enter the Job Title
- *Enter the Email Address
- *Re-enter the Email Address
- *Enter Street Line 1
- Enter Street Line 2
- *Enter the City
- *Select the State
- *Enter the Zip Code
- *Enter a Login ID based on the Login ID Requirements.
- *Enter a Password based on the Password Requirements.
- *Re-enter Password for verification.
-
*Select Security Questions and enter Answers (these are not case-sensitive fields when you are asked for them within the Secure Website).
In the Account Manager Confirmation pop-up window:
- Print this page for your records.
- Review the important reminders.
-
Select Exit to return to the RDS Program Website.
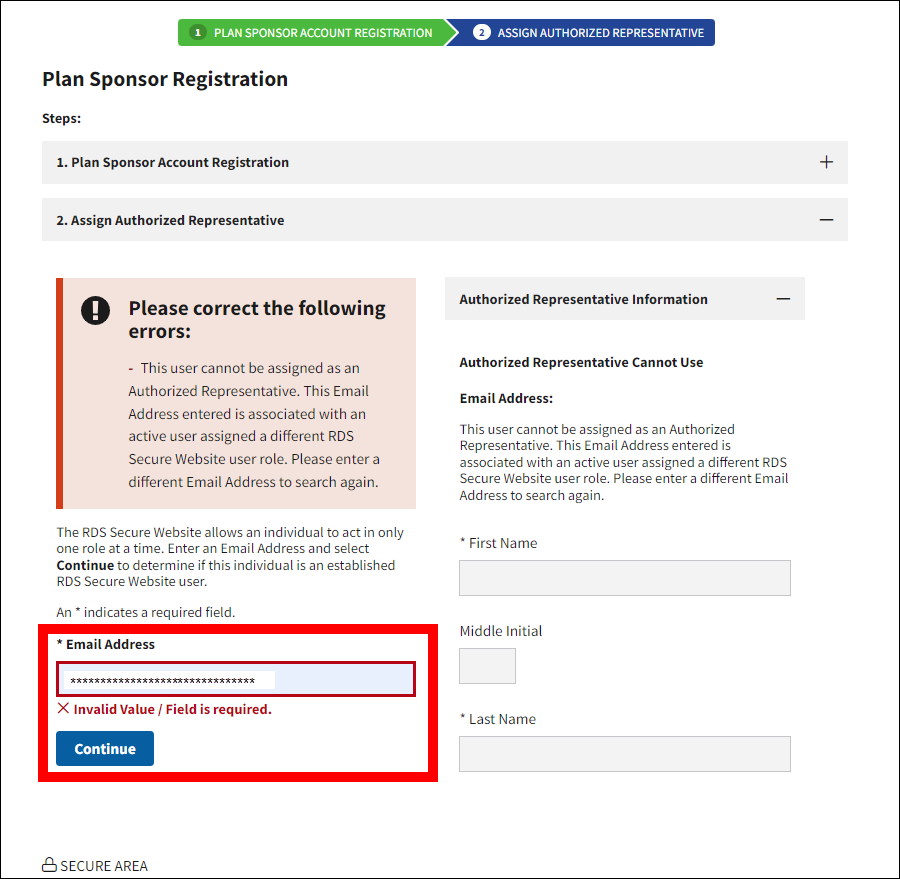
Authorized Representative Cannot Use Message
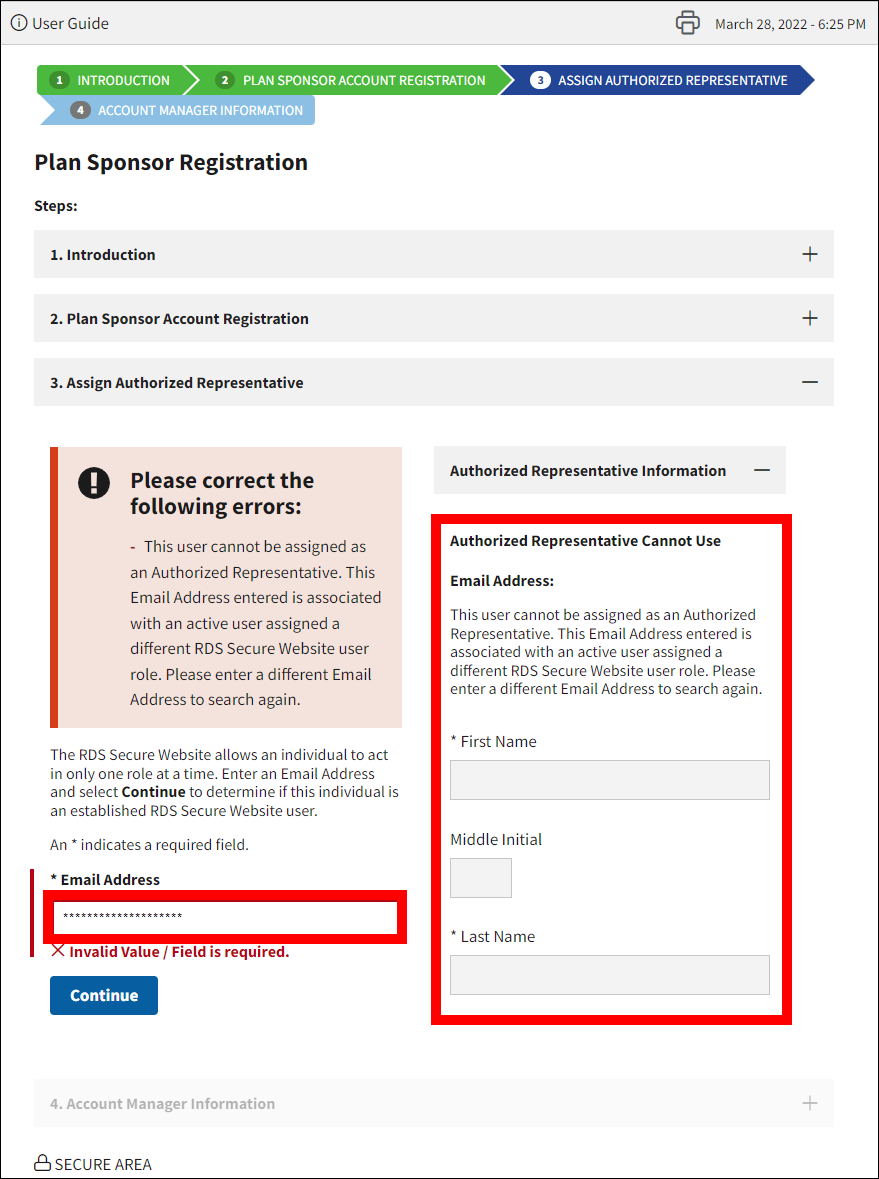
In the Authorized Representative Information section:
- Enter a new Email Address in the Email Address field to appoint a different individual; the Authorized Representative Cannot Use message will be removed. Close the browser, or select Cancel from the Introduction section to terminate this process and return to the Login page.
-
Select Continue again to determine if that new user can be assigned as the Authorized Representative.
Note: A user cannot be assigned as an Authorized Representative when:
- Their RDS Secure Website user account is inactive. To resolve their inactive account, the Authorized Representative must verify their Email Address when logging into the RDS Secure Website. Refer to Verify Email Address for step-by-step instructions.
- Their Email Address is associated with a user account that has a different RDS Secure Website user role. If this user must be appointed as the Authorized Representative, their existing account must first be terminated. The individual must be removed from all applications and Plan Sponsor accounts they are assigned to, even applications that have completed Reconciliation in the past. Refer to User Management for guidance on these processes.
- Refer to the either of the previous two subsections, Authorized Representative Assignment Permitted Message or Authorized Representative Found Message, for guidance on how to complete the Assign Authorized Representative process based on the results from the new Email Address you entered.
Existing User
If you have an existing Account Manager Secure Website account, follow the instructions below:
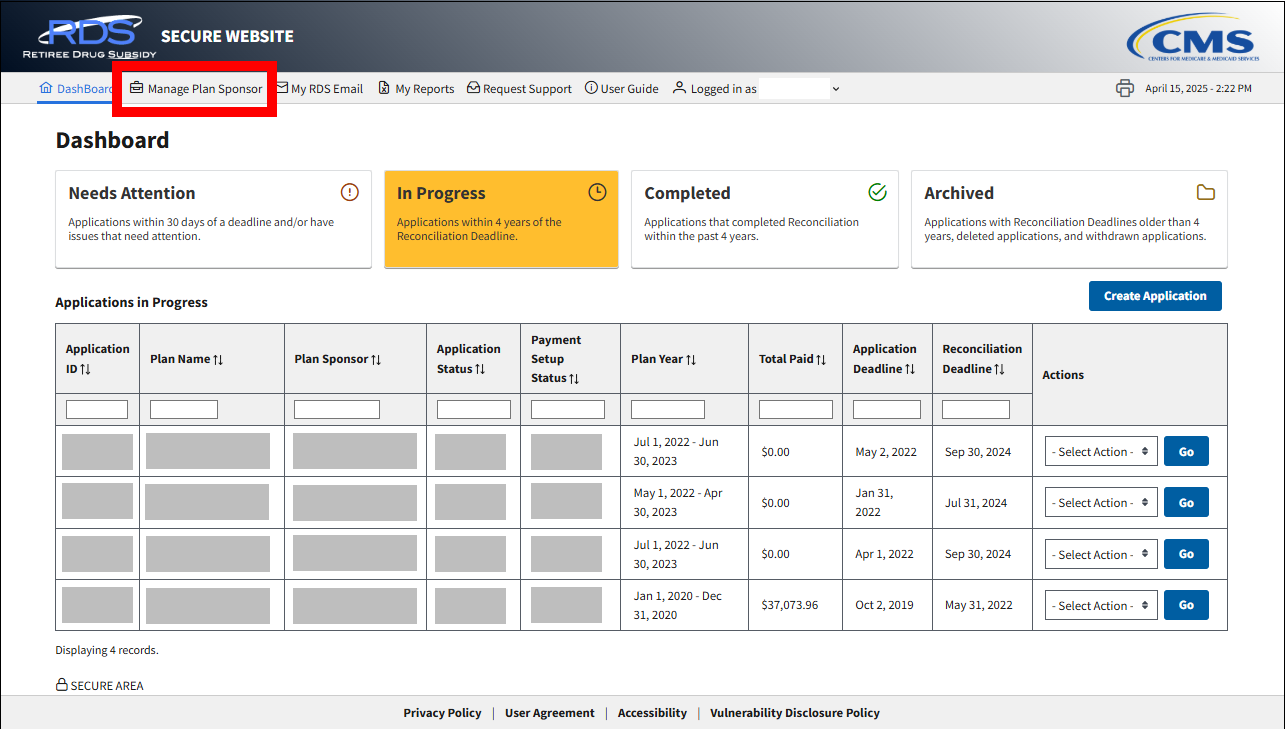
On the Dashboard page:
-
Select Manage Plan Sponsor.
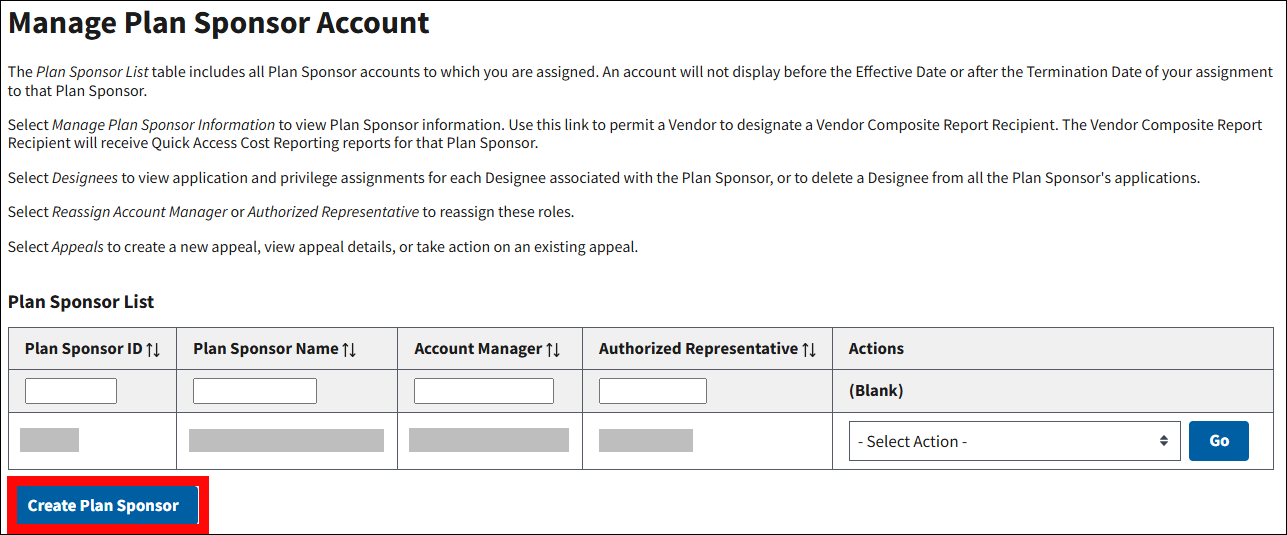
On the Manage Plan Sponsor Account page:
-
Select Create Plan Sponsor.
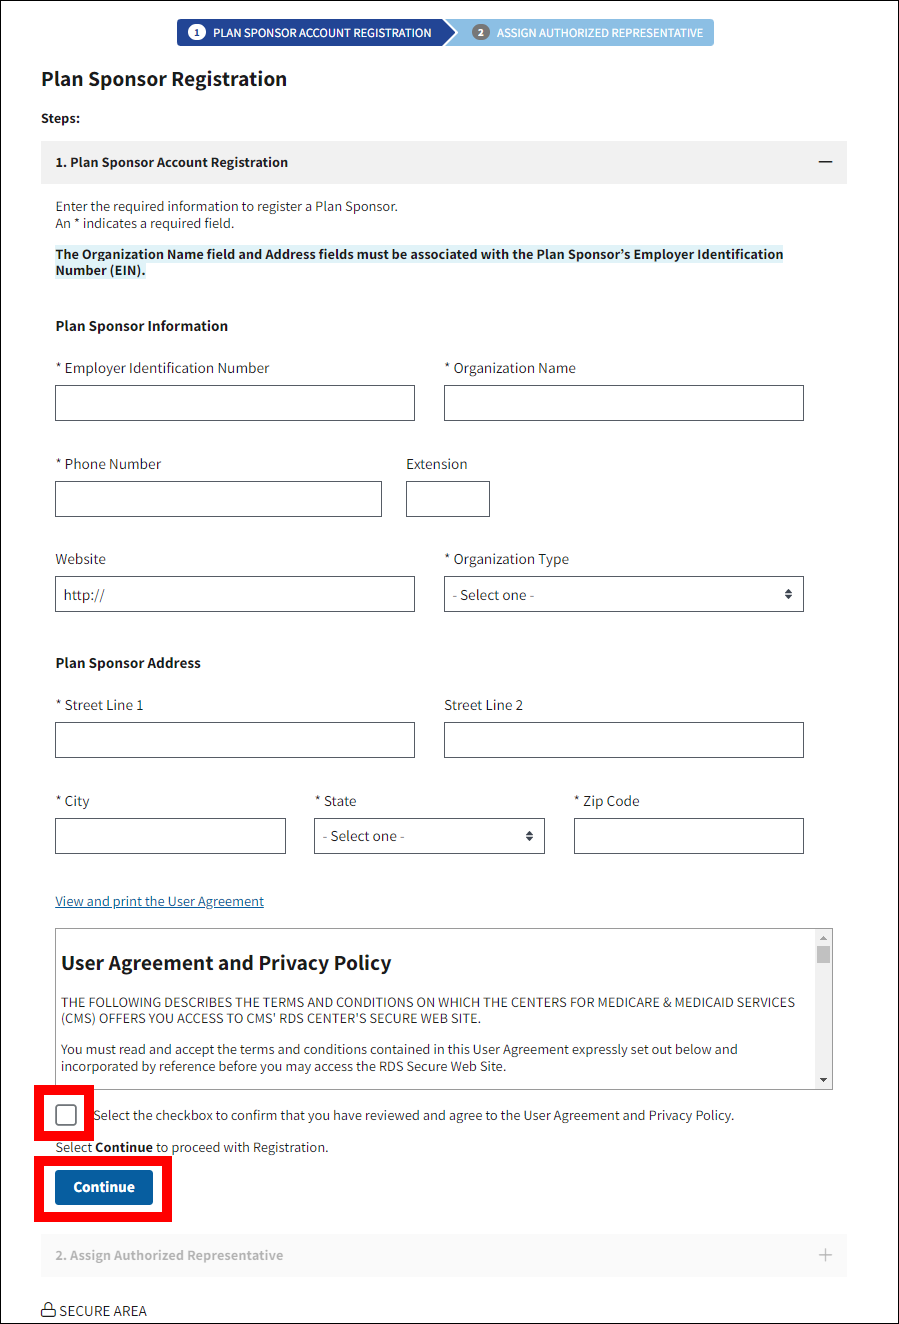
On the Plan Sponsor Registration page:
An asterisk (*) indicates a required field.
- *Enter the Employer Identification Number
- *Enter the Organization Name (If the entire legal organization name does not fit in the field, enter it without abbreviation until the character limit is reached.)
- Example: Entering the Legal Organization Name
- Legal Organization Name: First America American Autoworkers Union Local Chapter 47
- Correct Entry: First America American Autoworkers Union Local Cha
- Incorrect Entry: First Amer American Autowkers Union Local Chapt 47
- Legal Organization Name: First America American Autoworkers Union Local Chapter 47
- Example: Entering the Legal Organization Name
- *Enter the Phone Number
- Enter the Organization Website
- *Select the Organization Type
- *Enter Street Line 1
- Enter Street Line 2
- *Enter the City
- *Select the State
- *Enter the Zip Code
- Review the User Agreement. Use the scroll bar to scroll through and view the User Agreement, or select the link to view and print the User Agreement in a new window.
- *Select the checkbox to accept the User Agreement.
-
Select Continue.
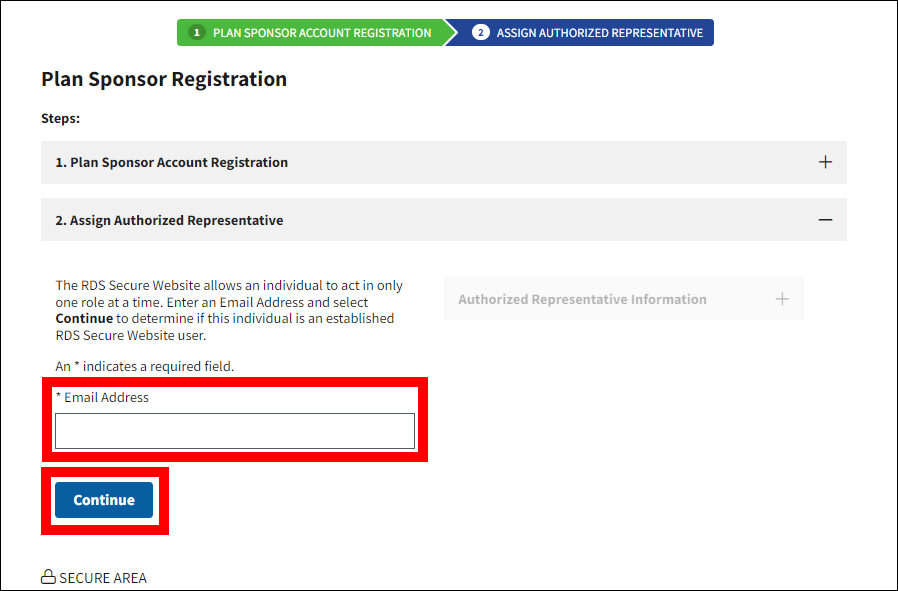
On the Assign Authorized Representative page:
An asterisk (*) indicates a required field.
- *Enter the Email Address for the person who will be invited to be the Authorized Representative.
-
Select Continue.
Note: You will navigate to one of the following pages based on the Email Address entered for the Authorized Representative. Follow the instructions for the corresponding page name.
- Authorized Representative Assignment Permitted message
- Authorized Representative Found message
- Authorized Representative Cannot Use message
Authorized Representative Assignment Permitted Message
In the Authorized Representative Information section:
An asterisk (*) indicates a required field.
- *Enter the First Name
- Enter the Middle Initial
- *Enter the Last Name.
-
Select Assign New Authorized Representative to appoint this person as the Authorized Representative and continue on to number 5 of this subsection. That individual will receive a Registration email at the address you provided in order to complete Registration and create their RDS Secure Website account. Close the browser, or select Cancel from the Introduction section to terminate this process and return to the Login page.
If you would like to assign a different individual, you may enter a new Email Address in the Email Address field; the Authorized Representative Assignment Permitted message will be removed. Select Continue again to determine if that new user can be assigned as the Authorized Representative.

In the Plan Sponsor Account Confirmation pop-up window:
- Print this page for your records.
- Review the important reminders.
-
Select Exit.

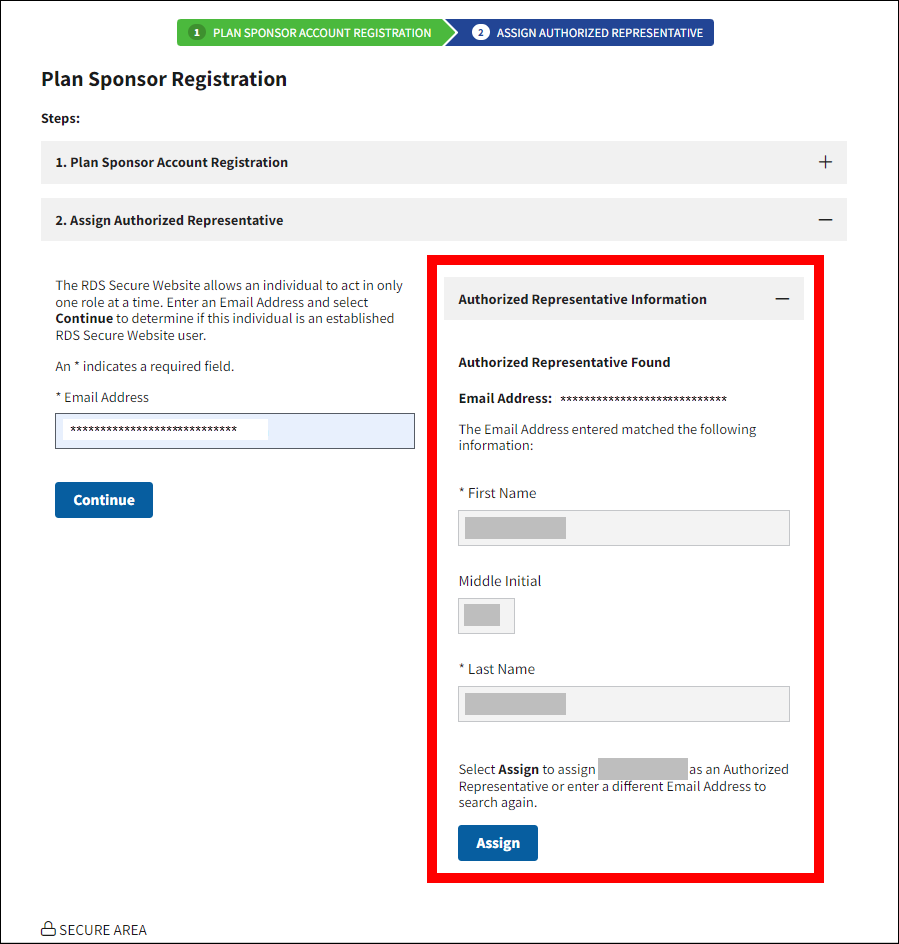
Authorized Representative Found Message
In the Authorized Representative Information section:
-
Select Assign to appoint this person as the Authorized Representative. That individual will receive an email at the address you provided notifying them that they have been invited to the Plan Sponsor account. Close the browser, or select Cancel from the Introduction section to terminate this process and return to the Login page.
If you would like to assign a different individual, you may enter a new Email Address in the Email Address field; the Authorized Representative Assignment Found message will be removed. Select Continue again to determine if that new user can be assigned as the Authorized Representative.
In the Plan Sponsor Account Confirmation pop-up window:
- Print this page for your records.
- Review the important reminders.
-
Select Exit.
Authorized Representative Cannot Use Message:
- Enter a new Email Address in the Email Address field to appoint a different individual; the Authorized Representative Cannot Use message will be removed. Close the browser, or select Cancel from the Introduction section to terminate this process.
-
Select Continue again to determine if that new user can be assigned as the Authorized Representative.
Note: A user cannot be assigned as an Authorized Representative when:
- Their RDS Secure Website user account is inactive. To resolve their inactive account, the Authorized Representative must verify their Email Address when logging into the RDS Secure Website. Refer to Verify Email Address for step-by-step instructions.
- Their Email Address is associated with a user account that has a different RDS Secure Website user role. If this user must be appointed as the Authorized Representative, their existing account must first be terminated. The individual must be removed from all applications and Plan Sponsor accounts they are assigned to, even applications that have completed Reconciliation in the past. Refer to User Management for guidance on these processes.
Refer to either of the previous two subsections, Authorized Representative Assignment Permitted Message or Authorized Representative Found Message, for guidance on how to complete the Assign Authorized Representative process based on the results from the new Email Address you entered.
Troubleshooting
Error Message Descriptions and Resolutions
Use the following table to assist in resolving errors associated with creating a new Plan Sponsor account.
| Message Text | Message Type | Condition | Resolution |
|---|---|---|---|
| Invalid Value/Field is required. | Error | Required field(s) left empty and/or field(s) contains invalid data. | Populate all required fields with valid data. |
| <Field Name> is required. Enter a valid value in the <Field Name> field. | Error | Required field(s) left empty and/or field(s) contains invalid data. | Populate all required fields with valid data. |
| Select the checkbox to confirm that you have reviewed and agree to the User Agreement and Privacy Policy. | Error | User Agreement and Privacy Policy checkbox left unchecked. | Select the checkbox. |
| This user cannot be assigned as an Authorized Representative. The Email Address entered is associated with an active user assigned a different RDS Secure Website user role. Please enter a different Email Address to search again. | Error | The Email Address entered is associated to an active user account with a different role type (i.e., Account Manager, Designee, or Actuary). |
|
| The Social Security Number you provided is already in use. Users can have only one Login ID, which is identified by unique Social Security Number. Please re-enter the Social Security Number if it was entered incorrectly. | Error | The Social Security Number is associated to an active user account. |
|
| Login ID is already in use. Enter a new Login ID. | Error | Login ID is already associated to another user account. | Enter a new Login ID based on the Login ID Requirements. |
| Password invalid. Password entered does not meet the requirements. | Error | Invalid password format. | Enter a new Password based on the Password Requirements. |
| Password entries do not match. | Error | Password field and Re-enter Password Field values do not match. | Ensure the Password field and the Re-enter Password field match exactly. |
| Security Questions cannot be the same. | Error | Same value selected for Security Question 1 and Security Question 2. | Ensure Security Question 1 and Security Question 2 are not the same question selection. |
| Email Address entries must match. | Error | Values in Email Address field and Re-enter Email Address field do not match. | Ensure the Email Address field and the Re-enter Email Address field match exactly. |
| Email Address entry is associated with an active user holding a different RDS Secure Website user role. Verify the Email Address and enter a different Email Address. | Error | Email Address is associated to an active user account. |
|
Field Formats
Use the following table to assist in completing form fields associated with creating a new Plan Sponsor account.
- Plan Sponsor Information Field Formats
- Plan Sponsor Address Field Formats
- Required Authorized Representative Information Field Formats
- Account Manager Information Field Formats
- Account Manager Mailing Address Field Formats
Plan Sponsor Information Field Formats
| Field Name | Required or Optional | Size Limit | Character Requirements | Notes |
|---|---|---|---|---|
| Employer Identification Number | Required | 9 Characters Exactly | Numeric Only |
|
| Organization Name | Required | 1-50 Characters | Alpha, Numeric, and Special Characters Allowed |
|
| Phone Number | Required | 10 Characters Exactly | Numeric Only | None |
| Extension | Optional | 1-5 Characters | Numeric Only | None |
| Website | Optional | 1-255 Characters | Alpha, Numeric, and Special Characters Allowed | Pre-populated with ‘http://’, which can be edited or removed |
| Organization Type | Required | Pre-defined Choices | Pre-defined Choices | Select from: Commercial, Government, Nonprofit, Religious, or Union |
Plan Sponsor Address Field Formats
| Field Name | Required or Optional | Size Limit | Character Requirements | Notes |
|---|---|---|---|---|
| Street Line 1 | Required | 1-40 Characters | Alpha, Numeric, and Special Characters Allowed | Must be associated with Employer Identification Number (EIN) |
| Street Line 2 | Optional | 1-40 Characters | Alpha, Numeric, and Special Characters Allowed | Must be associated with Employer Identification Number (EIN) |
| City | Required | 1-30 Characters | Alpha, Numeric, and Special Characters Allowed | Must be associated with Employer Identification Number (EIN) |
| State | Required | Pre-defined Choices | Pre-defined Choices | Must be associated with Employer Identification Number (EIN) |
| Zip | Required | 5 or 9 Characters Exactly | Numeric Only | Must be associated with Employer Identification Number (EIN) |
Required Authorized Representative Information Field Formats
| Field Name | Required or Optional | Size Limit | Character Requirements | Notes |
|---|---|---|---|---|
| Email Address | Required | 1-255 Characters | Alpha, Numeric, and Special Characters Allowed |
|
| First Name | Required | 1-30 Characters | Alpha, Numeric, and Special Characters Allowed | None |
| Middle Initial | Optional | 1 Character | Alpha, Numeric, and Special Characters Allowed | None |
| Last Name | Required | 1-40 Characters | Alpha, Numeric, and Special Characters Allowed | None |
Account Manager Information Field Formats
| Field Name | Required or Optional | Size Limit | Character Requirements | Notes |
|---|---|---|---|---|
| First Name | Required | 1-30 Characters | Alpha, Numeric, and Special Characters Allowed | Must be associated with Social Security Number |
| Last Name | Required | 1-40 Characters | Alpha, Numeric, and Special Characters Allowed | Must be associated with Social Security Number |
| Middle Initial | Optional | 1 Character | Alpha, Numeric, and Special Characters Allowed | Must be associated with Social Security Number if provided |
| Date of Birth | Required |
|
Numeric Only |
|
| U.S. Social Security Number | Required | Exactly 9 Characters | Numeric Only |
|
| Phone Number | Required | Exactly 10 Characters | Numeric Only | None |
| Extension | Optional | 1-5 Characters | Numeric Only | None |
| Job Title | Required | 1-20 Characters | Alpha, Numeric, and Special Characters Allowed | None |
| Email Address | Required | 1-255 Characters | Alpha, Numeric, and Special Characters Allowed |
|
| Re-enter Email Address | Required | 1-255 Characters | Alpha, Numeric, and Special Characters Allowed | Must match Email Address field exactly |
Account Manager Mailing Address Field Formats
| Field Name | Required or Optional | Size Limit | Character Requirements | Notes |
|---|---|---|---|---|
| Street Line 1 | Required | 1-40 Characters | Alpha, Numeric, and Special Characters Allowed | None |
| Street Line 2 | Optional | 1-40 Characters | Alpha, Numeric, and Special Characters Allowed | None |
| City | Required | 1-30 Characters | Alpha, Numeric, and Special Characters Allowed | None |
| State | Required | Pre-defined Choices | Pre-defined Choices | None |
| Zip | Required | 5 or 9 Characters Exactly | Numeric Only | None |