
Overview
This section provides an overview of actions and events in Payment History, as well as information on troubleshooting Payment History.
- Introduction to Payment History
- Timing & Dependencies
- User Roles
- Payment History Event Types
- Payment History Actions
- Troubleshooting Payment History
Introduction to Payment History
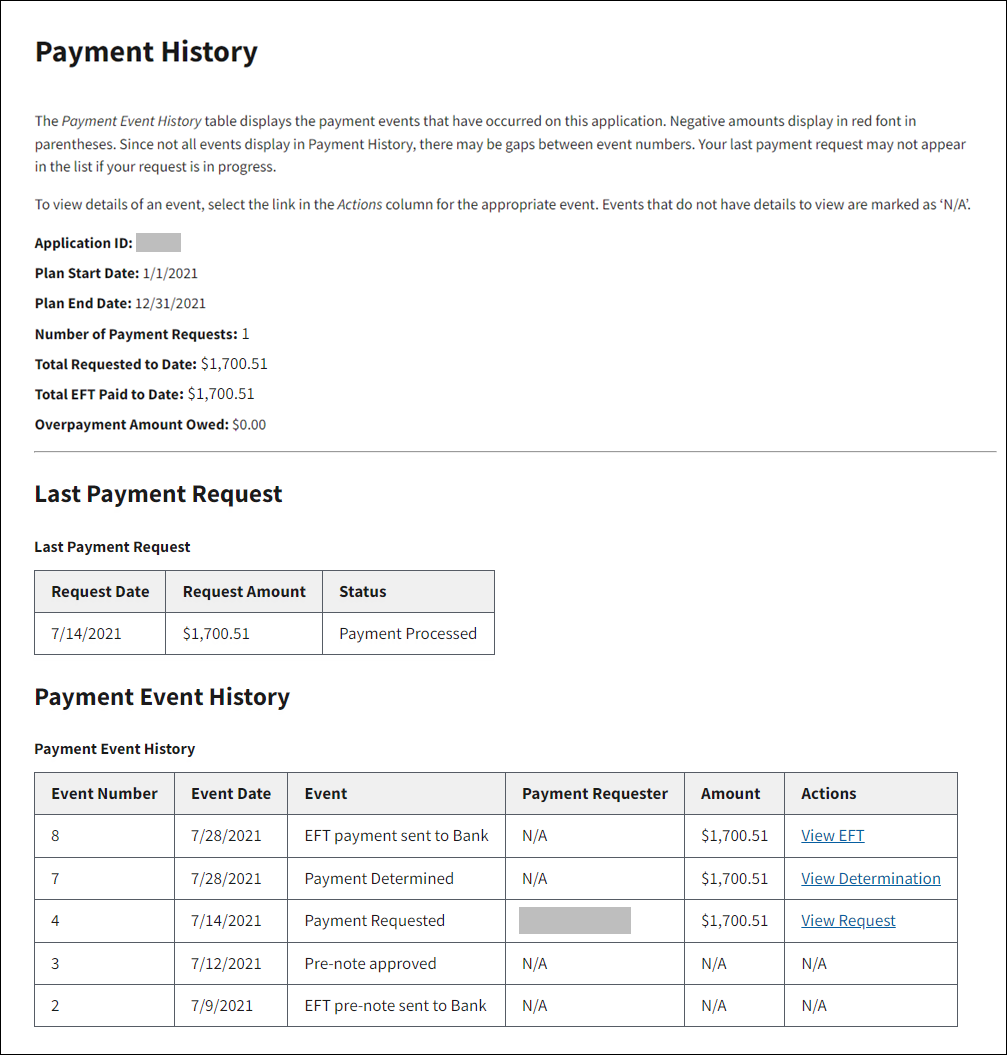
Payment History is an action that displays payment events that have occurred on an application. A Payment Requester (an Account Manager, Authorized Representative, or Designee with Request Payment privilege) selects Payment History from the Left Navigation menu of the application to view payment events that have occurred on an application.
For more information about the various payment events, refer to Payment History Event Types.
For information on how to access Payment History, refer to View a Payment Request.
Timing & Dependencies
Payment History is available in the left Navigation Menu after the application has been submitted and approved.
User Roles
Once an RDS application is approved, the Account Manager, Authorized Representative, or Designee with Request Payment privilege can access the Payment History pages.
Payment History Event Types
The following Payment History event types are associated with an application:
- EFT Pre-note Sent to Bank - This event displays when a Plan Sponsor enters or re-enters Banking Information on the RDS Secure Website. The Banking Information supplied by the Plan Sponsor on the application is sent to the bank as a pre-note verification to confirm that it is valid. This process may take up to two weeks.
- EFT Pre-note Approved - This event displays after the pre-note verification is sent to the bank, and the bank approves the Banking Information provided by the Plan Sponsor.
- EFT Pre-note Rejected - This event displays when the pre-note verification is received from the bank advising that the Banking Information provided by the Plan Sponsor is not valid. The Banking Information on the application must be corrected. After the Banking Information corrections are complete, the Authorized Representative must review, re-sign, and re-submit the application for the pre-note validation to be performed. Allow up to two weeks for the pre-note validation process to complete.
- Payment Requested - This event displays when a Payment Requester submits a payment request on the RDS Secure Website, and the payment request has been initially processed by CMS' RDS Center. Note: It may take several days after a payment request is made for this event to appear in the event list. If more than two weeks pass without a payment request event, contact CMS' RDS Center.
- Payment Determined - This event displays the subsidy amount approved by CMS' RDS Center for payment.
- Payment Adjustment applied to another Application - This event displays when CMS' RDS Center uses the subsidy amount owed on the application requesting payment to reduce a negative balance on another application. This event displays the amount deducted from the total payment.
- Payment Adjustment applied from another Application - This event displays when CMS' RDS Center uses funds owed on another application to reduce the negative balance on the application requesting payment. This event displays the amount added to the total payment.
- Adjust Balance Increment - This event displays when CMS' RDS Center makes an incremental adjustment to the payable amount for an application. This is a rare event that does not appear for most applications.
- Adjust Balance Decrement - This event displays when CMS' RDS Center decreases the payable amount for an application. This is a rare event that does not appear for most applications. The event always displays a negative amount.
- EFT Payment Sent to Bank - This event displays when the subsidy payment is sent to the Plan Sponsor's bank by Automated Clearing House (ACH) deposit.
- EFT Payment Failed at Bank - This event displays if the Plan Sponsor's bank rejects the EFT payment even though the bank may have previously approved the account information during the pre-note process. When this event occurs, an email is sent to the Account Manager and Authorized Representative. The Banking Information supplied on the application must then be corrected. After Banking Information corrections are complete, the Authorized Representative must review, re-sign, and re-submit the application for the pre-note validation to be performed. Allow up to two weeks for the pre-note validation to process. If no errors are detected in the corrected Banking Information, the EFT payment is automatically re-sent (this is a system regenerated request).
- System Regenerated Request - If an EFT payment fails, corrections to the Banking Information are made, and the application is re-signed by the Authorized Representative. The EFT payment is automatically re-sent without requiring any further action.
- Payment Request Cancelled - This event displays if a payment request is cancelled by CMS' RDS Center.
Payment History Actions
There are four Payment History actions that may display on the Payment History page:
From this page, an Authorized Representative, Account Manager, or a Designee with Request Payment privilege can review payment requests, payment determinations, payment adjustments, EFT pre-notes, and EFT payment events. Negative amounts display in red font in parentheses.
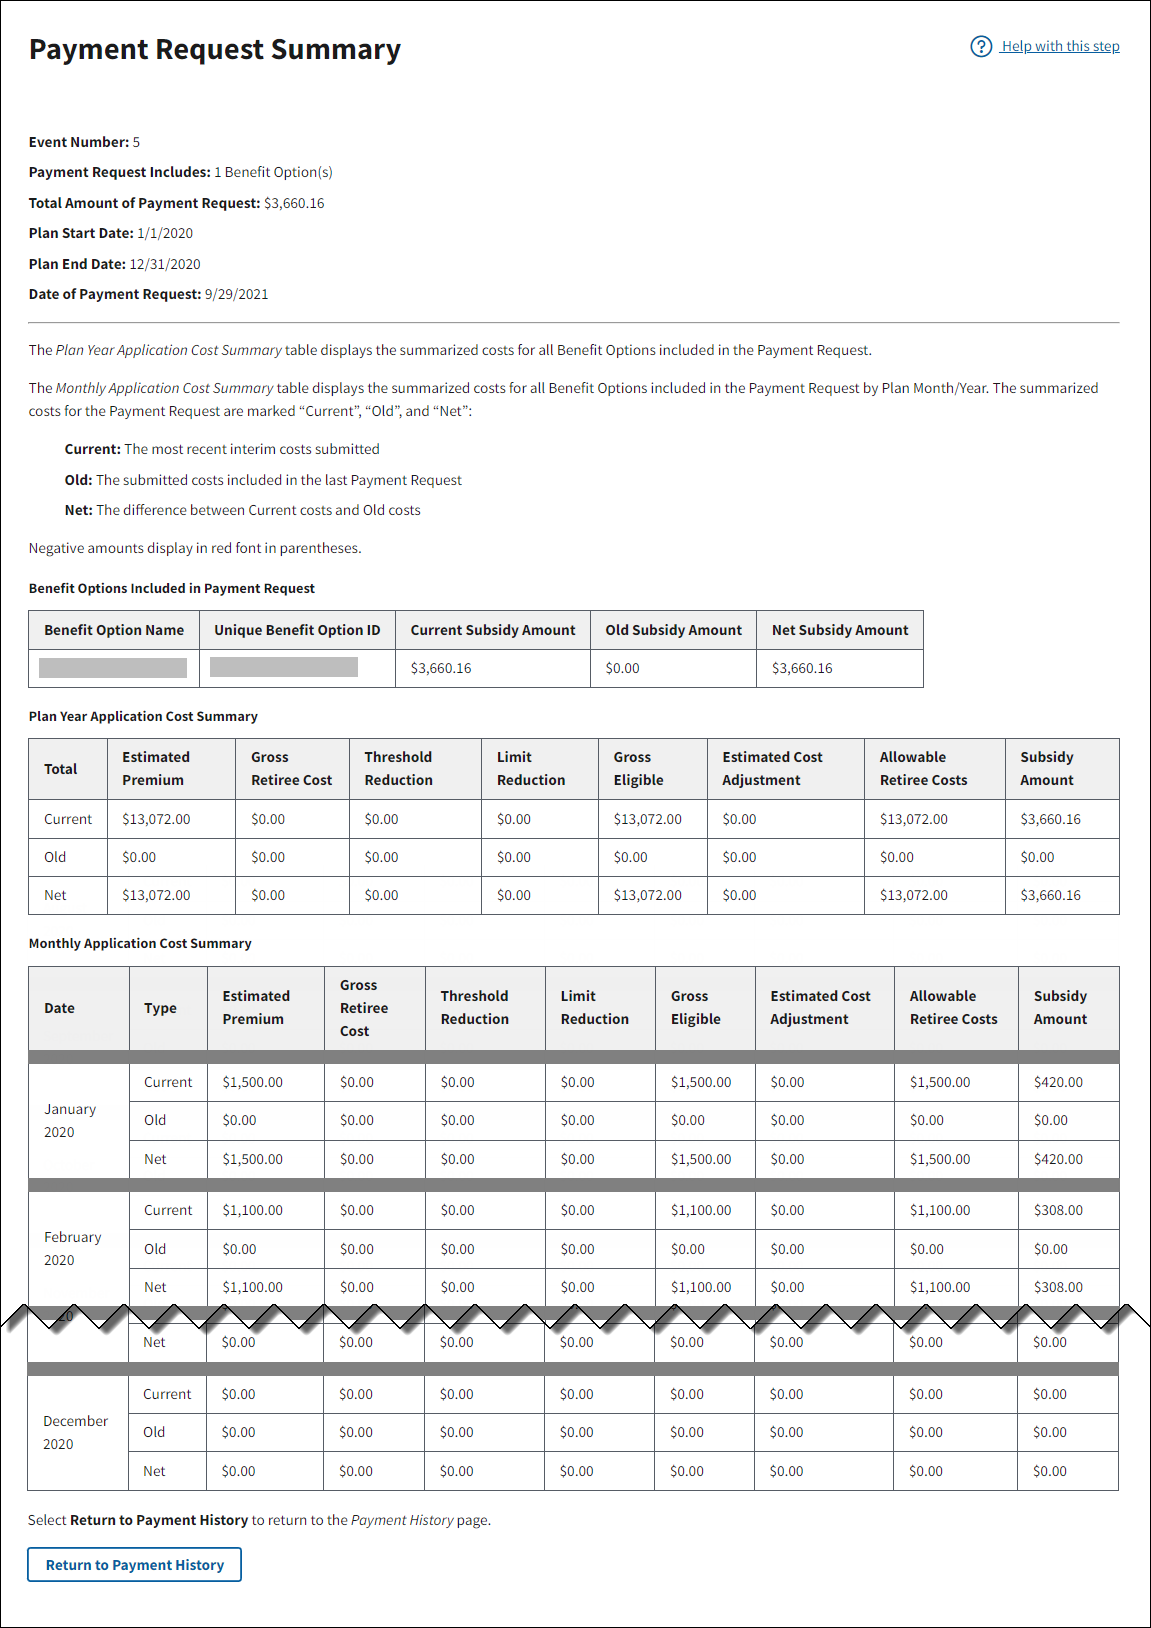
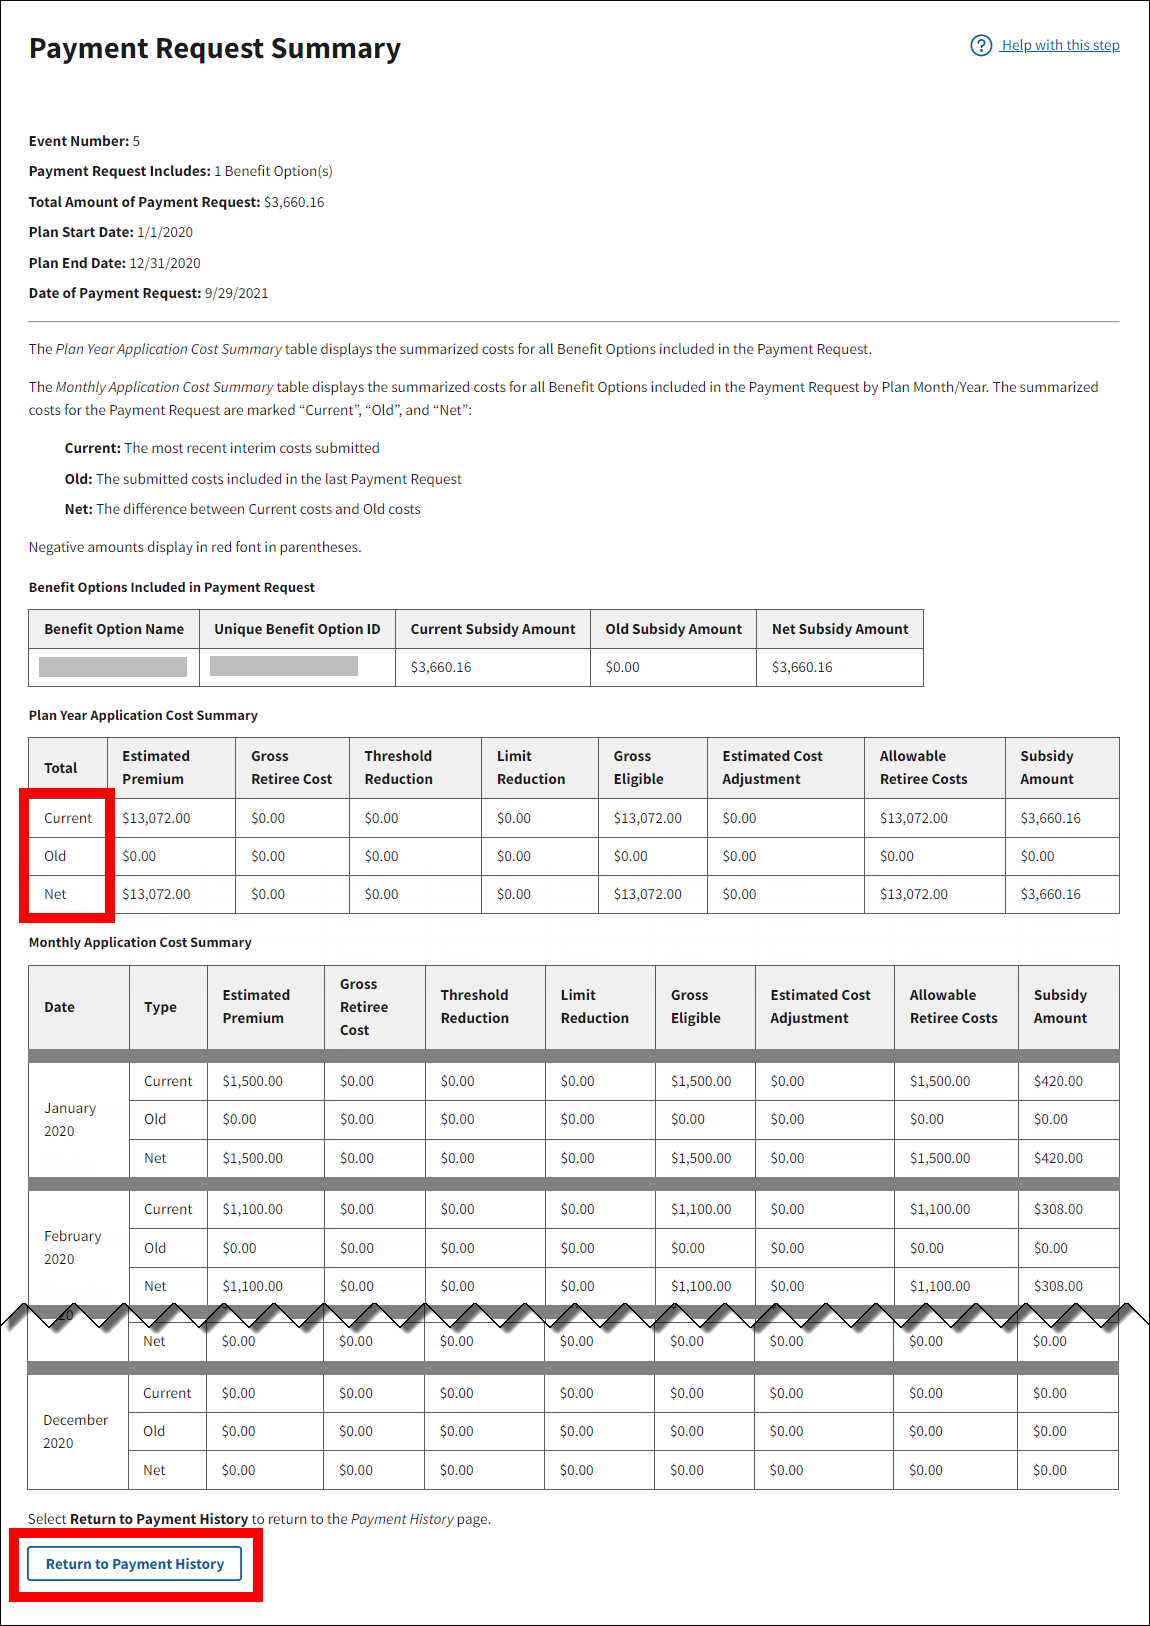
View Request - This action directs the user from the Payment History page to the Payment Request Summary page. Negative amounts display in red font in parentheses. The Payment Request Summary page displays:
- Event Number
- Payment Request Includes (number of Benefit Options included in the request)
- Total Amount of Payment Request
- Plan Start Date
- Plan End Date
- Date of Payment Request
- Benefit Options Included in Payment Request
- Plan Year Application Cost Summary
- Monthly Application Option Cost Summary
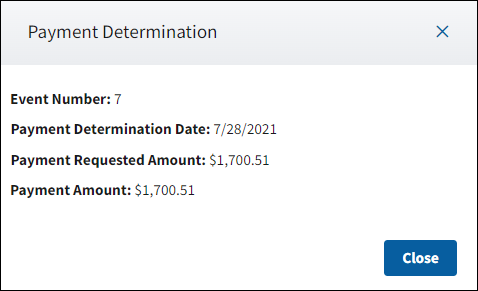
View Determination - This action directs the user from the Payment Event History page to the Payment Determination pop-up. Negative amounts display in red font in parentheses. The window displays:
- Event Number
- Payment Determination Date
- Payment Requested Amount
- Payment Reduction due to... (if applicable)
- Payment Amount
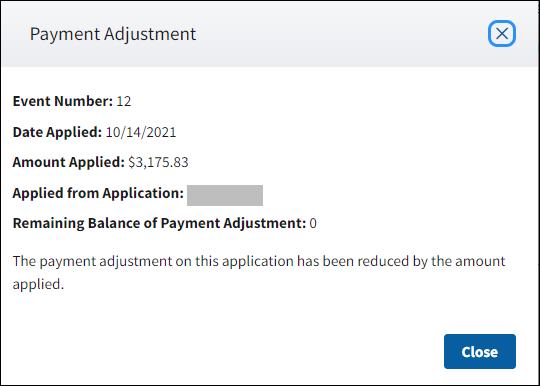
View Adjustment - This action directs the user from the Payment Event History page to the Payment Adjustment pop-up. Negative amounts display in red font in parentheses. The window displays:
- Event Number
- Date Applied
- Amount Applied
- Applied to/Applied from Application - This indicates dollar adjustments either applied to or from. (Adjustments occurring across applications for a Plan Sponsor appear as separate events on the Payment Event History page and the Payment Determination page. Adjustments that occur within an application appear only on the Payment Determination page.)
For example: The $19,350.80 debit in the following Payment Adjustment example resulted from a negative payment request made on another application associated with the same Plan Sponsor.
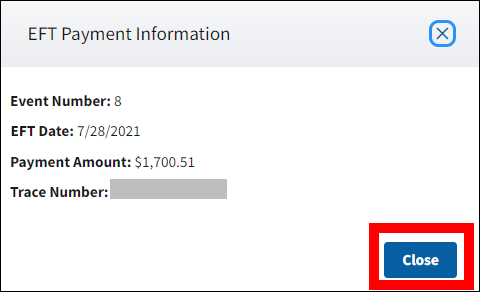
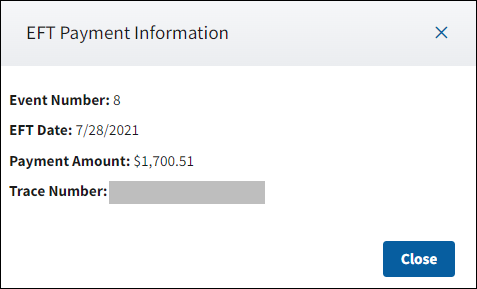
View EFT- This action directs the user from the Payment History page to the EFT Payment Information pop-up. The window displays:
- Event Number
- EFT Date
- Payment Amount
- Trace Number
Troubleshooting Payment History
Determining if EFT Payment Was Successful
To determine if an EFT payment was successful, go to the Payment History page and look for an EFT Payment Sent to Bank event. If more than two weeks have passed since the EFT Payment Sent to Bank event date, and a payment has not been received in the Plan Sponsor's account and an EFT Payment Failed at Bank event does not display, contact CMS' RDS Center.
If an EFT payment failed, the EFT Payment Failed at Bank event displays on the Payment History page. This event displays if the Plan Sponsor's bank rejects the EFT payment even though the bank may have previously approved the account information during the pre-note process. When this event occurs, an email is sent to the Account Manager and Authorized Representative. The Banking Information supplied on the application must be corrected.
After the Banking Information changes are complete, the Authorized Representative must review, re-sign, and re-submit the application for the EFT pre-note validation to be performed. Allow up to two weeks for the Banking Information re-validation process. If no errors are detected in the corrected Banking Information, the EFT payment is automatically re-sent.
Missing Payment Requests
If the last payment request on the Payment History page does not display, the request is still in progress.
Note: If a payment request does not display after two weeks, contact CMS' RDS Center.
Step-by-Step Instructions
This section provides step-by-step instructions to complete the following Payment History tasks:
View Payment Request
To access the RDS Secure Website, and navigate to the Dashboard page review instructions to access the RDS Secure Website.
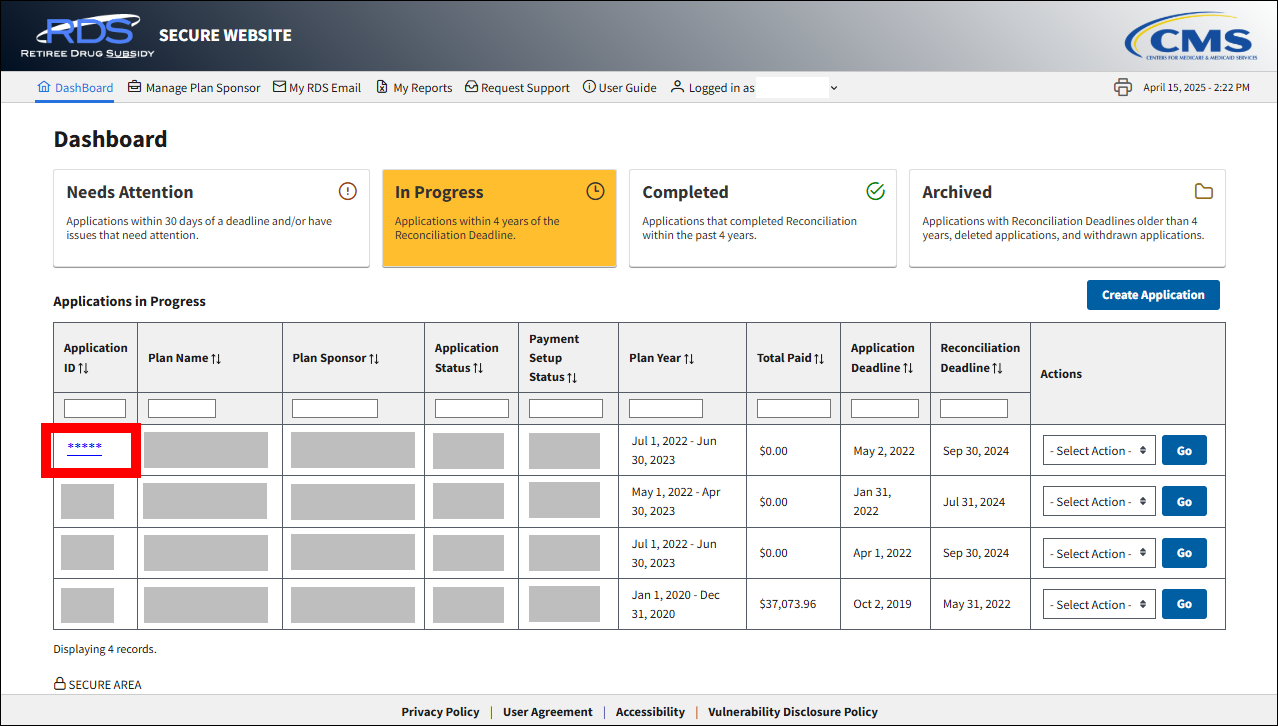
On the Dashboard page:
- Select the appropriate application view—In Progress, Completed, or Archived—to filter the list of applications displayed on the page.
-
Select the Application ID for which you want to view Payment History.

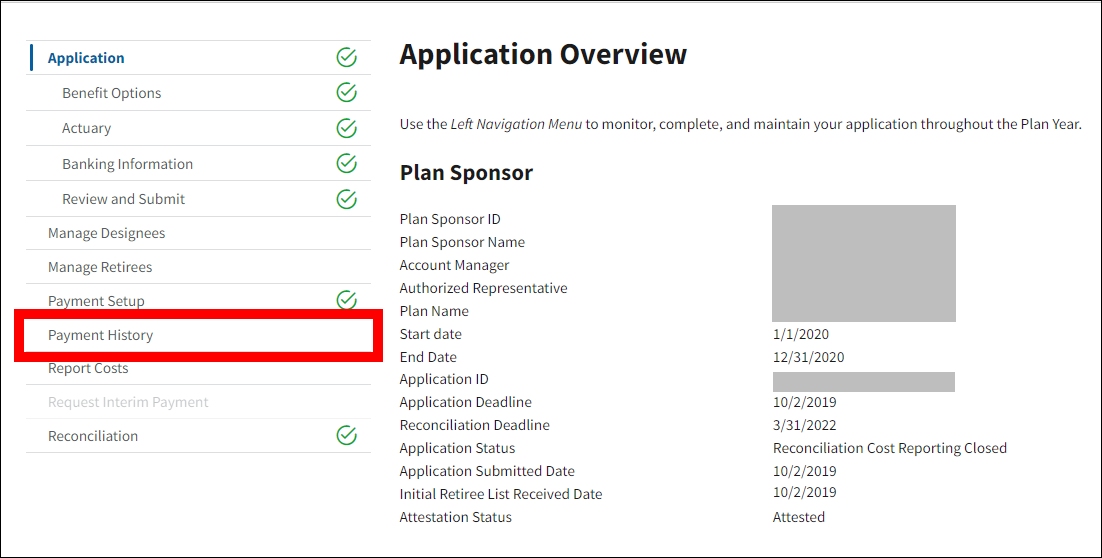
On the Application Overview page:
-
Select Payment History.

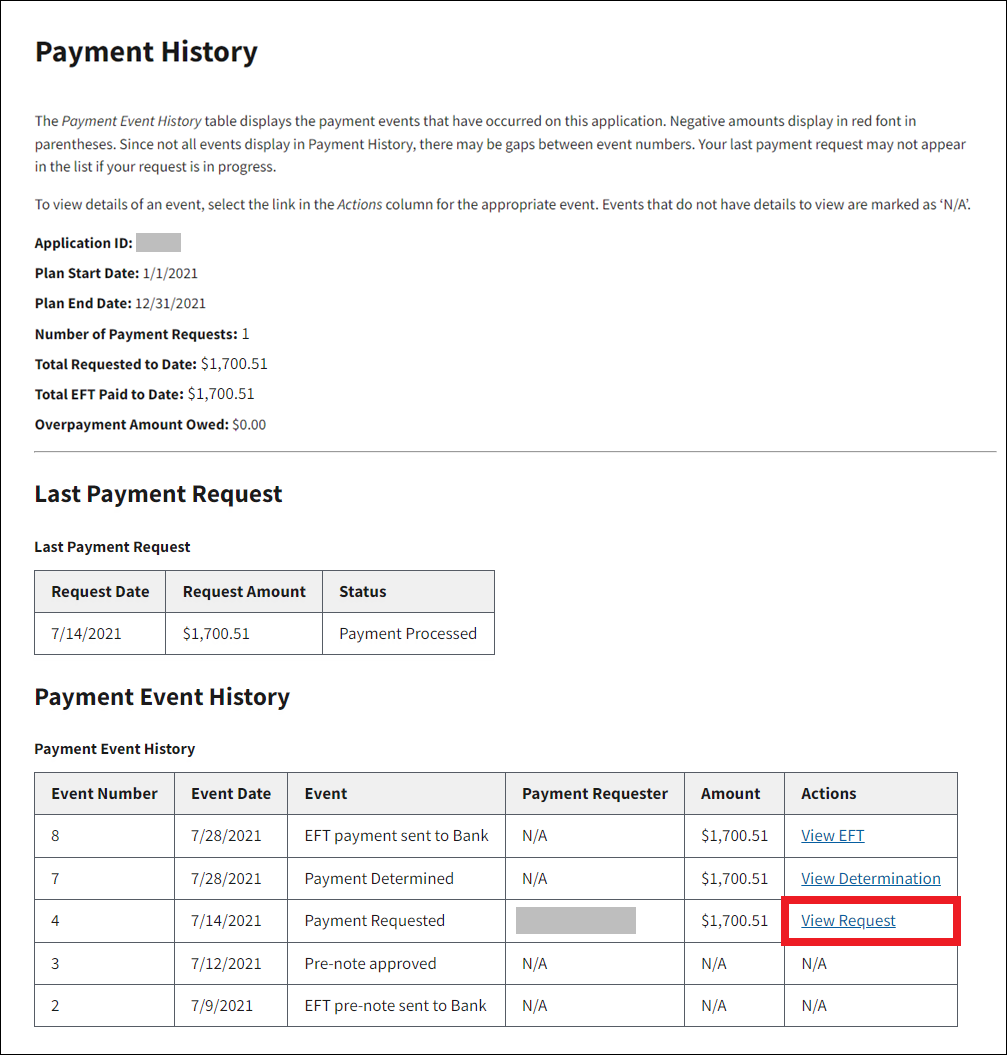
On the Payment History page:
-
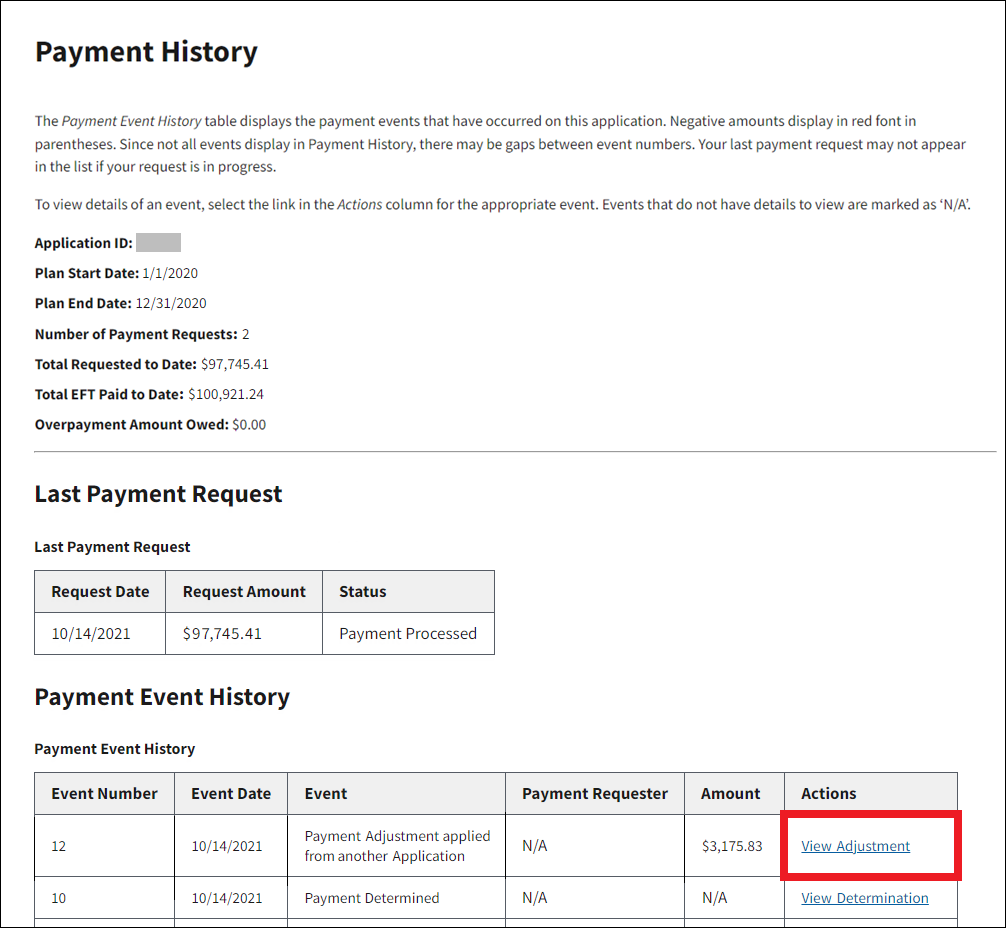
To view details of a particular payment request event, select the View Request hyperlink in the Actions column that corresponds to the appropriate event.
On the Payment Request Summary page:
-
The submitted costs and calculated subsidy amount included in the payment request display and are broken down by Benefit Option and plan month. Negative amounts display in red font in parentheses. Costs displayed include:
- Current - These costs reflect the most recently submitted costs.
- Old - These costs reflect the submitted costs last included in a payment request.
- Net - These costs are calculated as the difference between "Current" and "Old" costs. The amount of the payment request is calculated based on the "Net" costs.
-
Select Return to Payment History to return to the Payment History page.
View Payment Determination
To access the RDS Secure Website, and navigate to the Dashboard page review instructions to access the RDS Secure Website.
On the Dashboard page:
- Select the appropriate application view—In Progress, Completed, or Archived—to filter the list of applications displayed on the page.
-
Select the Application ID for which you want to view Payment History.
On the Application Overview page:
-
Select Payment History.

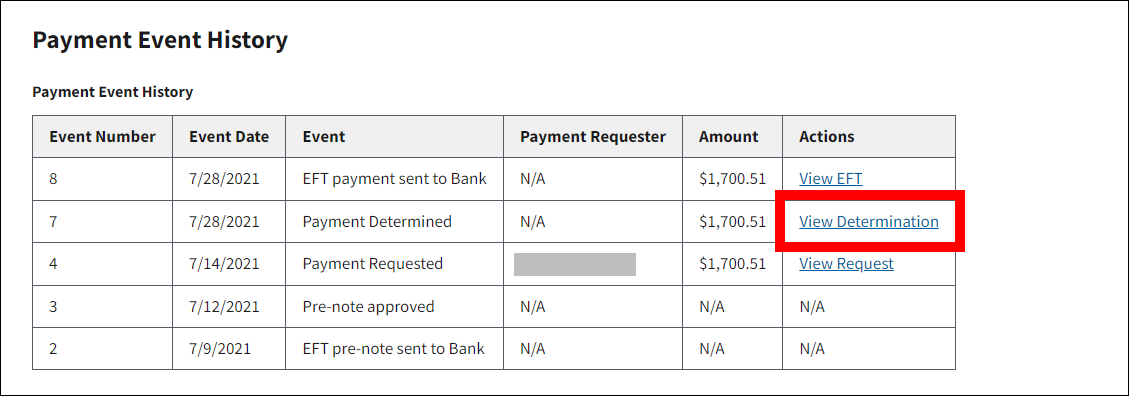
On the Payment History page:
-
To view the amount of a determination, select the View Determination hyperlink in the Actions column that corresponds with the appropriate event.
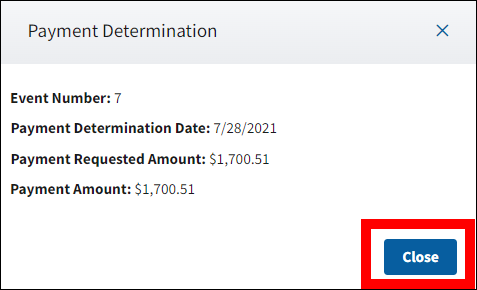
On the Payment Determination pop-up:
-
This pop-up displays the results of the payment determination events. Negative amounts display in red font in parentheses. Items displayed may include:
- Event Number – Displays the identification number of the payment determination event. Event Numbers are sequential – the more events occur, and the more recently an event occurred, the higher the number. Gaps in the sequence of Event Numbers indicate background processing events that are not displayed in the RDS Secure Website.
- Payment Determination Date – Displays the date the payment amount was calculated and approved by CMS' RDS Center.
- Payment Requested Amount – Displays the subsidy amount requested by the Plan Sponsor through a payment request submitted on the RDS Secure Website. If the Reconciliation payment request results in an overpayment (meaning money is owed to CMS' RDS Center), CMS will initiate proceedings to recover the funds.
- Payment Reduction due to interim adjustment on Application – Displays the sum by which the Payment Requested Amount was reduced due to a previous interim adjustment on the application. This type of payment reduction occurs from a negative payment request previously submitted for the application. This line does not display on the page if no reduction was made to the Payment Requested Amount.
- Payment Reduction due to interim adjustment on Application – Displays the sum by which the Payment Request Amount was reduced due to application of the total payable to an interim adjustment on another of the Plan Sponsor's applications. The amount of the reduction corresponds to a payment adjustment applied to another application event displayed on the Payment Event History page. This type of payment reduction is most often the result of a negative payment request previously submitted on another of the Plan Sponsor's applications. This line does not display on the page if no reduction was made to the Payment Requested Amount. The reduction amount and Application ID displays for each application to which the amount payable was applied.
- Payment Amount – Displays the approved payment amount determined by CMS' RDS Center. This is the subsidy amount that will be paid by EFT.
-
Select Close to close the pop-up and return to the Payment History page.
View Adjustment
To access the RDS Secure Website, and navigate to the Dashboard page review instructions to access the RDS Secure Website.
On the Dashboard page:
- Select the appropriate application view—In Progress, Completed, or Archived—to filter the list of applications displayed on the page.
-
Select the Application ID for which you want to view Payment History.

On the Application Overview page:
-
Select Payment History.
On the Payment History page:
-
To view the amount of an adjustment, select the View Adjustment hyperlink in the Actions column that corresponds with the appropriate event.
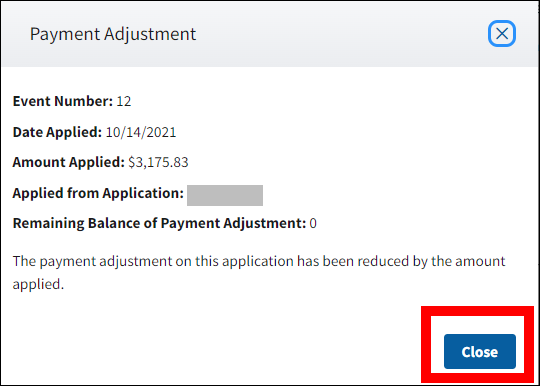
On the Payment Adjustment pop-up:
-
This pop-up displays the results of the payment adjustment or payment reduction events. Negative amounts display in red font in parentheses. Items displayed include:
- Event Number – Displays the sequence number of the payment adjustment event. This number is cumulative so the more events that occur, the higher the number. Since not all events display in Payment History, there may be gaps between event numbers.
- Date Applied – Date of the payment adjustment.
- Amount Applied – Amount paid out of a Plan Sponsor's positive balance on another application to satisfy the owed amount.
- Applied to/Applied from Application – Application ID identifying the source of the Amount Applied to or from. (Adjustments occurring across applications for a Plan Sponsor appear as separate events on the Payment Event History page and the Payment Determination page. Adjustments that occur within an application appear only on the Payment Determination page.)
-
Select Close to close the pop-up and return to the Payment History page.
View EFT Information
To access the RDS Secure Website, and navigate to the Dashboard page review instructions to access the RDS Secure Website.
On the Dashboard page:
- Select the appropriate application view—In Progress, Completed, or Archived—to filter the list of applications displayed on the page.
-
Select the Application ID for which you want to view Payment History.

On the Application Overview page:
-
Select Payment History.

On the Payment History page:
-
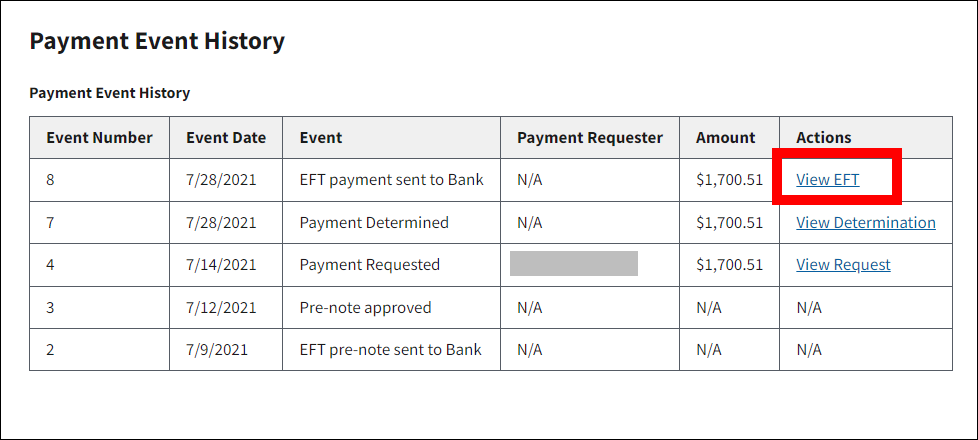
To view the details of an EFT payment, select the View EFT hyperlink in the Actions column that corresponds with the appropriate event.
On the EFT Payment Information pop-up:
-
This pop-up displays the Electronic Funds Transfer (EFT) event. Items displayed include:
- Event Number – Displays the sequence number of the EFT payment event. This number is cumulative so the more events that occur, the higher the number. Since not all events display in Payment History, there may be gaps between event numbers.
- EFT Date – Date of the Electronic Funds Transfer.
- Payment Amount – Amount of the Electronic Funds Transfer.
- Tracer Number – Control number assigned by the bank that identifies the Electronic Fund Transfer to the bank.
-
Select Close to close the pop-up and return to the Payment History page.